Group Project Guide
To help you complete your group project, the teaching assistant team has prepared a comprehensive guide that can serve as a reference throughout the development process. This guide is compiled based on experience and best practices for team collaboration commonly used in software development.
Group projects have their own complexity compared to individual assignments. A deep understanding of workflows that support effective collaboration is required. Without a structured workflow, various technical problems often arise such as code conflicts, work duplication, and even loss of work progress that has been made. This guide will outline standard workflows that you can apply, covering team organization setup, architecture design, branch management, to CI/CD implementation for automatic deployment.
The purpose of this guide is to ensure that each team member can contribute optimally, the collaboration process runs smoothly without technical obstacles, and produces maximum output. The teamwork skills you learn here will also be very useful for future projects, both in other courses and in the future.
GitHub Organization
GitHub Organization is a shared workspace that allows teams to manage various repositories in one place.
Steps to Create GitHub Organization
- Log in to your GitHub account
- Click your profile photo in the top right corner
- Select "organizations" from the dropdown menu
- Click the "New organization" button
- GitHub will display plan options, choose "Create a free organization"
- Click "Continue" to proceed
- Fill in the organization details form:
- Organization account name: Create a representative name for your team (example: pbp-group-a1)
- Contact email: Use the email of one team member
- This organization belongs to: Select "My personal account"
- In the "Add organization members" section, enter team members' GitHub usernames
- Click "Invite" for each member
- Click "Complete setup" when finished
Creating Repository in Organization
- On the organization page, click "New repository"
- Fill in Repository name according to your project
- Choose Public or Private as needed
- Click "Create repository"
Setting Member Permissions
- Click the "People" tab in the organization
- Find the name of the member you want to configure
- Click the dropdown next to their name
Choose the appropriate role:
- Owner: Full access, can manage organization
- Member: Access according to given permissions
By following the steps above, your team will have an organized GitHub workspace for working on group projects.
Figma
 Figma is one of the cloud-based design tools widely used to create user interface (UI) designs and user experience (UX) for websites and applications. Figma's main advantage over other design software is its collaborative nature. Many designers, developers, and stakeholders can work together on one file in real-time, similar to Google Docs. This makes it easier for teams to discuss, revise, and approve designs without having to send files back and forth.
In learning Figma, there are several things you can do:
- Preparation & create account / new file First, open Figma (can be through browser or its application). If you don't have an account yet, register first. If you already have one, just click New File to start and you can begin experimenting.
Tips You can also claim Figma Education for Figma Pro features
- Creating Frame (artboard)
Frame in Figma can be considered as a "container" or "canvas" where you place design elements, similar to artboards in Photoshop or slides in PowerPoint. Each application screen or website page is usually created in one frame, so elements like text, images, and buttons are neatly arranged within it. Frames also support responsive settings through constraints or auto layout, so designs can adjust size when the screen changes. Additionally, frames can be nested (frame within frame) making it easier to manage structure, for example large frames for main screens and small frames for cards or buttons.
Implementation Example
- Select Frame tool (Frame icon or press F/A).
- Determine size by selecting preset (example: iPhone, Desktop) or create custom size.
- Frame functions as screen/page, so each prototype screen must be inside a frame.
- If you already have a collection of objects, they can be made into one frame by selecting objects → Frame selection.
- Creating basic elements: shape, text, image
Basic elements in Figma include shapes (rectangle, ellipse, line, polygon), text, image, frame, and vector/pen tool. Shapes are used to create simple forms, text to add writing, image to insert pictures, frame as container or artboard, and vector/pen tool to draw custom shapes. All these elements become the main materials in building layouts, components, and interface designs in Figma.
Implementation Example
- Add rectangle (R), ellipse (O), line (L), and text (T) through toolbar or shortcuts.
- Set properties like color, border, radius, and elevation in the right panel.
- For images, use Place image menu or simply drag-drop to canvas.
Always give clear and logical layer names (example: btn-primary, hero-title) for easy management in large projects.
- Organizing structure: group, frame nesting, and constraints
Organizing structure in Figma means arranging design elements to be neater, more organized, and easier to manage. Frame nesting, which is placing frames within other frames to create clear design hierarchy (for example large frame for main screen, small frame for cards or buttons) while constraints, which are position rules for elements relative to their parent frame so elements remain proportional or responsive when screen size changes. The combination of the three helps maintain layout consistency while facilitating the editing process and handoff to developers.
Implementation Example
- Group elements using Group or Frame for neater and easier management.
- Learn Constraints (for example left, right, center, stretch) so elements react correctly when frame size changes.
- Auto Layout
Auto Layout in Figma is a feature that allows elements within a frame to be automatically arranged following direction rules (horizontal or vertical), spacing between elements, and padding within their container. With Auto Layout, designs become more flexible because element size and position can adjust dynamically when content increases, decreases, or changes. This feature is very useful for creating consistent and responsive components, such as buttons, cards, lists, or navbar, without having to rearrange element positions one by one.
Implementation Example
- Select several objects, then activate Auto Layout (in right panel or press Shift + A). Auto Layout makes elements automatically arranged in horizontal, vertical, or grid direction.
- Spacing between elements will automatically adjust when content increases or decreases.
TIPS Use the Suggest Auto Layout feature to convert designs to auto layout automatically.
- Components & Variants
Components & Variants in Figma are features for creating consistent and reusable design elements. Component functions as the "master" of an element, for example button or card, so every time it's used (instance), changes to the master will automatically affect all its instances. Meanwhile, Variants allow one component to have multiple versions or states, such as default, hover, and disabled buttons, which can be combined in one set.
Implementation Example
- Convert elements (for example buttons) into Components with Create component menu.
- Group variations into Variants (example: default, hover, disabled) to facilitate instance swapping.
Component + Variants help maintain design consistency and speed up mass changes. Use interactive components to directly handle states like hover or click in prototypes.
- Styles & Simple Design System
By saving these elements as Styles, designers don't need to reset every time they want to use the same colors or text, just apply existing styles. This approach also facilitates updates, because changes to styles will be automatically applied to all connected elements.
- Prototyping: connecting frames & creating interactions
Prototyping in Figma is the process of connecting frames or elements to simulate flow and interactions in an application or website. With this feature, designers can determine how users move from one screen to another, add interactions like click, hover, or animation transitions, to create an experience as if the application is already functioning. Prototyping helps teams and stakeholders understand flow, test user experience, and provide feedback before design enters the development stage.
Implementation Example
- Enter Prototype tab in right panel.
- Drag node from element (for example button) to destination frame to create navigation.
- Select trigger: On Click, On Hover, etc.
- Determine action: Navigate, Open overlay, Change to.
- Set animation: Instant, Smart Animate, etc.
- Use Present button to preview flow as if application is actually running.
- Preview on device / share prototype
Figma provides features to try and share design results in interactive simulation form. With preview, designers can directly see how prototypes appear and function on real devices through Figma Mirror application or Present mode. Meanwhile, share features allow designs to be shared via links, with permission settings (view or edit), so teams and stakeholders can provide feedback directly through comments within the file. You can share prototype links (set permission: view / edit) and note comments directly in files using Comment tool.
- Developer handoff (Inspect / Dev Mode)
Developer handoff (Inspect / Dev Mode) in Figma is the stage when finalized designs are prepared for use by developers. Through Inspect features or Dev Mode, developers can see technical design details such as size, position, spacing, complete colors with CSS code, and directly export image assets or icons needed. Designers can also mark elements as Ready for Dev so development teams know which parts are ready to be implemented.
Reference: Figma Tutorial
Pull Request
Pull Request (PR) is a mechanism to propose changes from feature branch to main branch. Through PR, other team members can see, review, and provide feedback on code that will be merged before entering the main branch.
Creating Pull Request
- After pushing feature branch to remote, open repository on GitHub
- GitHub usually displays a yellow banner with "Compare & pull request" button - click that button

-
If banner doesn't appear, click "Pull requests" tab then click "New pull request"
-
Make sure branch settings are correct:
- Base:
main(destination branch) - Compare:
feat/feature-name(source branch)
- Base:
-
Fill in PR information:
- Title: Provide clear and descriptive title
- Description: Explain changes made or features added
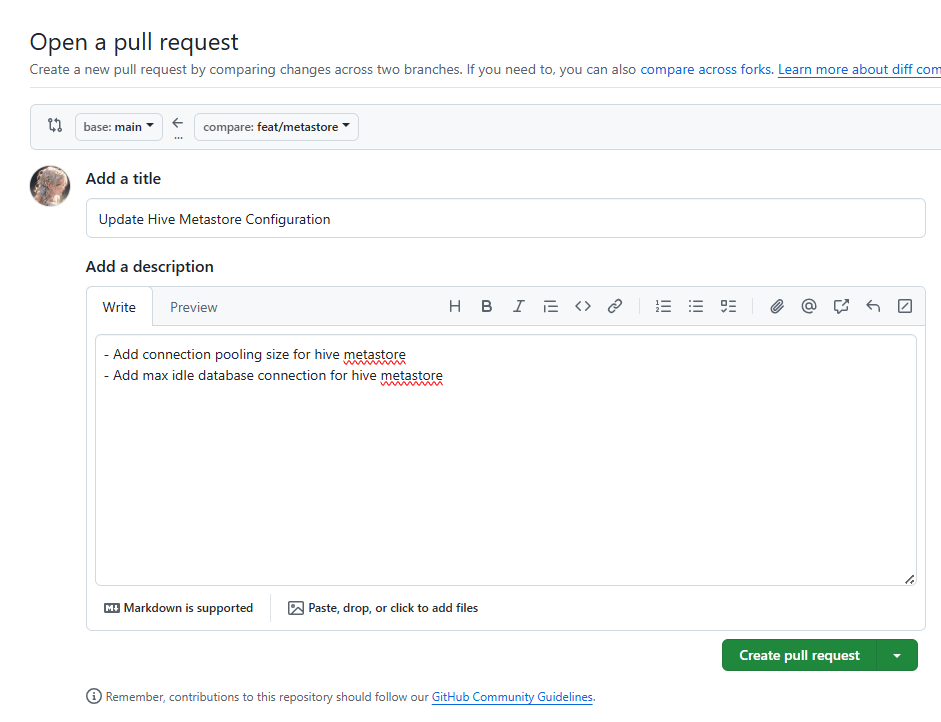
- Click "Create pull request"
Review Process
As Reviewer
- Open PR that needs to be reviewed
- Click "Files changed" tab to see all code changes
- Provide comments on specific code lines if needed
- After review is complete, click "Review changes" in top right corner
- Choose "Approve" if code is ok, or "Request changes" if improvements needed
As PR Author
If there are requested changes:
- Make improvements locally
- Commit and push changes to the same branch:
git add .
git commit -m "Fix review comments"
git push origin feat/feature-name
- PR will automatically update with new commits
Merge Pull Request
After PR is approved:
- Click "Merge pull request" button at bottom of PR
- Confirm by clicking "Confirm merge"

Handling Conflicts
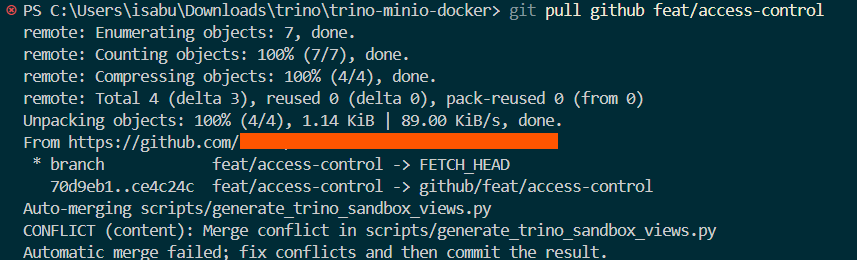
If PR has conflicts, GitHub will display error message. To resolve:
- Locally, pull updates from main to feature branch:
git checkout feat/feature-name
git pull origin main
- Resolve conflicts manually in code editor
- Commit and push:
git add .
git commit -m "Resolve merge conflicts"
git push origin feat/feature-name
By using Pull Requests, your team can ensure all changes are reviewed before entering the main branch.
Merge Conflict
Merge conflict occurs when Git cannot automatically combine changes from two different branches because there are changes to the same code lines. This often happens in team work when two or more developers modify the same file simultaneously.
When Do Merge Conflicts Occur?
Conflicts usually appear when:
- Two developers change the same lines in the same file
- One developer deletes a file while another modifies it
- There are changes to project structure that collide
Identifying Merge Conflict
When conflict occurs, Git will give error message like:
Auto-merging views.py
CONFLICT (content): Merge conflict in views.py
Automatic merge failed; fix conflicts and then commit the result.
To see which files have conflicts:
git status
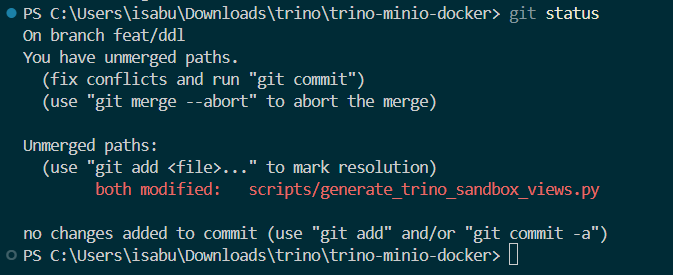
Output will display files with "both modified" status.
Resolving Merge Conflict with VS Code
-
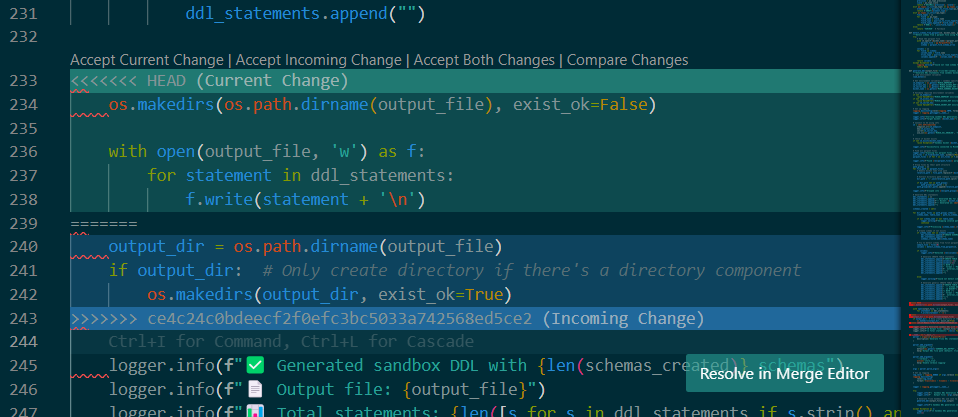
Open conflicted file in VS Code
-
VS Code will automatically detect and highlight conflict areas with different colors
-
Click "Resolve in Merge Editor"
-
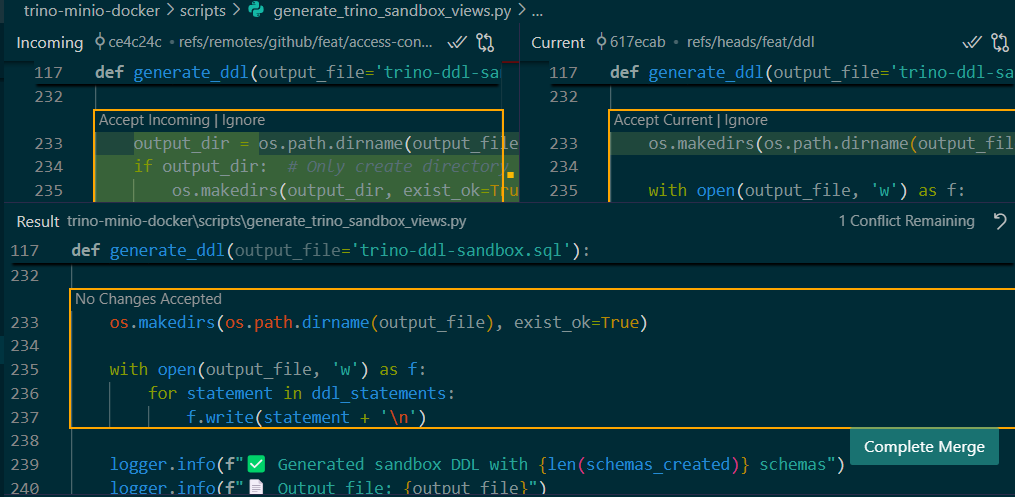
In Merge Editor, you'll see three panels:
- Incoming: Changes from branch being merged
- Current: Changes from current branch
- Result: Final result after resolving conflict
-
For each conflict, choose one option:
- Accept Incoming: Use version from branch being merged
- Accept Current: Use version from current branch
- Accept Combination: Combine both versions (if possible)
-
After all conflicts are resolved, click "Complete Merge"
-
Save resolved files
-
Commit changes:
git add .
git commit -m "Resolve merge conflict"
Git Feature Branch Workflow
Git Feature Branch Workflow is a development methodology where each feature or task is worked on in a separate branch from the main branch. After completion, that branch is merged back to main through pull request. This workflow allows multiple developers to work in parallel without interfering with each other.
In this workflow, there are several types of branches:
- Main/Master Branch: Main branch that is always in stable condition and ready to deploy
- Feature Branch: Temporary branch for developing one specific feature or module
- Hotfix Branch: Branch for urgent bug fixes in production (optional)
Implementing Git Feature Branch Workflow
Clone Repository
- Clone organization repository to local:
git clone https://github.com/organization-name/repository-name.git
cd repository-name
- Make sure you're on main branch and update to latest version:
git checkout main
git pull origin main
Creating Feature Branch
- Create new branch for feature to be worked on:
git checkout -b feat/feature-name
Examples of good branch names:
feat/user-authenticationfeat/product-catalog
Development in Feature Branch
- Do development as usual in that branch
- Commit changes regularly with clear messages:
git add .
git commit -m "Add user registration form"
git commit -m "Implement password validation"
- Push feature branch to remote repository:
git push origin feat/feature-name
Synchronization with Main Branch
During development, main branch might already have updates from other team members. To avoid major conflicts, perform synchronization regularly:
- Make sure you're on feature branch:
git branch
- If not on feature branch yet, checkout to that feature branch:
git checkout feat/feature-name
- Update main branch and merge to feature branch:
git pull origin main
- If there are conflicts, resolve them first, then commit merge results
Completing Feature
- After feature is complete and tested, make sure branch is up-to-date with main
- Push final version to remote:
git push origin feat/feature-name
- Create Pull Request on GitHub to merge to main branch
- After PR is approved and merged, feature branch is kept for history tracking
By following Git Feature Branch Workflow, your team can work in parallel with minimal conflict risk and more organized code.
Branch Protection Rules
Branch Protection Rules is a GitHub feature that allows you to protect important branches (especially main/master) from uncontrolled changes. With protection rules, you can ensure that every change to main branch must go through pull request and review first.
Why Need Branch Protection?
In team work, main branch like main or master must always be in stable condition and deployable anytime. Without protection, team members can directly push code to main branch that might still be buggy or not reviewed, potentially breaking the project.
Setting Branch Protection Rules
- Go to repository in your GitHub Organization
- Click "Settings" tab in repository
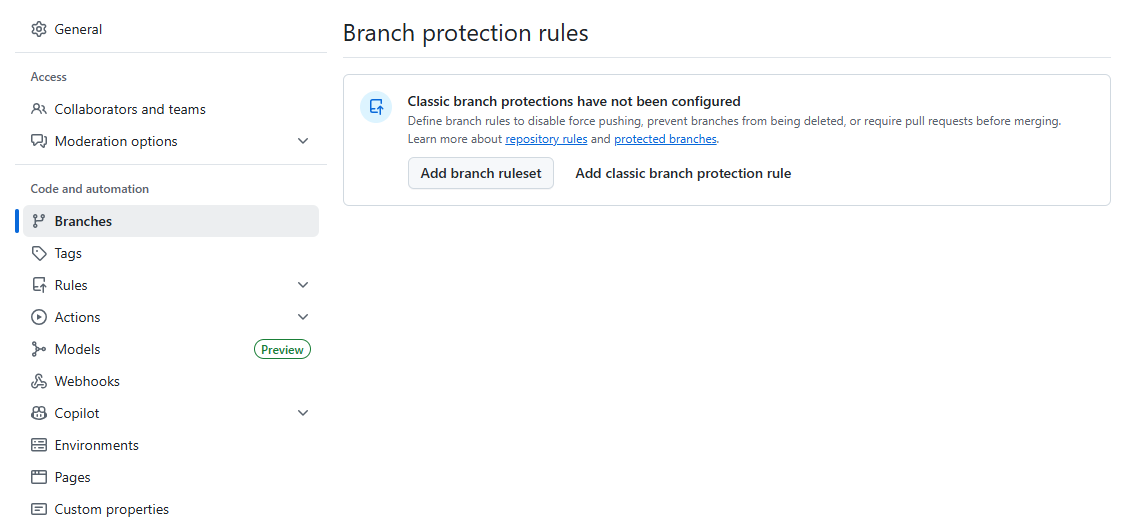
- In left sidebar, select "Branches"
- Click "Add classic branch protection rule"
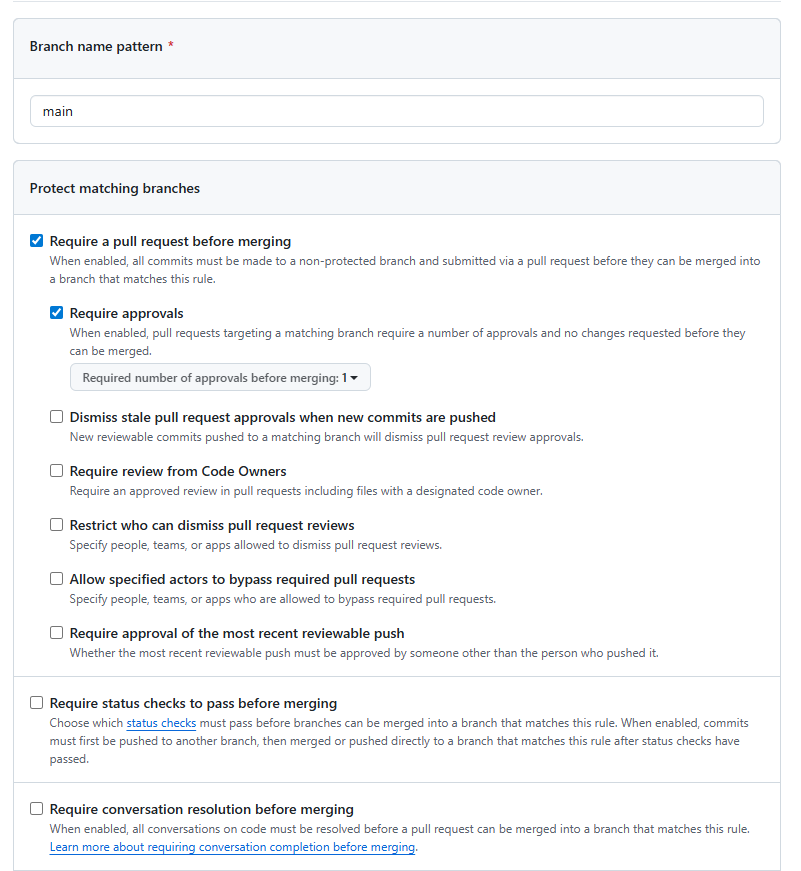
- In "Branch name pattern" field, enter name of main branch you want to protect (usually
mainormaster) - Check the following options:
- "Require a pull request before merging": Must create PR, can't directly push to main/master
- "Require approvals": PR must be approved before it can be merged
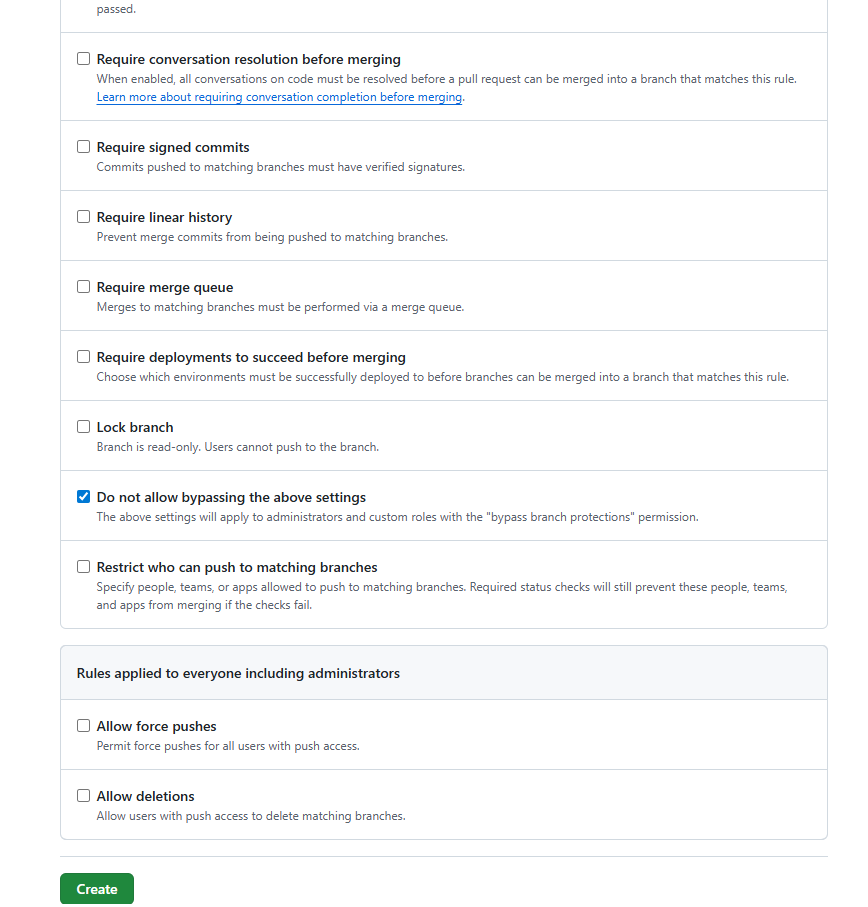
- "Do not allow bypassing the above settings": Ensures even admin/owner cannot bypass created rules
- Click "Create" to save rules
GitHub Issue Tracker
Issue tracker (or bug / issue tracking system) is a centralized tool used by teams to record, organize, track, and resolve work in the form of bugs, tasks, feature requests, or operational issues throughout project lifecycle.
The goals are:
- Ensure every issue is well documented (title, description, reproduction steps, evidence)
- Backlog management
- Monitor progress and collaborate (comments, attachments, links to commits/PR)
Step-by-Step usage:
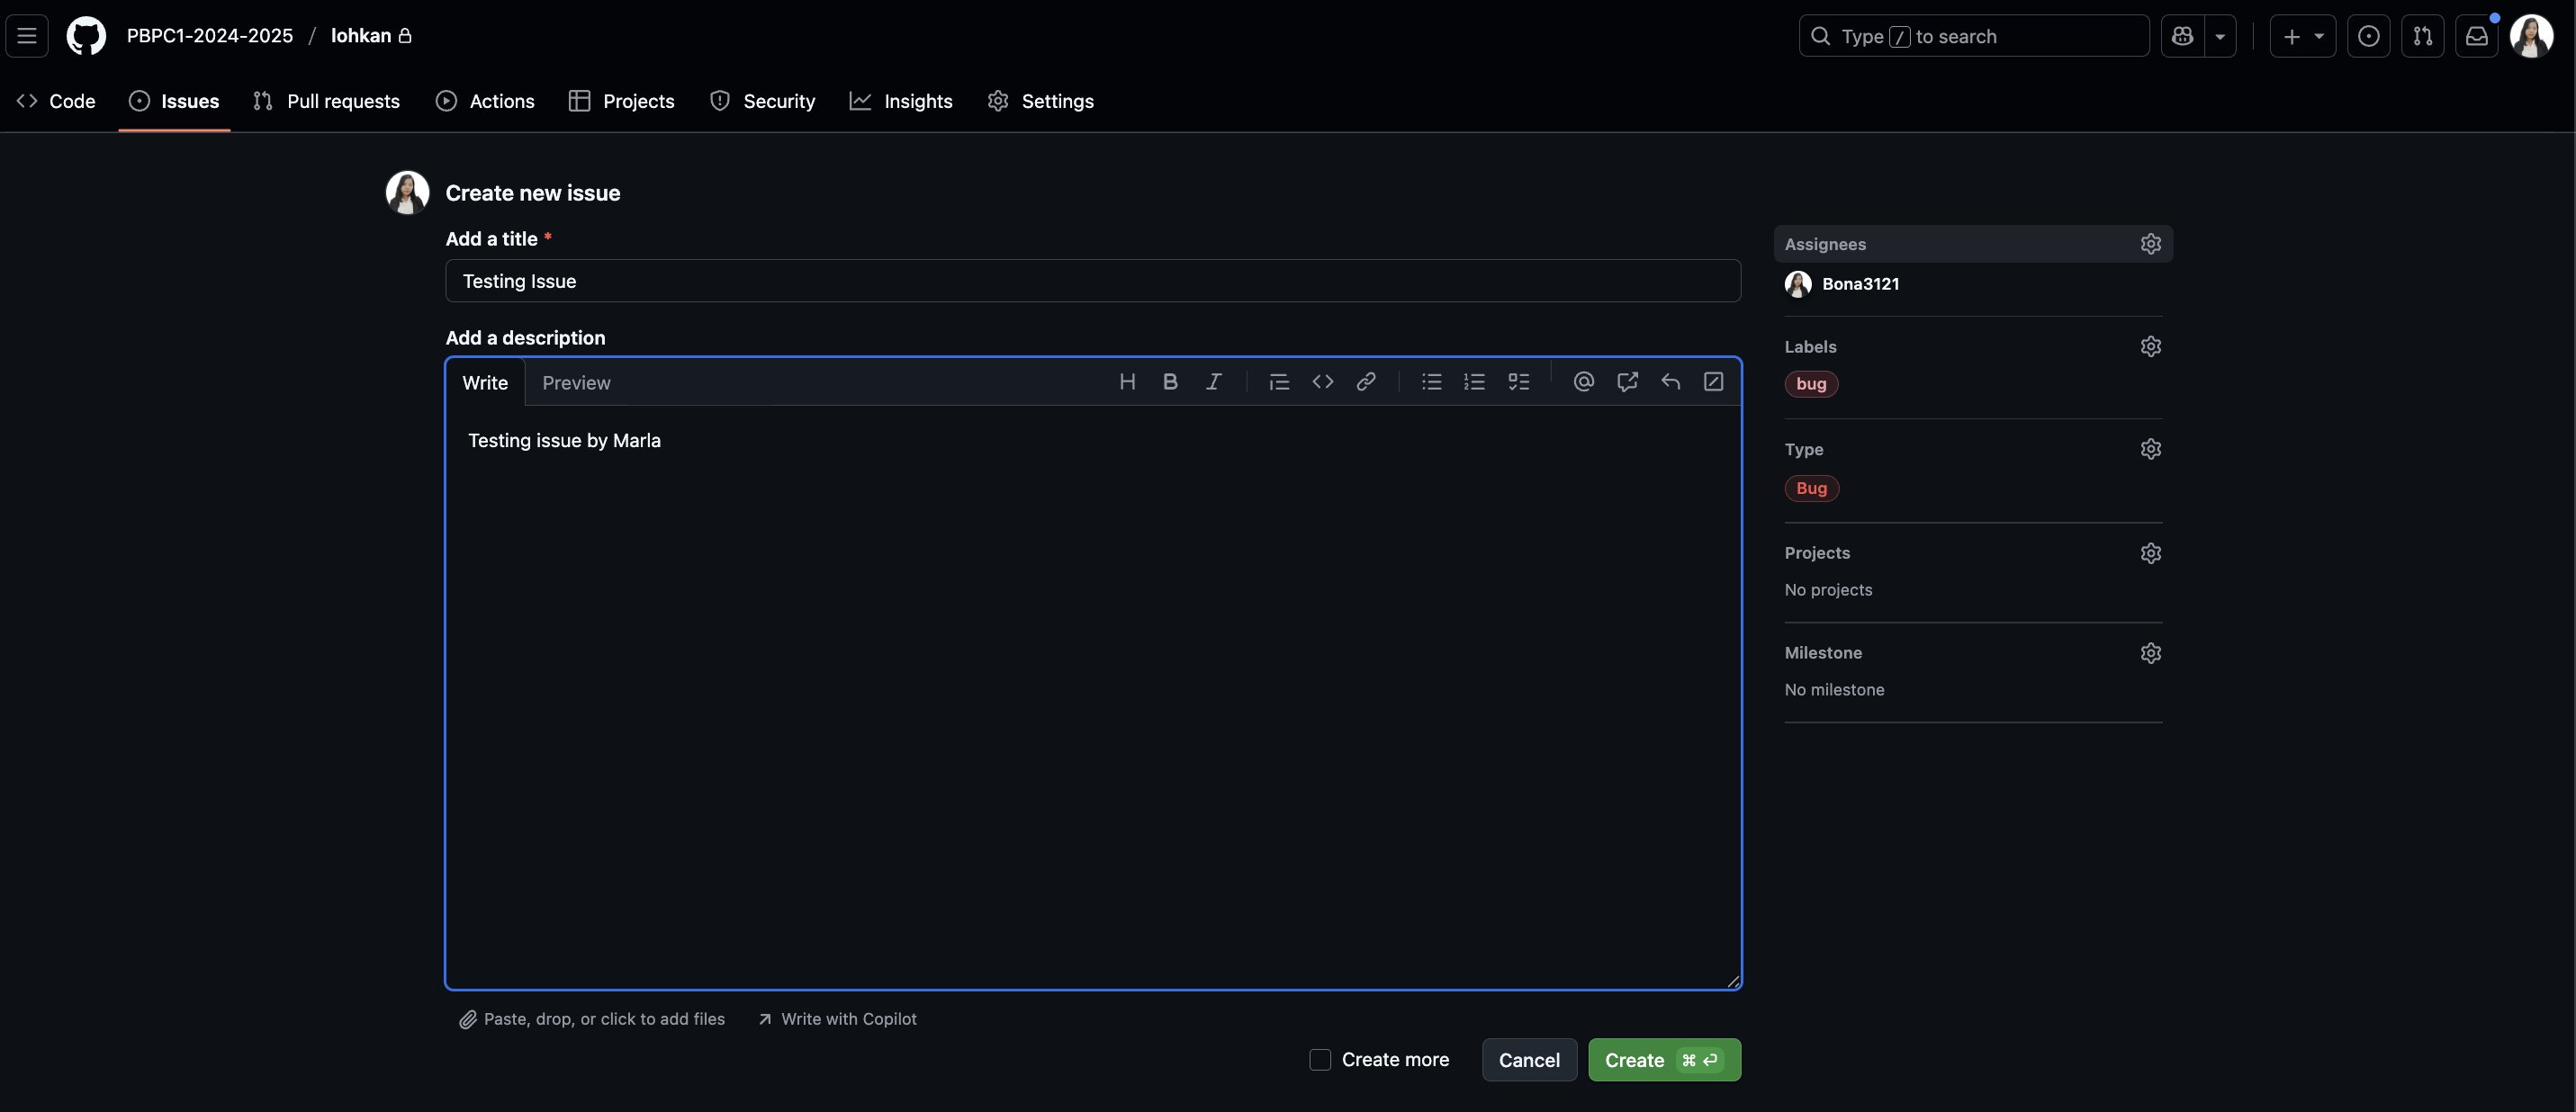
- Open repo/project on issue tracker platform (e.g. Jira, GitHub Issues, GitLab Issues) and select New Issue.
- Write short and clear title that directly describes the problem.
- Write complete description: summary, reproduction steps, expected results, actual results. Attach supporting evidence (screenshots, logs, videos, sample files).
- Mark issue type (bug/feature/task/documentation) and give consistent labels.
- Assign issue to appropriate owner/responsible person. Add assignees, watchers or teams that need notifications.
- Connect issue with branch/commit/PR when starting work.
- Then click create
Usage Example
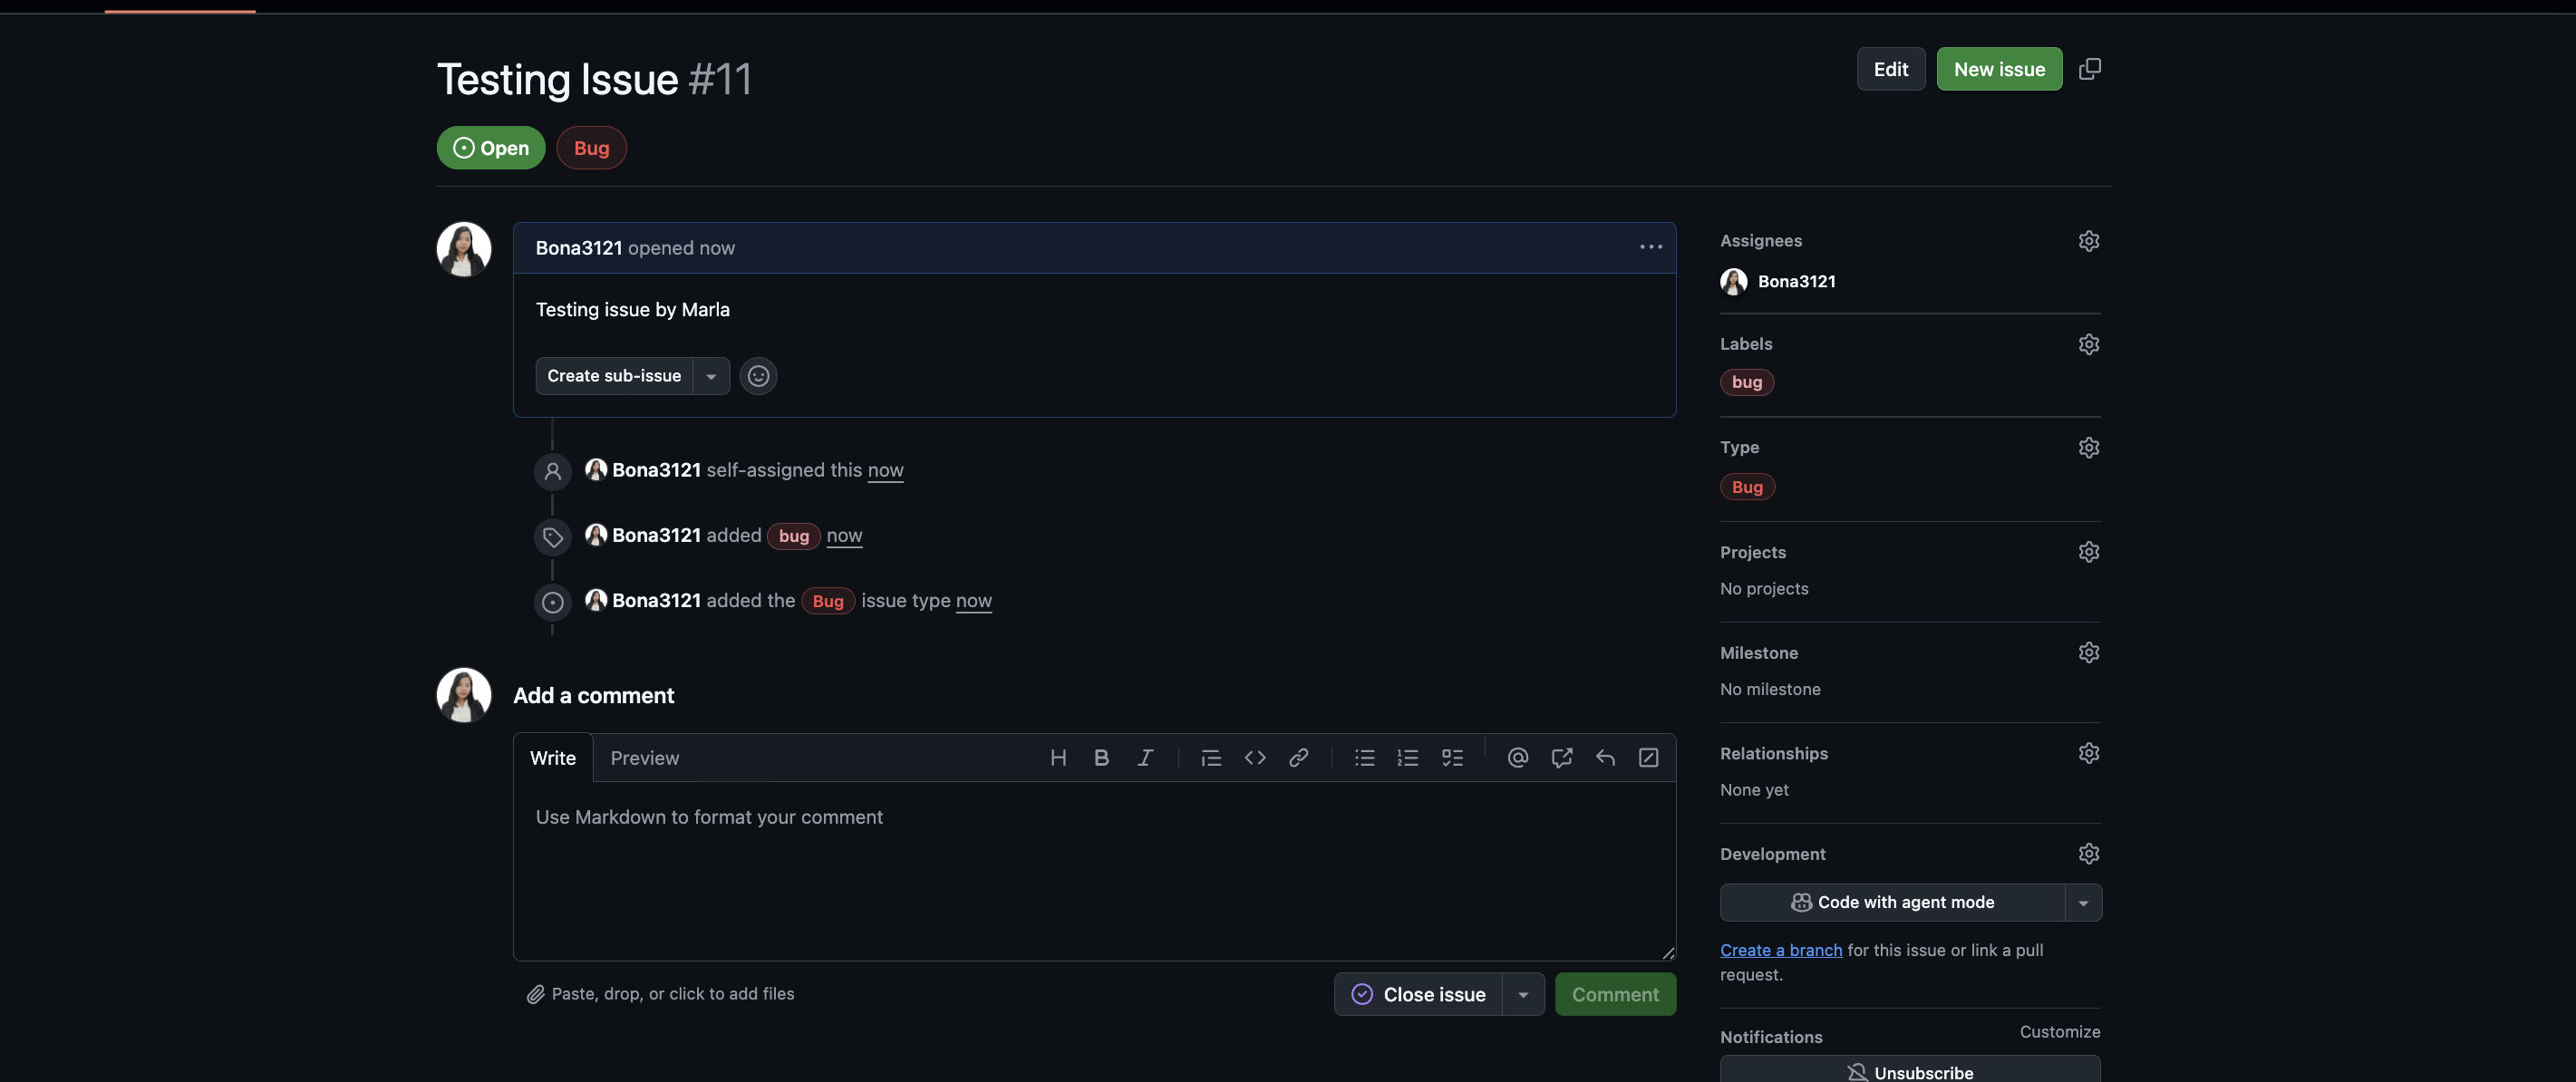
Reference: Github Docs Issue Tracker
CI/CD Integration for PWS Push on GitHub
Previously, if you wanted to push to GitHub and deploy to PWS, you needed to push twice, namely to GitHub (git push origin main) and to PWS (git push pws main). This is certainly inefficient and error-prone, especially in team work where each member has to do manual deployment.
What is CI/CD?
Continuous Integration (CI) is a practice where developers routinely integrate their code into shared repository, and automated system will run tests to ensure code doesn't break the application. Continuous Deployment (CD) is a practice where every change that has gone through CI will automatically be deployed to production server without manual intervention.
Why Need CI/CD for Automatic Deployment?
In team work, every time there are changes in main branch, entire team has to do manual deployment to PWS. This creates several problems:
- Inconsistency: Not all team members do deployment, so PWS version can lag behind
- Effort duplication: Each team member has to push to PWS separately from their local
- Human error: Forgetting to deploy or deploying wrong branch
- Difficult coordination: Hard to determine who is responsible for deployment
With CI/CD, every time there are changes in main branch (through merge pull request), system will automatically deploy to PWS. This ensures PWS version is always up-to-date with main branch and reduces team workload.
Setup GitHub Actions for PWS Deployment
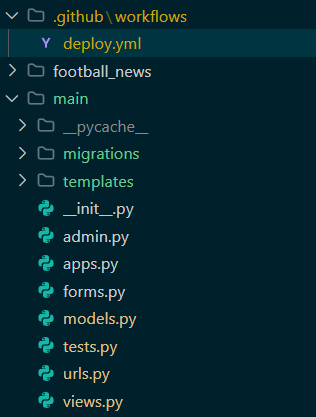
- In your local repository, create
.github/workflows/folder if it doesn't exist - Create new file named
deploy.ymlinside that folder - Fill file with following configuration (adjust with your repository's main branch name):
name: Push to PWS

on:
  push:
    branches: [ main ]

jobs:
  build-and-push:
    runs-on: ubuntu-latest
    steps:
    - name: Checkout code
      uses: actions/checkout@v2
      with:
        fetch-depth: 0

    - name: Set up Git
      run: |
        git config --global user.name 'github-actions[bot]'
        git config --global user.email 'github-actions[bot]@users.noreply.github.com'

    - name: Push to PWS
      env:
        PWS_URL: ${{ secrets.PWS_URL }}
      run: |
          # Get current branch name
          current_branch=$(git branch --show-current)
          echo "Current branch: $current_branch"

          # Push current branch to PWS master branch
          push_output=$(git push $PWS_URL $current_branch:master 2>&1)
          if [[ $? -ne 0 ]]; then
            echo "Push failed with output: $push_output"
            echo "Error: Unable to push changes. Please check the error message above and resolve any conflicts manually."
            exit 1
          fi
          echo "Push successful with output: $push_output"
Note: Adjust branch name in branches: [ main ] with your repository's main branch name (can be main or master).
IMPORTANT: Don't push this file to GitHub yet. Setup secrets first in next step.
- In your repository on GitHub, open Settings > Secrets and variables > Actions

-
Click "New repository secret" to add new "secret" variable in your repository
-
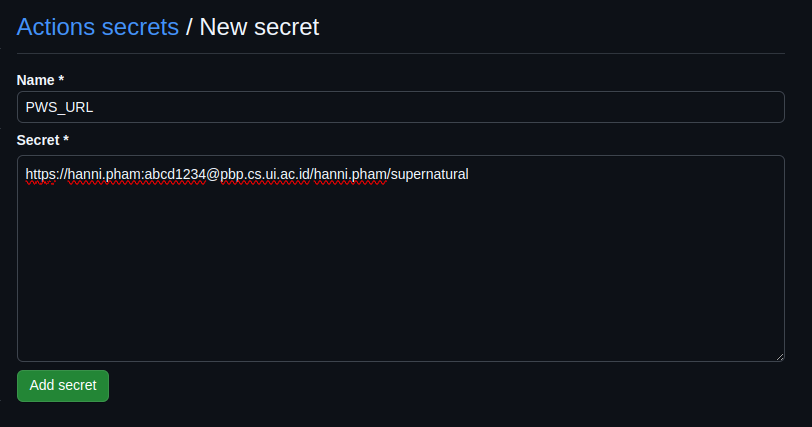
Fill Name with
PWS_URL. Then, fill Secret with data using following format:https://<sso username>:<PWS project password>@pbp.cs.ui.ac.id/<sso username>/<your project name>
For example, if your SSO username is hanni.pham, your project password is abcd1234, and your project name is supernatural, then you need to fill Secret like this:
https://hanni.pham:abcd1234@pbp.cs.ui.ac.id/hanni.pham/supernatural
- Push workflow file to GitHub:
git add .
git commit -m "Add CI/CD workflow for PWS deployment"
git push origin main
- Every time there's push to main branch, GitHub Actions will automatically run deployment to PWS. Check "Actions" tab in repository to see deployment status
Database for Group Project
For database purposes used in group projects, you can use tugas_kelompok schema from one of your group member's database that was previously provided by ITF team.
Make sure you have used the schema determined above for this group project work.
Recommended Project Management Tools
These project management tools are NOT MANDATORY, but only facilitate you in future project tasks. Additionally, you are also allowed to use other tools.
1. Microsoft Planner
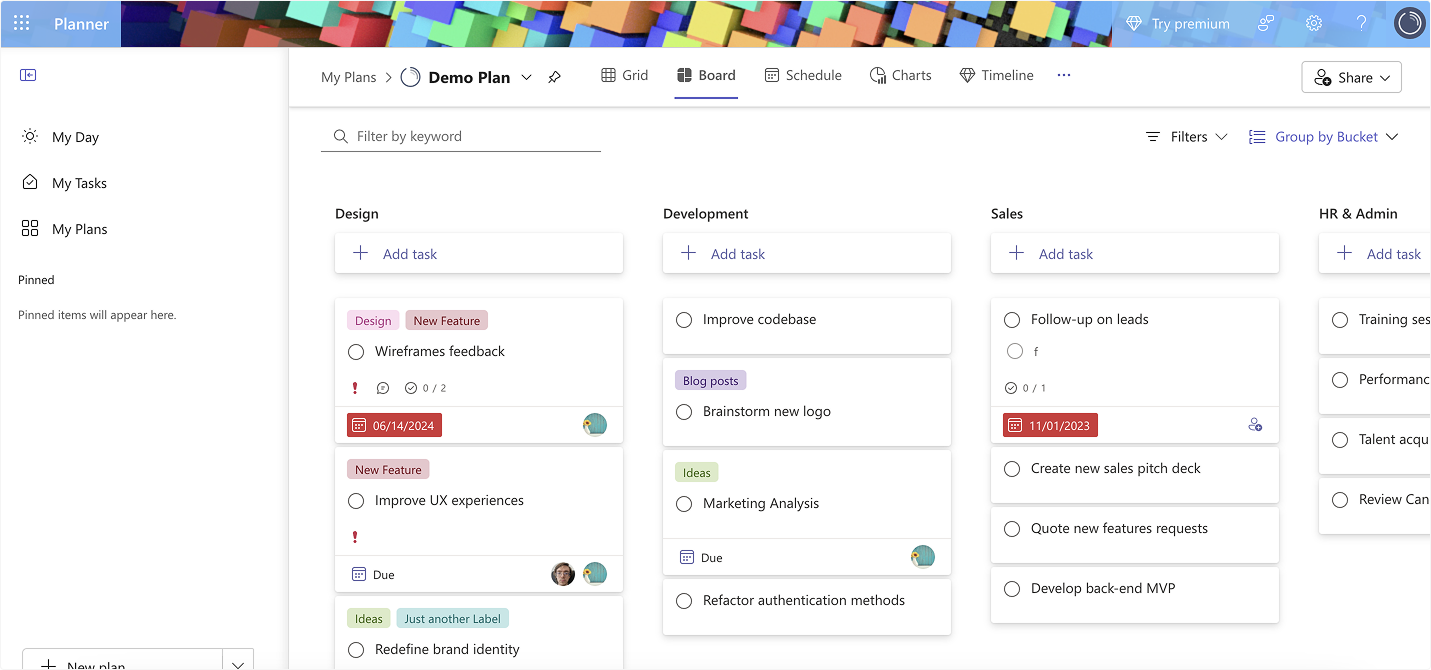
Introduction
Microsoft Planner is a task management application integrated with Microsoft 365. Suitable for organizing to-do lists, dividing tasks, and monitoring progress through board (Kanban), calendar, and chart views.
Purpose
Help teams plan and manage simple projects with full integration in Microsoft Teams, Outlook, and To Do.
YouTube Tutorial
Advantages
- Closely integrated with Microsoft 365 ecosystem.
- Simple display (board, calendar, chart).
- Suitable for small-medium scale team collaboration.
Disadvantages
- Complete features (like roadmap & AI Copilot) are paid.
- Less flexible for complex Agile/Scrum methods.
2. Linear.app
Introduction
Linear is a modern tool for software development teams. Focuses on speed, minimalist design, and agile workflow like sprint, issue tracking, and roadmap.
Purpose
Help developer teams manage technical tasks, sprints, and bug tracking quickly and focused.
YouTube Tutorial
Advantages
- Fast, responsive, and minimalist UI.
- GitHub, Slack integration and automation.
- Suitable for modern developer workflow.
Disadvantages
- Limited reporting and dashboard features.
- Less suitable for non-technical teams.
3. Notion
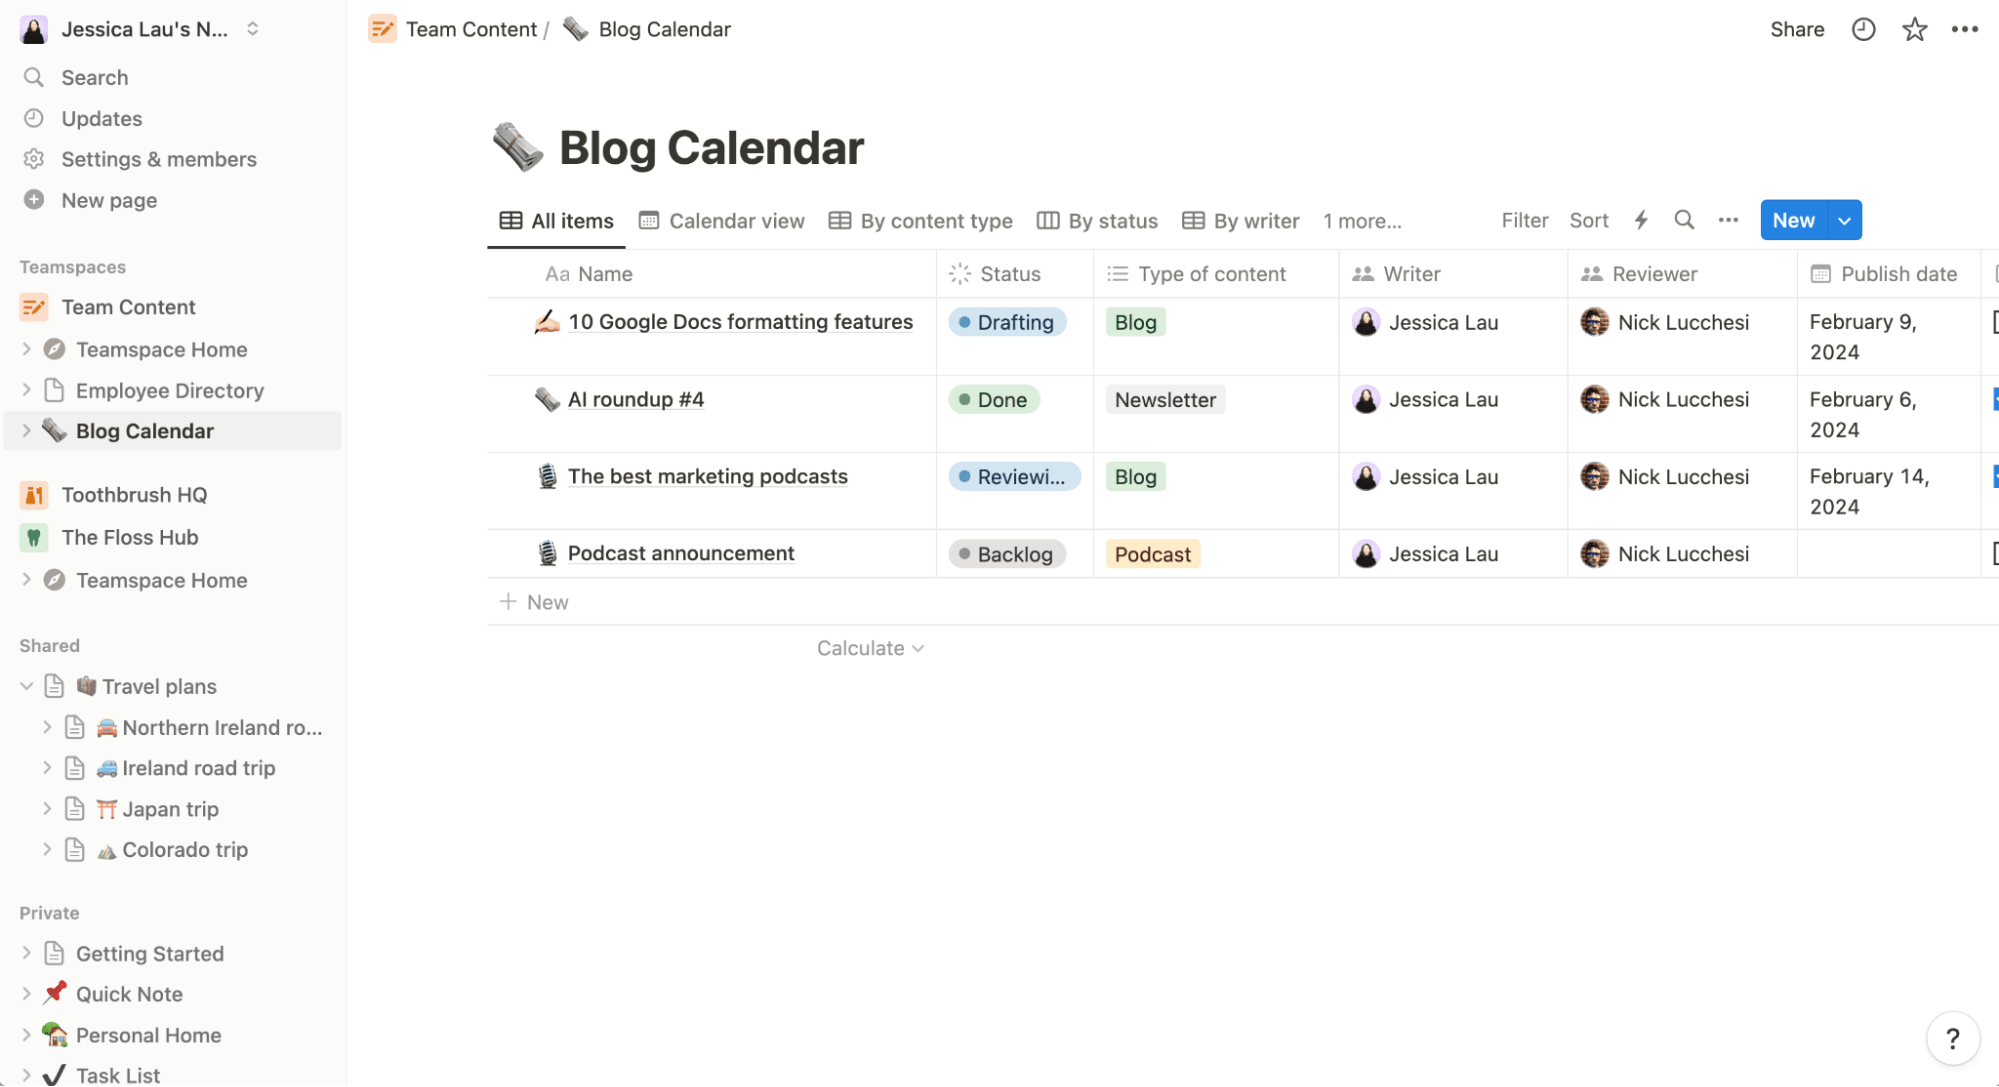
Introduction
Notion is an all-in-one workspace that combines notes, databases, wikis, and project management in one application.
Purpose
Help teams document ideas, create to-do lists, to managing project boards flexibly in one platform.
YouTube Tutorial
Advantages
- Very flexible (notes, tables, kanban, database).
- Can be used for personal or team.
- Many free ready-to-use templates.
Disadvantages
- Can feel complicated for beginners.
- Not as fast as Linear for technical issue-tracking.
4. ClickUp
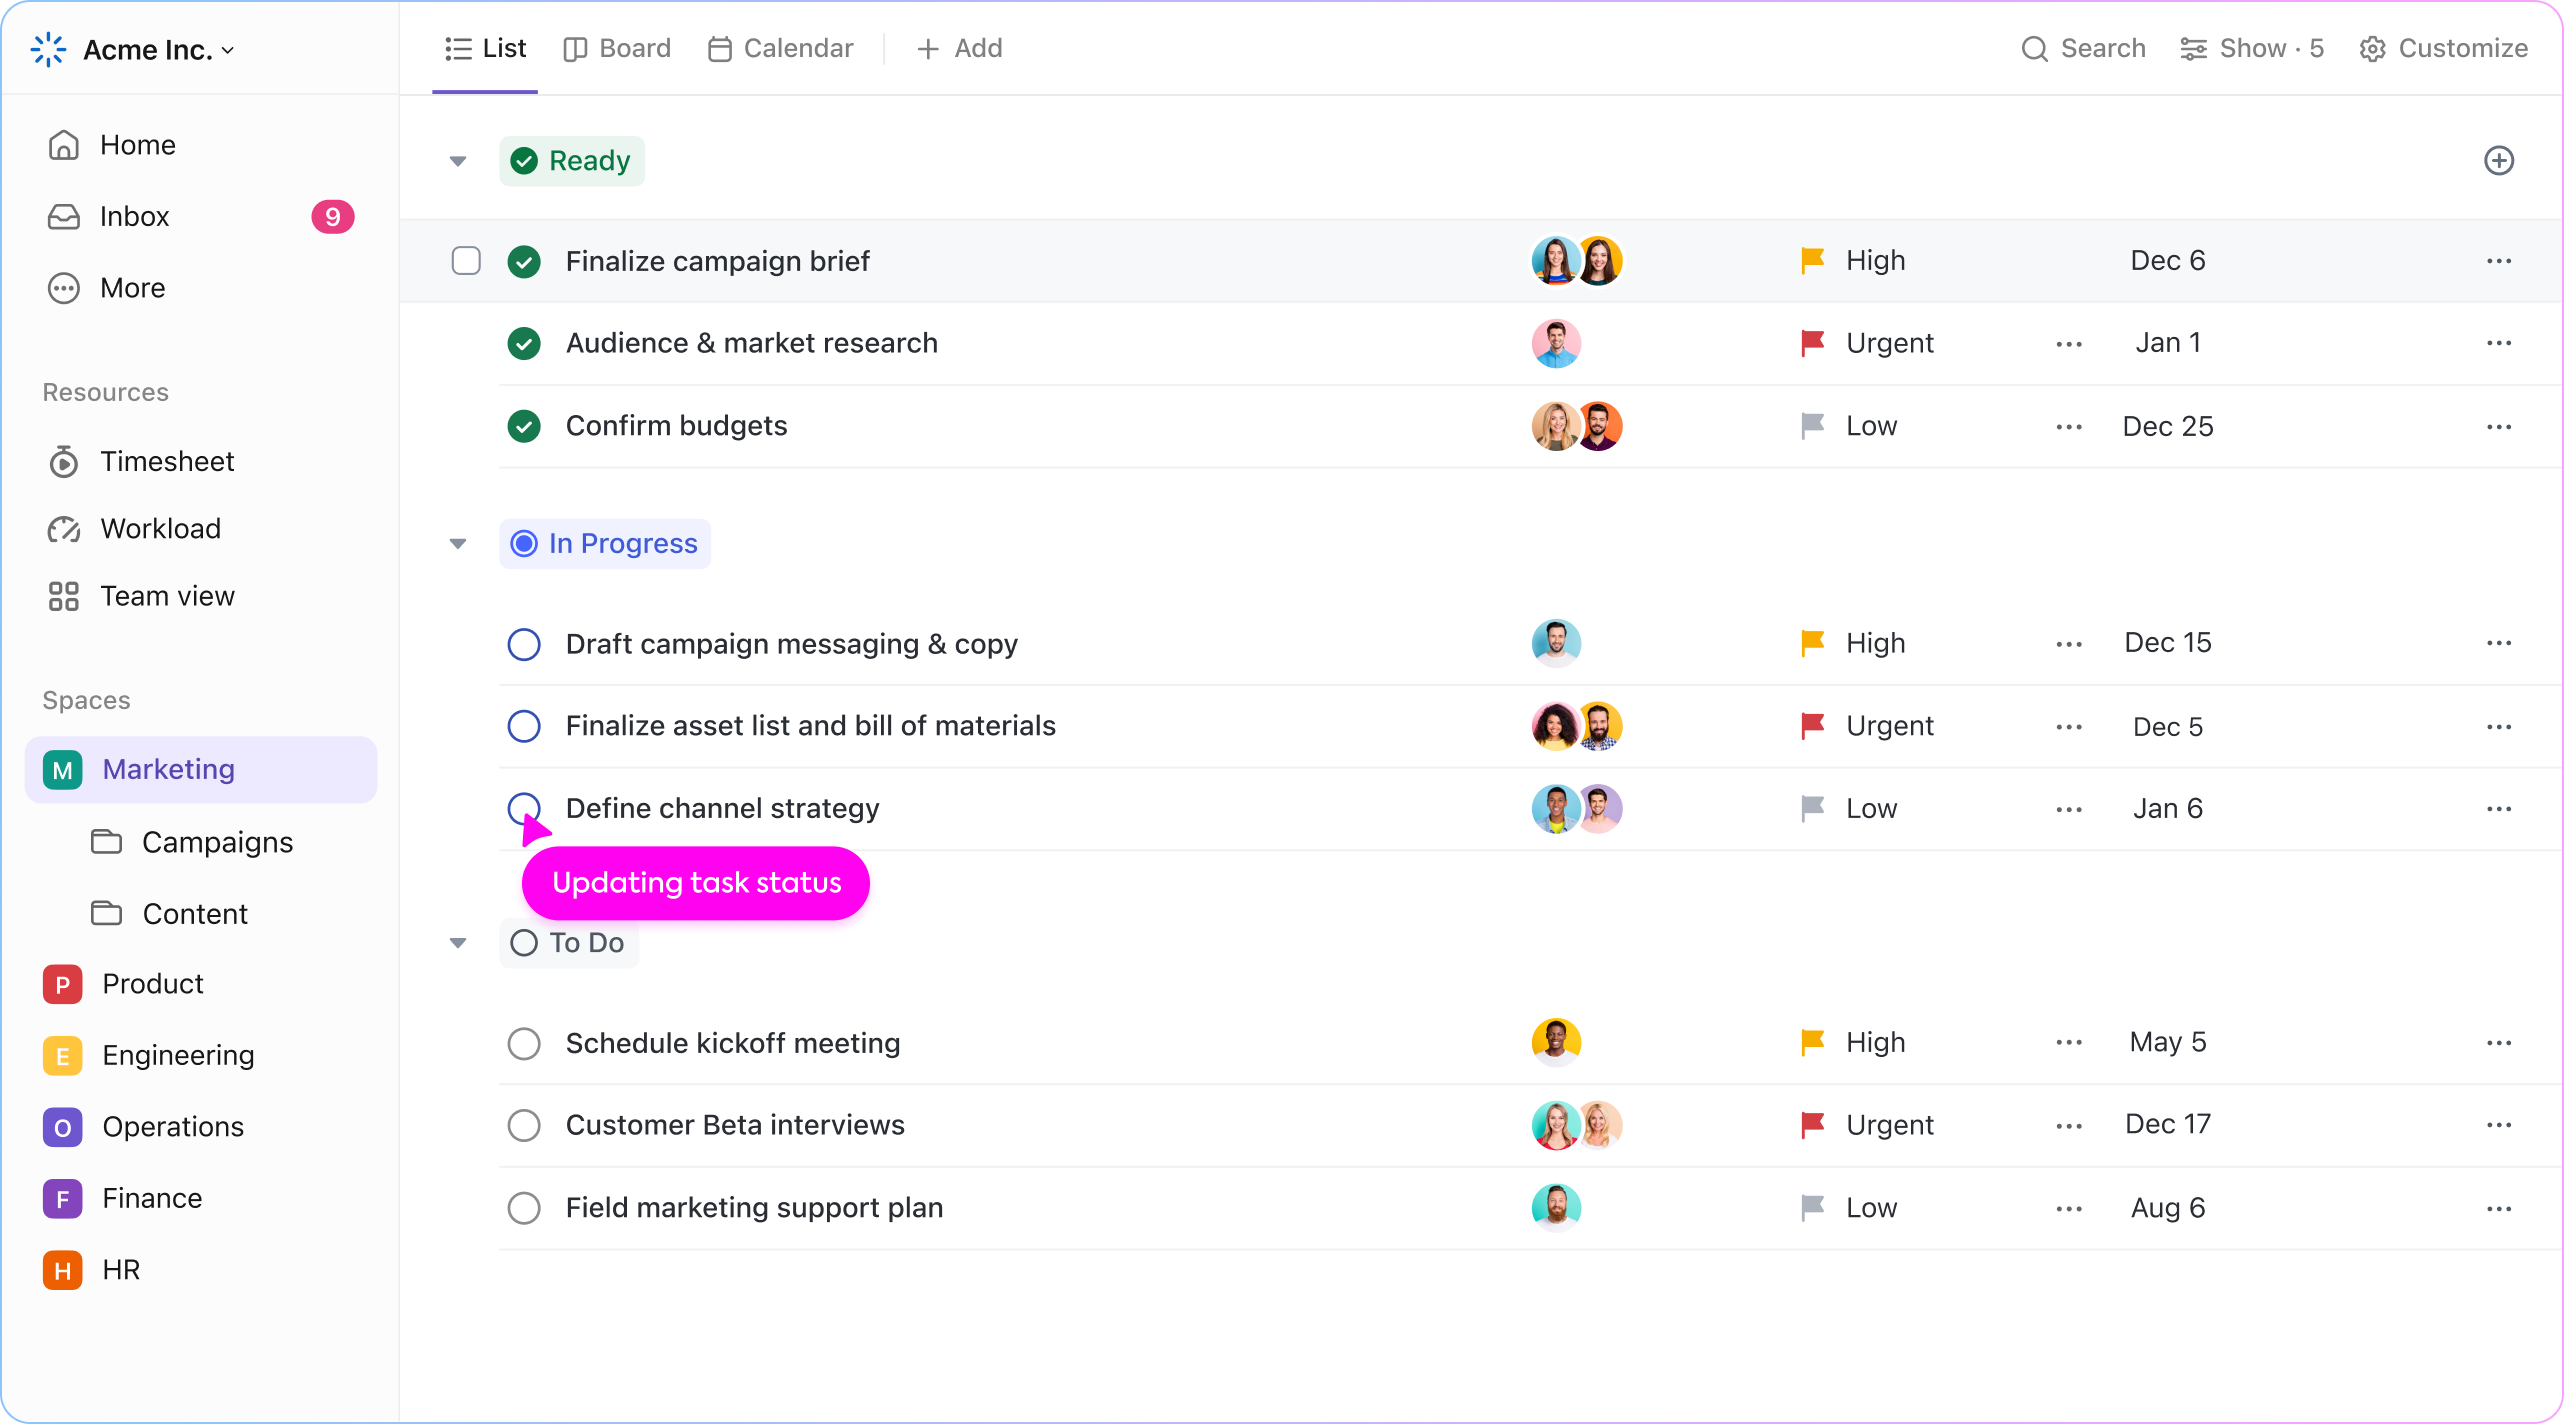
Introduction
ClickUp is a versatile work management platform, can be used for task management, goal setting, docs, chat, and timeline.
Purpose
Help teams manage projects from simple to complex, with many built-in features without needing many additional integrations.
YouTube Tutorial
Advantages
- Very complete features (task, docs, chat, goal, whiteboard).
- Suitable for cross-division teams (not just developers).
- Display can be customized according to team needs.
Disadvantages
- Can feel "overwhelming" due to too many features.
- Performance can slow down if workspace is too large.
Conclusion
- Microsoft Planner → suitable for those already using Microsoft 365.
- Linear.app → ideal for developer teams needing speed & agile workflow.
- Notion → flexible for documentation + light project management.
- ClickUp → complete for cross-division teams with complex needs.
Contributors
- Marla Marlena
- Isa Citra Buana
- Regina Meilani Aruan