Tutorial 9: Flutter Deployment with GitHub Actions and Microsoft App Center
Platform-Based Programming (CSGE602022) — held by Faculty of Computer Science Universitas Indonesia, Odd Semester 2024/2025
Learning Objectives
After completing this tutorial, students are expected to be able to:
- Understand the concepts of continuous integration and continuous deployment
- Understand the concept and usage of GitHub Actions
- Understand the concept and usage of Microsoft App Center
- Implement continuous integration and continuous deployment in Flutter applications using GitHub Actions and Microsoft App Center
- Implement GitHub Actions to automatically build and release Flutter applications
Introduction to CI/CD
CI/CD, short for Continuous Integration and Continuous Deployment, is an important concept in software development related to GitHub Actions. This concept provides ways to automate and improve quality and speed in software development.
Continuous Integration (CI) focuses on continuously merging (integrating) code changes into a shared repository by team members. When a developer makes changes to code and submits it to the repository (like we do with GitHub), the CI system will automatically run a series of tests and verifications to ensure that the changes don't break or interfere with existing functionality. In other words, CI helps identify problems earlier in the development cycle.
Continuous Deployment (CD), in turn, involves automation to deploy code changes that have passed the CI process to production or testing environments. When code changes are declared safe after going through a series of CI tests, CD allows deploying these changes automatically to servers or other environments without manual intervention. This helps speed up the development process and improves responsiveness to changing business needs.
When we use GitHub Actions in CI/CD, every time there are changes to the repository, GitHub Actions can trigger CI workflows to run tests and verification. If everything succeeds, the CD workflow can be activated to release these changes to production or testing environments.
By using CI/CD, development teams can ensure that changes made don't break application quality or performance. This also speeds up product release time and improves efficiency in overall software lifecycle management.
Introduction to GitHub Actions
GitHub Actions is a feature provided by GitHub that enables automation in the software development cycle. In other words, GitHub Actions allows us to create and customize automated workflows to perform certain tasks every time there are changes to a GitHub repository.
These workflows can be set up to run various automated actions or scripts, such as testing, building applications, or releasing new versions. The goal is to help development teams automate these processes so they can focus on writing code and developing features without worrying too much about administrative steps.
For example, when there are code changes in a GitHub repository, GitHub Actions can automatically run workflows that you've specified. These workflows can include steps like testing whether the changes don't break existing functionality, building new applications, and even releasing new versions if needed.
It's important to note that GitHub Actions uses special configuration files (usually named .github/workflows/file-name.yml) in the repository. This file contains descriptions of the steps that GitHub Actions should execute.
With GitHub Actions, collaboration in software development can become more efficient because many tasks can be automated. This provides additional flexibility for developers and teams to customize their workflows according to project needs.
Here's an example of a simple workflow we can use to build and test JavaScript application code using the Yarn package manager:
name: Build and test

on:
  push:
    branches:
    - main

jobs:
  build:
    runs-on: ubuntu-latest
    steps:
    - uses: actions/checkout@v4
    - name: Install dependencies
      run: yarn install
    - name: Build
      run: yarn build

  test:
    runs-on: ubuntu-latest
    steps:
    - uses: actions/checkout@v4
    - uses: actions/setup-node@v4
      with:
        node-version: 16
    - name: Install dependencies
      run: yarn install
    - name: Run tests
      run: yarn test
Introduction to Microsoft App Center
Microsoft App Center is a cloud service that provides various features to facilitate the build, test, release, and monitoring of applications. This service can be used for various platforms, such as Android, iOS, Windows, macOS, and others. In this tutorial, we will use this service to automatically build and release Flutter applications.
Microsoft App Center provides many great features for free such as continuous integration, UI testing, continuous delivery, detailed crash and error reports from applications showing how the error logs, and Analytics features. This time, we won't use all available features because Flutter is not yet officially supported by App Center. Currently, the languages and frameworks that are officially supported are Kotlin, Java, React Native, Xamarin, and Unity. In this tutorial, we will focus only on building and releasing applications on App Center. For more details, you can read the App Center documentation.
Tutorial: Basic Configuration in App Center
In this tutorial, you will deploy the Flutter application you created in previous tutorials to App Center. Here are the initial steps in the application deployment process:
-
Create an account on App Center using your GitHub account (top button).

-
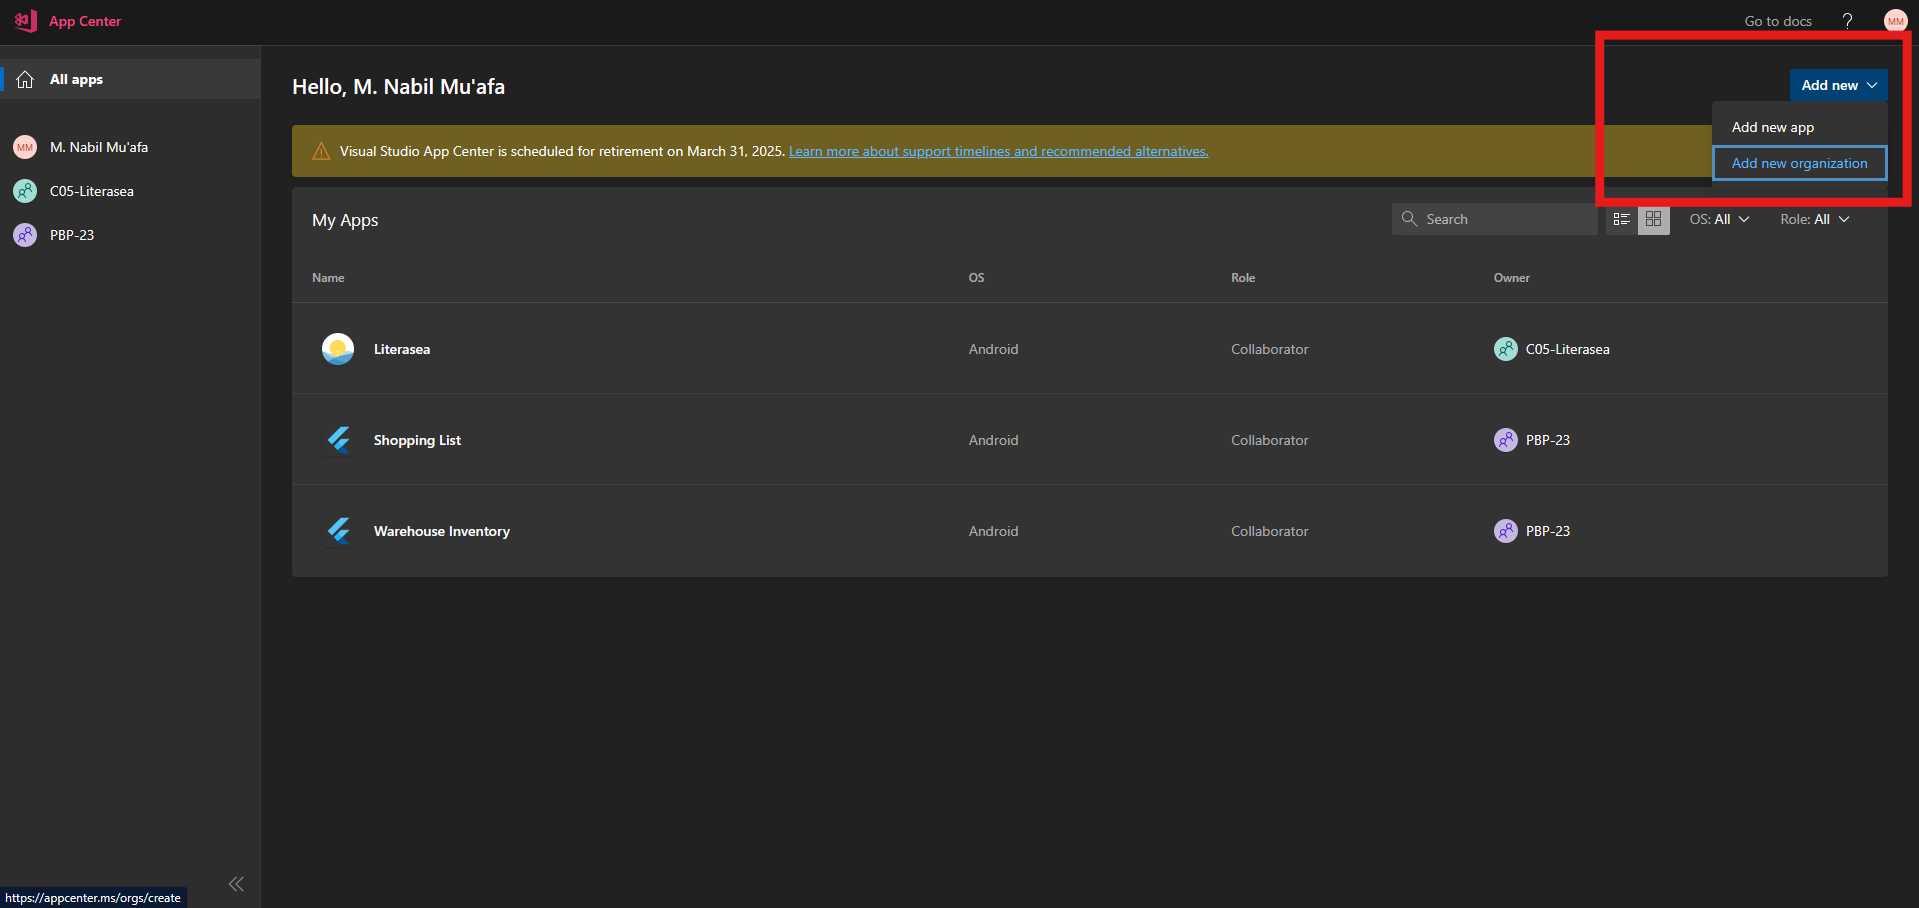
After successfully creating an account and signing in, create a new organization by accessing the Add new -> Add new organization menu. Fill in the organization name you want.
-
Create a new app slot by pressing the
Add appbutton.
-
Fill the application name with
Mental Health Tracker. You do not need to select a release type. ChooseAndroidas the OS andJava / Kotlinas the platform. Then, click "Add new app".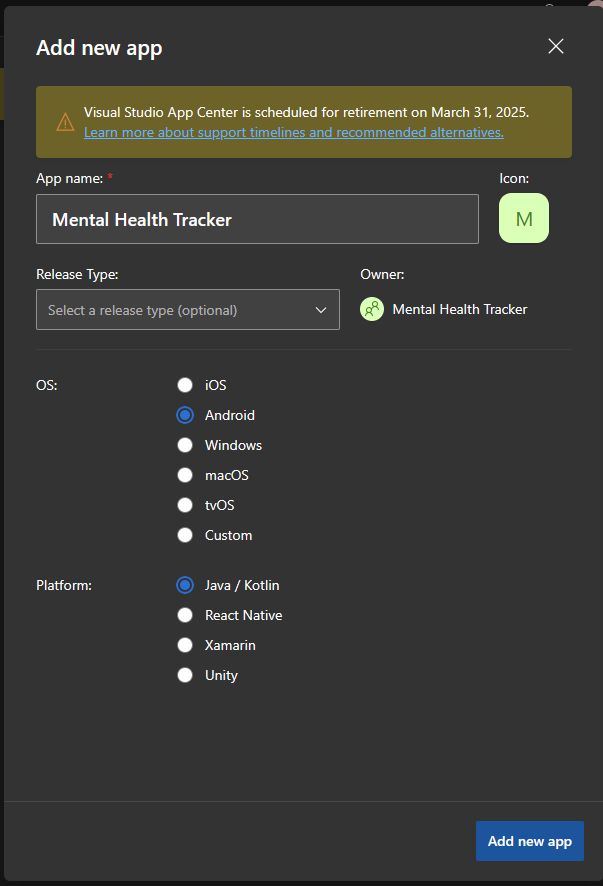
-
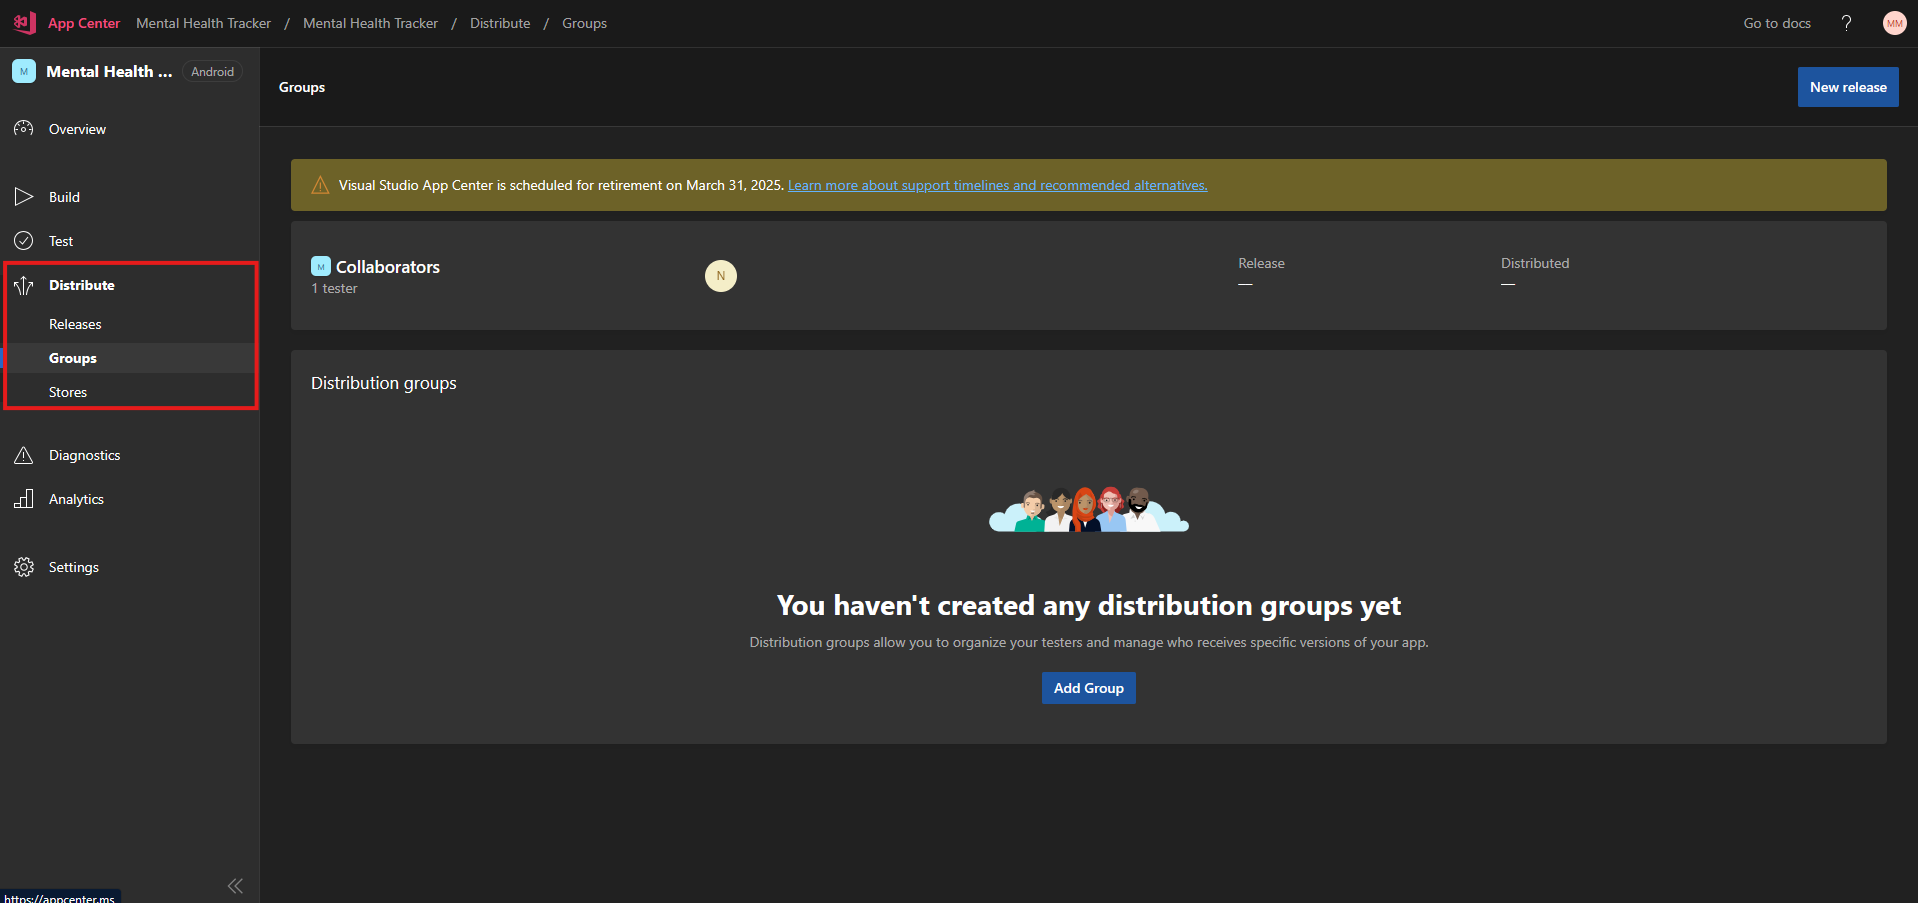
Open the Distribute menu and open the Groups menu.
-
Create a new group by pressing the "Add Group" button. Name it
Publicand provide public access by changing the toggle onAllow public access. Press theCreate Groupbutton to create a new group. We do this so that the APK later created by App Center can be accessed publicly.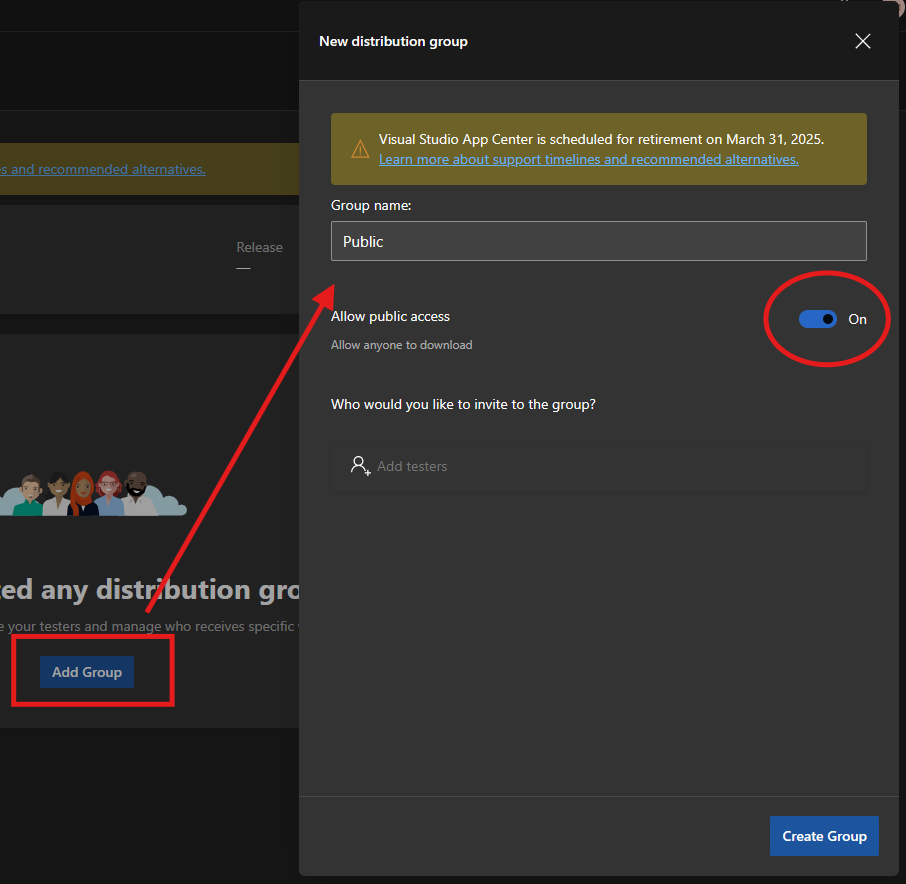
If you're using an organization to organize your project code, follow these additional steps:
-
Open the Authorized OAuth Apps site with the account registered in the organization that owns the project code.
-
Click
App Center. -
Find the organization that owns your project code, then click the
Grantbutton to give App Center access to the organization.
At this point, you have completed the basic setup in App Center. Next, you will set up scripts and signing for the Flutter application.
Tutorial: Basic Flutter Application Signing Configuration
To publish the application on App Center, the Flutter application must be signed using a key to guarantee its authenticity. Therefore, we will create a key for the application and set up automation so that CI/CD scripts (both on GitHub Actions and App Center) can run smoothly.
-
Create a keystore.
For Mac OS or Linux users, run the following command in the Terminal:
keytool -genkey -v -keystore ~/release-keystore.jks -keyalg RSA -keysize 2048 -validity 10000 -alias releaseFor Windows users, run the following command in Command Prompt:
keytool -genkey -v -keystore %userprofile%\release-keystore.jks -storetype JKS -keyalg RSA -keysize 2048 -validity 10000 -alias releaseProvide a secure password for the keystore and save or remember this password, don't forget it. Fill in the required information until the process is complete. Then, move this file to the project's root folder.
The command you just ran is useful for storing the keystore file named
release-keystore.jksin your home directory with the aliasrelease.noteIf Terminal or Command Prompt does not recognize the
keytoolcommand, please follow the additional guide on the official Flutter web page under Create an upload keystore to add thekeytoolcommand to your environment path. -
Add the following syntax to the
.gitignorefile in the project's root folder so that the keystore is not counted as a file in the Git repository. This is done because the keystore is a confidential file that needs to be protected like an account password.# Remember to never publicly share your keystore.
# See https://flutter.dev/docs/deployment/android#reference-the-keystore-from-the-app
*.keystore
*.jks -
Open the file
/android/app/build.gradleand find thebuildTypessection.buildTypes {
release {
// TODO: Add your own signing config for the release build.
// Signing with the debug keys for now,
// so `flutter run --release` works.
signingConfig signingConfigs.debug
}
}Change this section to the following:
signingConfigs {
        release {
                storeFile file("../../release-keystore.jks")
                storePassword = "$System.env.KEY_PASSWORD"
                keyAlias = "release"
                keyPassword = "$System.env.KEY_PASSWORD"
        }
}
    buildTypes {
        release {
            signingConfig signingConfigs.release
        }
}
At this point, you have completed the basic configuration for application signing. Next, you will modify the GitHub Actions script and create a new script to build the application on App Center.
Tutorial: Creating GitHub Actions Scripts
-
Generate a base64 string representing the keystore file that we will store as an environment variable later.
For Mac OS or Linux users, run the
openssl base64 -in release-keystore.jkscommand in the Terminal at the root folder to generate a base64 string. Save the generated string temporarily.For Windows users, open the project root folder in File Explorer. Then right-click, click "Show more options", and then click "Git Bash here". A Git Bash terminal will open.
[Image descriptions of Git Bash process]
In the terminal, run the command
openssl base64 -in release-keystore.jks. This command will generate a base64 string. Save the generated string temporarily.Here's an example of the result of running this command.
[Image of base64 output]
-
Create repository secrets in the GitHub repository with the following specifications:
i.
GH_TOKENcontains a GitHub (Personal Access) Token from the repository admin for automated release purposes.If you are the repository admin, access this page to create a Personal Access Token. Give your token a unique name. Under "Repository access", choose "Only select repositories" and select your Flutter project repository. Open the "Repository permissions" section, and grant at least read-only access to the following permissions:
- Secrets
Grant read and write access to at least the following permissions:
- Actions
- Workflows
- Contents
Copy the generated Personal Access Token and save it elsewhere, as you won't be able to see this token again through GitHub. Then, fill the
GH_TOKENrepository secret with the Personal Access Token you copied.ii.
KEY_JKScontains thebase64string from the keystore file you created earlier.iii.
KEY_PASSWORDcontains the password you used when creating the keystore file.Finally, your repository secrets page will look like this.
[Image of GitHub Secrets page]
-
If it doesn't exist already, create a
.github/workflowsfolder in the application's root folder. -
Create three new files in the
.github/workflowsfolder with the following specifications:noteAssumed that the
stagingbranch is used to contain application code before release and themainbranch is used for code release.i.
staging.yml; functions to check if the codebase on thestagingbranch is free of errors when runningflutter analyze. This script is only triggered when there's a commit on thestagingbranch.name: Staging
# Controls when the workflow will run
on:
# Triggers the workflow on push or pull request events but only for the develop branch
push:
branches: [staging]
pull_request:
branches: [staging]
# A workflow run is made up of one or more jobs that can run sequentially or in parallel
jobs:
# This workflow contains a single job called "build"
build:
name: Analyze
# The type of runner that the job will run on
runs-on: ubuntu-latest
steps:
- name: Checkout the code
uses: actions/checkout@v4
- name: Setup Java
uses: actions/setup-java@v3
with:
distribution: "zulu"
java-version: "17"
- name: Setup Flutter
uses: subosito/flutter-action@v2
with:
channel: "stable"
- name: Get packages
run: flutter pub get
- name: Analyze
run: flutter analyzeii.
pre-release.yml; functions to check if the application build process can run without errors. If there are no errors, the APK file can be accessed as an artifact. This script is only triggered when there's a pull request from thestagingbranch to themainbranch.name: Pre-Release
# Controls when the workflow will run
on:
# Triggers the workflow on pull request events but only for the main branch
pull_request:
branches: [main]
# A workflow run is made up of one or more jobs that can run sequentially or in parallel
jobs:
# This workflow contains a single job called "Build and Pre-Release APK"
releases:
name: Build and Pre-Release APK
# The type of runner that the job will run on
runs-on: ubuntu-latest
steps:
- name: Checkout the code
uses: actions/checkout@v4
- name: Setup Java
uses: actions/setup-java@v3
with:
distribution: "zulu"
java-version: "17"
- name: Setup Flutter
uses: subosito/flutter-action@v2
with:
channel: "stable"
- name: Get packages
run: flutter pub get
- name: Generate Java keystore
env:
KEY_JKS: ${{ secrets.KEY_JKS }}
run: echo "$KEY_JKS" | base64 --decode > release-keystore.jks
- name: Build APK
env:
KEY_PASSWORD: ${{ secrets.KEY_PASSWORD }}
run: flutter build apk --split-per-abi
- name: Pre-release APK by uploading it to Artifacts
uses: actions/upload-artifact@v3
with:
name: APKS
path: build/app/outputs/flutter-apk/*.apkiii.
release.yml; functions to build the application and release it as a GitHub Release. This script is only triggered when there's a commit on themainbranch.# This is a basic workflow to help you get started with Actions
name: Release
# Controls when the workflow will run
on:
# Triggers the workflow on push events but only for the main branch
push:
branches: [main]
# A workflow run is made up of one or more jobs that can run sequentially or in parallel
jobs:
# This workflow contains a single job called "Build and Release APK"
releases:
name: Build and Release APK
# The type of runner that the job will run on
runs-on: ubuntu-latest
steps:
- name: Checkout the code
uses: actions/checkout@v4
- name: Get version from pubspec.yaml
id: version
run: echo "::set-output name=version::$(grep "version:" pubspec.yaml | cut -c10-)"
- name: Setup Java
uses: actions/setup-java@v3
with:
distribution: "zulu"
java-version: "17"
- name: Setup Flutter
uses: subosito/flutter-action@v2
with:
channel: "stable"
- name: Get packages
run: flutter pub get
- name: Generate Java keystore
env:
KEY_JKS: ${{ secrets.KEY_JKS }}
run: echo "$KEY_JKS" | base64 --decode > release-keystore.jks
- name: Build APK
env:
KEY_PASSWORD: ${{ secrets.KEY_PASSWORD }}
run: flutter build apk --split-per-abi
- name: Get current date
id: date
run: echo "::set-output name=date::$(TZ='Asia/Jakarta' date +'%A %d-%m-%Y %T WIB')"
- name: Release APK
uses: ncipollo/release-action@v1
with:
allowUpdates: true
artifacts: "build/app/outputs/flutter-apk/*.apk"
body: "Published at ${{ steps.date.outputs.date }}"
name: "v${{ steps.version.outputs.version }}"
token: ${{ secrets.GH_TOKEN }}
tag: ${{ steps.version.outputs.version }} -
Save these three files and push them to the repository. Check if the application is successfully built and released automatically by GitHub Actions.
If your application is successfully created and automatically released, then congratulations! At this point, we have completed the workflow on GitHub. Next, we will create a new script for building on App Center and configure the application further on the App Center website.
Tutorial: Adding CI/CD Scripts for App Center
In this section, we will add continuous integration and continuous delivery scripts to the Flutter application repository so that App Center can automatically build and generate the application's APK file.
-
Open the
/android/appfolder. -
Create a new file named
appcenter-post-clone.shand fill the file with the following code:#!/usr/bin/env bash
# Place this script in project/android/app/
cd ..
# fail if any command fails
set -e
# debug log
set -x
cd ..
git clone -b beta https://github.com/flutter/flutter.git
export PATH=`pwd`/flutter/bin:$PATH
flutter channel stable
flutter doctor
echo "Installed flutter to `pwd`/flutter"
# export keystore for release
echo "$KEY_JKS" | base64 --decode > release-keystore.jks
# build APK
# if you get "Execution failed for task ':app:lintVitalRelease'." error, uncomment next two lines
# flutter build apk --debug
# flutter build apk --profile
flutter build apk --release
# copy the APK where AppCenter will find it
mkdir -p android/app/build/outputs/apk/; mv build/app/outputs/apk/release/app-release.apk $_ -
Open the
/android/.gitignorefile and change it to the following. This is done so that App Center can detect the application as an Android application.# add comment for app center
# gradle-wrapper.jar
# /gradlew
# /gradlew.bat
/.gradle
/captures/
/local.properties
GeneratedPluginRegistrant.java
# Remember to never publicly share your keystore.
# See https://flutter.dev/docs/deployment/android#reference-the-keystore-from-the-app
key.properties
**/*.keystore
**/*.jks -
Save the file and push it to the repository. Ensure that this script and the new
.gitignorehave been pushed to themainbranch. -
Make sure the files
gradlew,gradlew.bat, andgradle/wrapper/gradle-wrapper.jarin theandroid/directory have also been pushed to GitHub. This is important so that Microsoft App Center can recognize your repository as a Flutter project.
After creating the script, we will configure the application in App Center to be automatically built and released.
Tutorial: Advanced Configuration in App Center
-
Open the App Center website and open the application project.
-
Open the
Buildmenu and select GitHub as the repository service provider. Choose the application repository for your group project.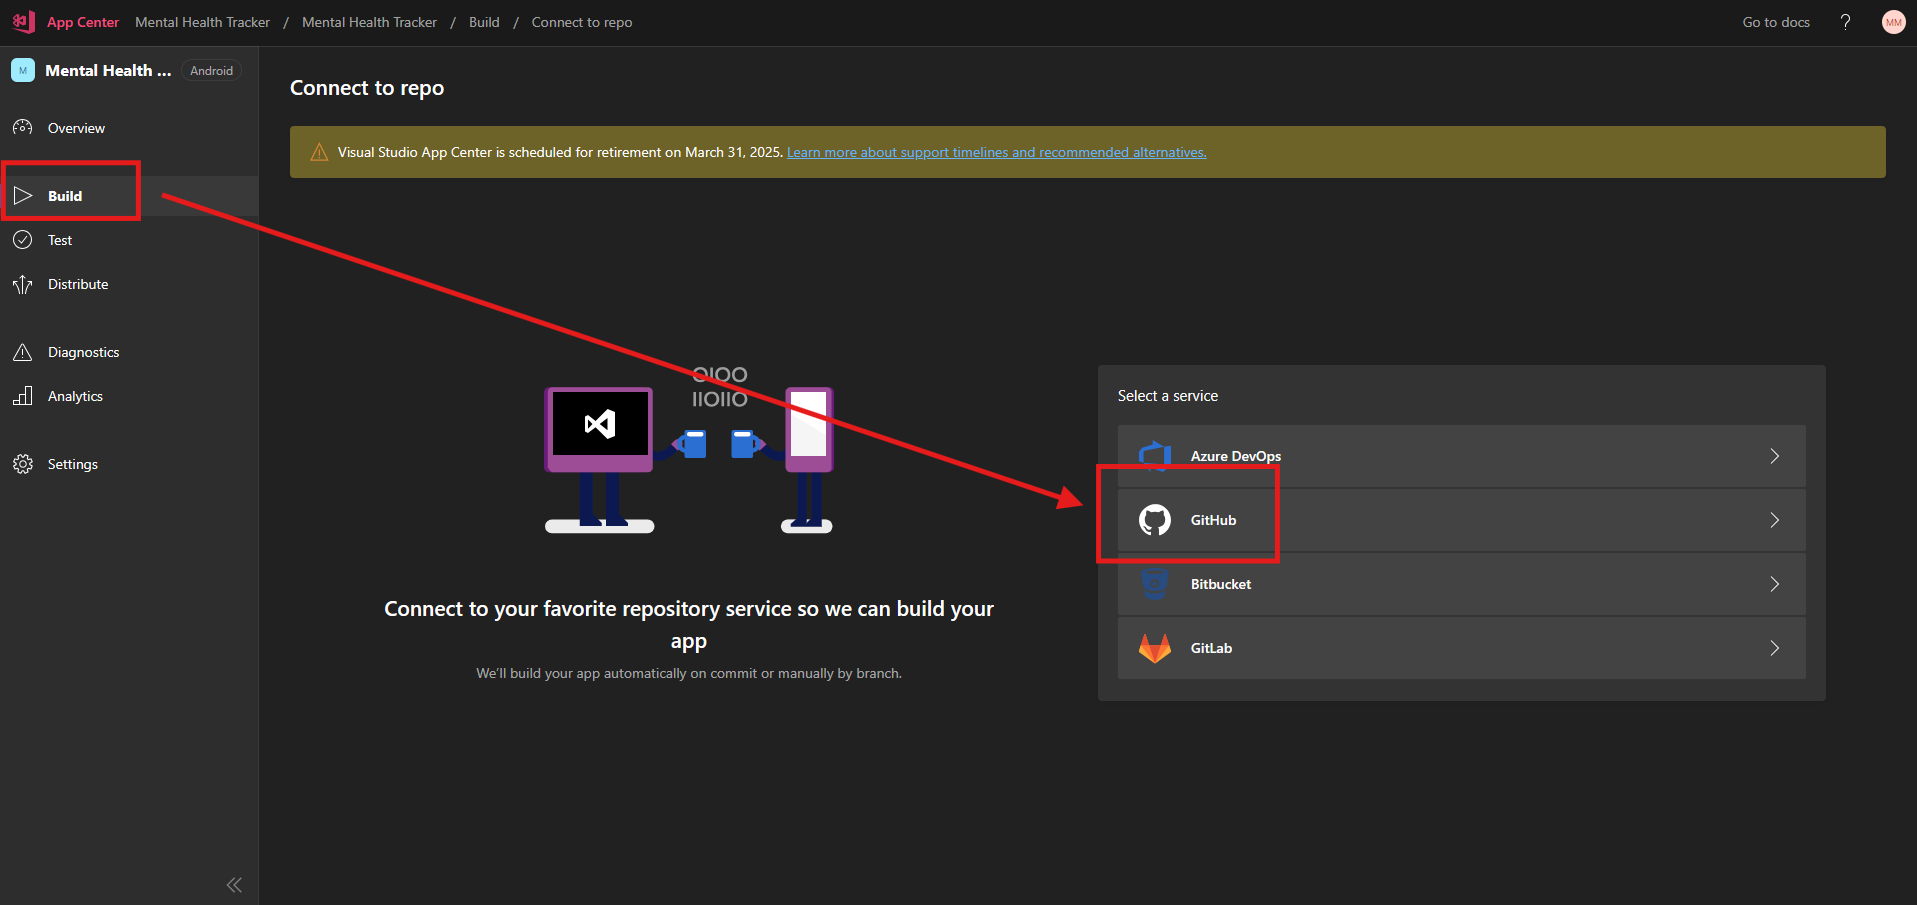
-
Open your main branch (
mainormaster, adjust as needed) and click theConfigure buildbutton.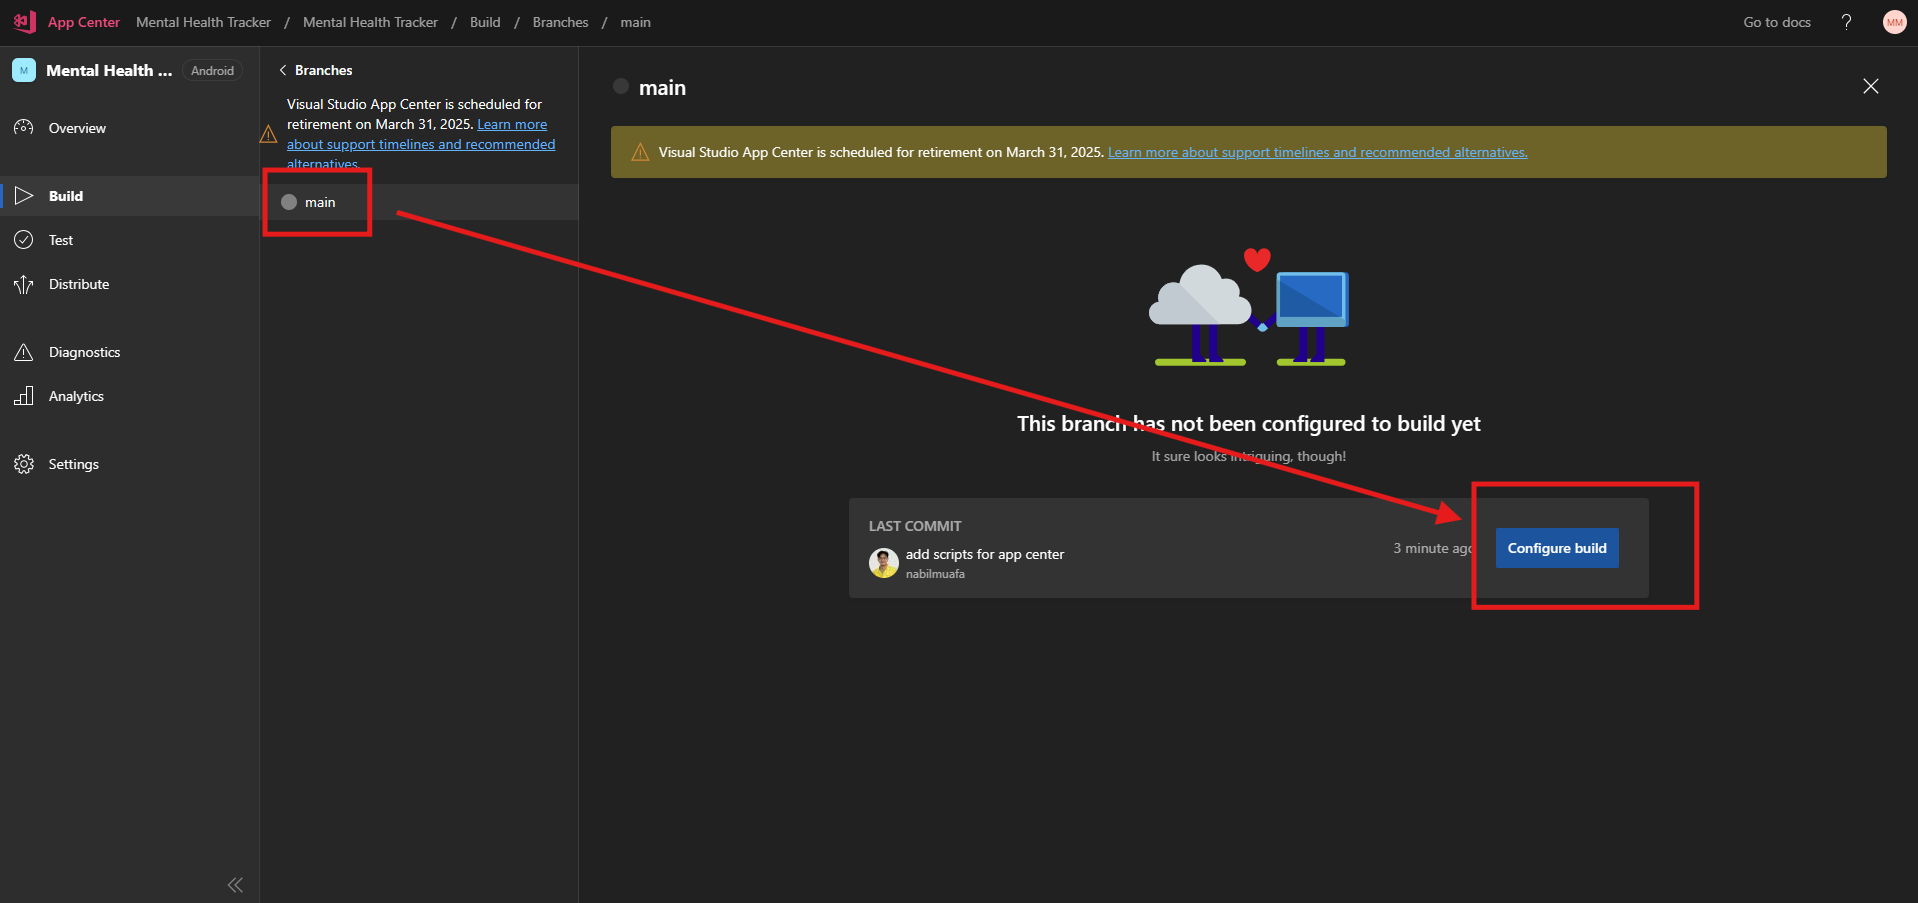
-
Follow these settings:
- Enable Environment variables
- Fill with the following name and value:
JAVA_HOME:$(JAVA_HOME_17_X64)KEY_JKS:<base64 of your keystore>KEY_PASSWORD:<password of your keystore>
- Check
Sign builds, and within it, checkMy Gradle settings are entirely set to handle signing automatically. - Check
Distribute buildsand theGroupsradio button. Check theContributorsandPublicgroups in the dropdown menu. - Check
Build status badge.
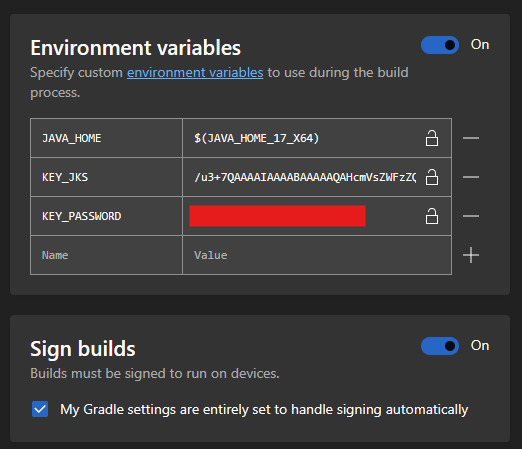
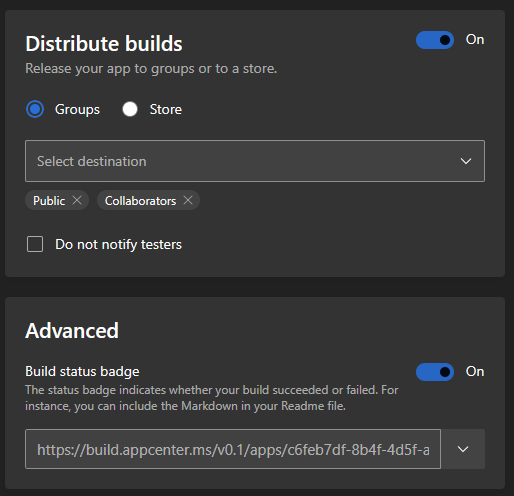
Notes:
- Don't forget to replace
KEY_JKSandKEY_PASSWORDwith the actual values. - Don't forget to create a
Publicgroup for public application distribution. - Copy the build badge link in
Markdownformat and paste it into yourREADME.md.


-
Click the
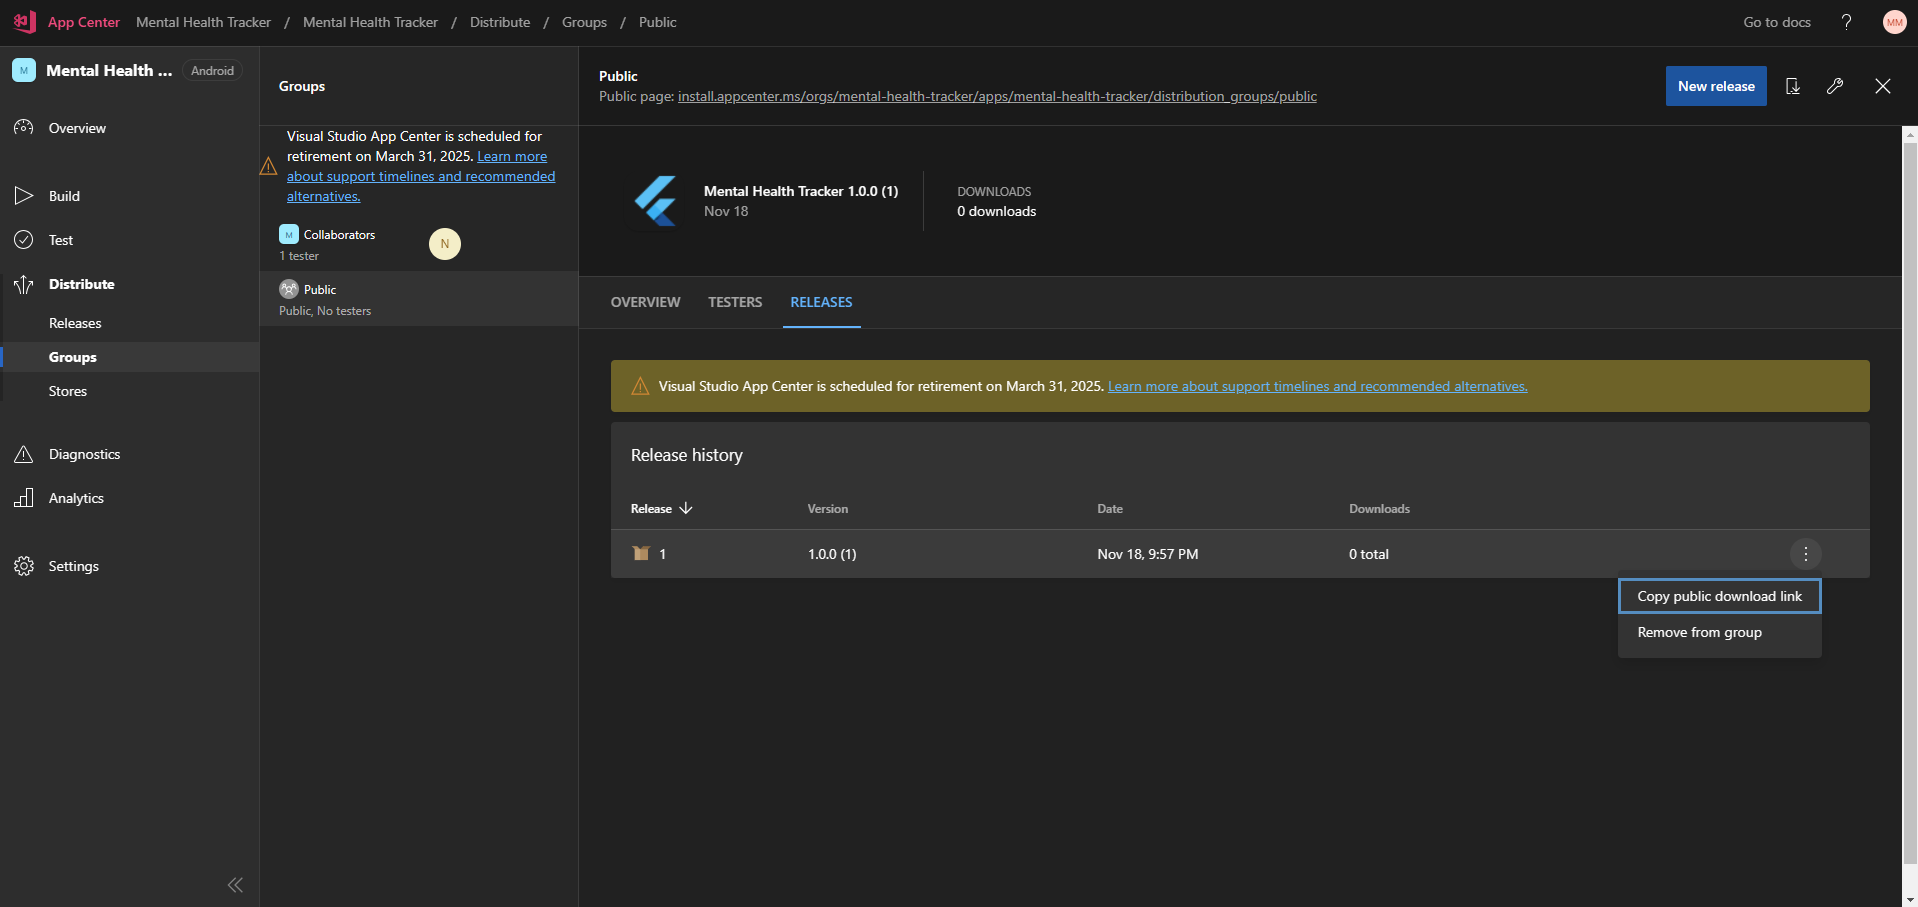
Save & Buildbutton to save the configuration and start the first build process.You can check the public link for application publication in App Center through the Distribute -> Groups -> Public menu. You can also copy the public link from the application publication.
-
Copy the public link from the application publication and paste it into
README.md
Closing Remarks
Congratulations, you have successfully deployed your Flutter application to App Center. You can check the application you've deployed by downloading the APK file from App Center and installing it on your smartphone.
And we have officially completed the PBP Tutorial for the Odd Semester 2024/2025! Thank you for having followed and completed all the PBP tutorials for the Odd Semester 2024/2025. The teaching team wants to express appreciation to all students who have participated and contributed to this course. The teaching team sees the effort and dedication you have shown in facing the challenges of multiplatform application development in this course.
During the lab and assignment process, we have explored the fundamental concepts and principles underlying web and mobile application development using Django and Flutter. You have learned about architectures, features, and tools that can help in building robust and responsive applications on both platforms.
The teaching team hopes that the labs and assignments can provide a deeper understanding of the potential and challenges in multiplatform application development and provide you with useful skills that can be applied in your career as a software developer.
However, learning does not stop here. The development world continues to evolve rapidly, and it is important to keep up with the latest developments in the industry. The teaching team encourages you to continue learning and keep your skills relevant by reading other references, taking advanced courses, and participating in real-world projects.
In closing, remember that multiplatform application development is an exciting and potential-filled field. Continue to explore and innovate, and the teaching team is confident that you have a bright future as a software developer. Thank you and best of luck on your journey!
Contributors
- Muhammad Nabil Mu'afa
- Adrian Hakim Utomo (Translator)
Credits
This tutorial was developed based on a blog entry written by Muhammad Athallah. All tutorials and instructions in this repository are designed so that students taking the Platform-Based Programming course can complete the tutorial during lab sessions.