Tutorial 2: Form and Data Delivery
Platform-Based Programming (CSGE602022) — Organized by the Faculty of Computer Science Universitas Indonesia, Odd Semester 2024/2025
Learning Objectives
After completing this tutorial, students are expected to be able to:
- Understand the purpose and how to implement the skeleton of a view
- Understand
XMLandJSONas one of the data delivery methods - Understand how data submission is done using the
formelement inHTML - Understand how to send data using the
XMLandJSONformat - Understand how to retrieve data based on a specific
ID - Understand the use of Postman as a data viewer
Introduction to Data Delivery
In the development of a platform, sometimes we need to send data from one stack to another. Data that is sent can be of many different types. Some commonly used data formats between different applications are HTML, XML, and JSON. The implementation of data delivery in the form of HTML has already been covered in the previous tutorial. In this tutorial, we will cover data delivery in the form of XML and JSON.
XML (Extensible Markup Language)
XML, or eXtensible Markup Language, is a format that is designed to be easy to read, because each element in XML describes itself. XML is commonly used in web and mobile applications for storage and transmission of data. An XML file only contains data in a specific tag, and to send, receive, store, or display information from the file, we need to create a program that can process it.
XML Format Example:
<?xml version="1.0" encoding="UTF-8"?>
<person>
    <name>Doddy Ferdiansyah</name>
    <age>25</age>
    <address>
        <street>Jl. Ganesa No.10</street>
        <city>Bandung</city>
        <province>Jawa Barat</province>
        <zip>40132</zip>
    </address>
</person>
The XML above is self-descriptive:
- There is information about name (
name) - There is information about age (
age) - There is information about address (
address)- There is information about street (
street) - There is information about city (
city) - There is information about province (
province) - There is information about zip code (
zip)
- There is information about street (
An XML document is structured like a tree that starts from the root, then branches, and ends at the leaves. An XML document must contain a root element which is the parent of other elements. On the given example, <person> is the root element.
The line <?xml version="1.0" encoding="UTF-8"?> is usually called the XML Prolog. The XML Prolog is optional, but if there is, then it must be at the beginning of the XML document. On an XML document, all elements must have closing tags. Tags in XML are case sensitive, so the tag <person> is different from the tag <Person>.
JSON (JavaScript Object Notation)
JSON, or JavaScript Object Notation, is a format that is designed to be easy to read, because each element in JSON is self-describing. JSON is commonly used in web and mobile applications for storage and transmission of data. Even though the syntax of JSON is based on JavaScript objects, JSON itself is a text format. Therefore, many programming languages have support for reading and creating JSON.
Example of JSON format:
{
  "name": "Doddy Ferdiansyah",
  "age": 25,
  "address": {
    "street": "Jl. Ganesa No.10",
    "city": "Bandung",
    "province": "Jawa Barat",
    "zip": "40132"
  }
}
Data in JSON is stored in the form of key and value. In the example above, the key is name, age, and address. The value can be of primitive data type (string, number, boolean) or an object.
Pre-Tutorial Notes
Before you start, and to ensure that you follow this tutorial correctly, we expect some results from tutorial 1:
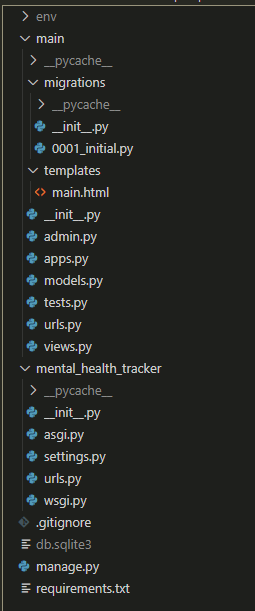
- Local directory structure
mental-health-trackershould look like this.
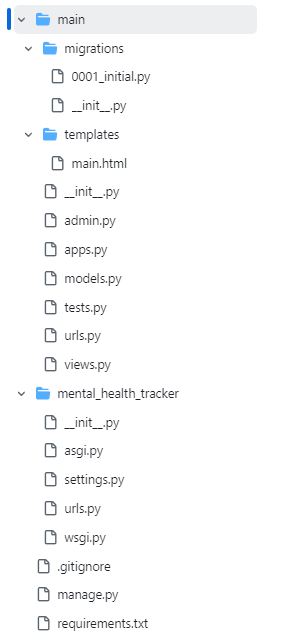
- Repository structure
mental-health-trackeron GitHub should look like this.
Tutorial: Implementing the Skeleton of a View
Before creating a registraton form, we need to create a skeleton that acts as a base for the views of our website. With the base view, we can ensure consistency in the design of our website and reduce the possibility of redundancy of code. In this tutorial, we will create a skeleton for the website that we will create in the next tutorial.
-
Create a directory
templatesin the main directory (root folder) and create a new HTML file namedbase.html. Thebase.htmlfile acts as a base template that can be used as a generic view for other web pages within the project. Create thebase.htmlfile with the following code:{% load static %}
<!DOCTYPE html>
<html lang="en">
<head>
<meta charset="UTF-8" />
<meta name="viewport" content="width=device-width, initial-scale=1.0" />
{% block meta %} {% endblock meta %}
</head>
<body>
{% block content %} {% endblock content %}
</body>
</html>The lines enclosed in
{% ... %}are called template tags in Django. The lines in this example will function to dynamically load data from Django into the HTML.In the example above, the
{% block %}tag in Django is used to define an area in the template that can be replaced by templates that inherit from the base template. The inherited template will extend the base template (in this casebase.html) and replace the content in the block as needed. -
Open the
settings.pyfile in the project directory (mental_health_tracker) and find the line that contains theTEMPLATESvariable. Adjust the code with the following code to make thebase.htmlfile detected as a template file....
TEMPLATES = [
{
'BACKEND': 'django.template.backends.django.DjangoTemplates',
'DIRS': [BASE_DIR / 'templates'], # Add this line
'APP_DIRS': True,
...
}
]
...noteIn some cases,
APP_DIRS's value on yourTEMPLATESconfiguration might beFalse. If it is, change it toTrue.APP_DIRS's value must beTrue. -
In the subdirectory
templatesin themaindirectory (main/templates/), change themain.htmlfile created in the previous tutorial to the following.{% extends 'base.html' %}
{% block content %}
<h1>Mental Health Tracker</h1>
<h5>NPM: </h5>
<p>{{ npm }}<p>
<h5>Name:</h5>
<p>{{ name }}</p>
<h5>Class:</h5>
<p>{{ class }}</p>
{% endblock content %}Note that the code above is the same as the code in
main.htmlin the previous tutorial. The difference is in the code above, we are usingbase.htmlas the main template.
Tutorial: Changing the Primary Key From Integer to UUID
To apply best practices from an application security standpoint, there are some changes that you need to make to the models.py file on the main/ subdirectory. By default, the ID of each model object you create uses an incremental integer starting from 1. This could become an "entrypoint" for a security vulnerability in your Django application, as enumeration of object IDs within the application could be performed.
If you are interested about this security vulnerability, you can read more here in this article regarding IDOR. For now, we will focus on implementing the best practices to mitigate this vulnerability.
If you have already created an object to your model, you must delete your database file (db.sqlite3) first so that the next steps will not produce errors.
- Add these lines to the
models.pyfile on themain/subdirectory.
import uuid  # add this line at the very top
...
class MoodEntry(models.Model):
    id = models.UUIDField(primary_key=True, default=uuid.uuid4, editable=False)  # add this line
    mood = models.CharField(max_length=255)
    time = models.DateField(auto_now_add=True)
    feelings = models.TextField()
    mood_intensity = models.IntegerField()
...
-
Do a model migration by running the commands below.
Windows:
python manage.py makemigrations
python manage.py migrate
Unix (Linux/macOS):
python3 manage.py makemigrations
python3 manage.py migrate
Tutorial: Creating Form Input Data and Displaying Data Mood Entry on HTML
Until now, no data has been added and displayed in the application. Now, we will create a simple form to input a Mood Entry data in the application so that we can add new data to be displayed on the main page.
-
Create a new file in the
maindirectory with the nameforms.pyto create the structure of the form that can receive new Mood Entry datas. Add the following code to theforms.pyfile.from django.forms import ModelForm
from main.models import MoodEntry
class MoodEntryForm(ModelForm):
class Meta:
model = MoodEntry
fields = ["mood", "feelings", "mood_intensity"]Code Explanation:
model = MoodEntryto indicate the model that will be used for the form. When data from the form is saved, the form's input will be saved as an object ofMoodEntry.fields = ["mood", "feelings", "mood_intensity"]to indicate the fields of theMoodEntrymodel that will be used for the form. Thetimefield is not included in thefieldslist because it will be added automatically.
-
Open the
views.pyfile in themaindirectory and add the following import at the top of the file.from django.shortcuts import render, redirect # Add import redirect at this line
from main.forms import MoodEntryForm
from main.models import MoodEntry -
In the same file, create a new function with the name
create_mood_entrythat receives a parameterrequest. Add the following code below to produce a form that can automatically add a Mood Entry data automatically when data is submitted from the form.def create_mood_entry(request):
form = MoodEntryForm(request.POST or None)
if form.is_valid() and request.method == "POST":
form.save()
return redirect('main:show_main')
context = {'form': form}
return render(request, "create_mood_entry.html", context)Code Explanation:
form = MoodEntryForm(request.POST or None)is used to create a newMoodEntryFormwith the input from the user inrequest.POSTentered into the QueryDict.form.is_valid()is used to validate the input from the form.form.save()is used to create and save the data from the form.return redirect('main:show_main')is used to perform a redirect to theshow_mainfunction in themainapplication's views after the form data is successfully saved.
-
Change the
show_mainfunction that already exists in theviews.pyfile to the following.def show_main(request):
mood_entries = MoodEntry.objects.all()
context = {
'name': 'Pak Bepe',
'class': 'PBP KKI',
'npm': '2306123456',
'mood_entries': mood_entries
}
return render(request, "main.html", context)Code Explanation:
The
MoodEntry.objects.all()function is used to retrieve all objects of theMoodEntryobjects stored in the database. -
Open the
urls.pyfile in themaindirectory and import thecreate_mood_entryfunction that you just created.from main.views import show_main, create_mood_entry -
Add the URL path to the
urlpatternsvariable in theurls.pyfile in themaindirectory to access the function that was imported in the previous point.urlpatterns = [
...
path('create-mood-entry', create_mood_entry, name='create_mood_entry'),
] -
Create a new HTML file with the name
create_mood_entry.htmlin themain/templatesdirectory. Fill in thecreate_mood_entry.htmlfile with the following code.{% extends 'base.html' %}
{% block content %}
<h1>Add New Mood Entry</h1>
<form method="POST">
{% csrf_token %}
<table>
{{ form.as_table }}
<tr>
<td></td>
<td>
<input type="submit" value="Add Mood Entry" />
</td>
</tr>
</table>
</form>
{% endblock %}Code Explanation:
<form method="POST">is used to indicate the block for the form with the POST method.{% csrf_token %}is a token that functions as a security system. The token is automatically generated by Django to prevent attacks.{{ form.as_table }}is a template tag used to display the form fields created in theforms.pyfile as a table.<input type="submit" value="Add Mood Entry"/>is used as a submit button to send the request to thecreate_mood_entry(request)view.
-
Open the
main.htmlfile and add the following code within the{% block content %}block to display the data in the form in the form of a table and the "Add New Mood Entry" button that will redirect to the form page....
{% if not mood_entries %}
<p>There are no mood data in mental health tracker.</p>
{% else %}
<table>
<tr>
<th>Mood Name</th>
<th>Time</th>
<th>Feeling</th>
<th>Mood Intensity</th>
</tr>
{% comment %} This is how to display mood data
{% endcomment %}
{% for mood_entry in mood_entries %}
<tr>
<td>{{mood_entry.mood}}</td>
<td>{{mood_entry.time}}</td>
<td>{{mood_entry.feelings}}</td>
<td>{{mood_entry.mood_intensity}}</td>
</tr>
{% endfor %}
</table>
{% endif %}
<br />
<a href="{% url 'main:create_mood_entry' %}">
<button>Add New Mood Entry</button>
</a>
{% endblock content %} -
Run the Django project with the
python manage.py runservercommand and go to http://localhost:8000/ in your browser of choice. Try adding some new mood data and you should be able to see the added data on the main application page.
Tutorial: Returning Data in XML Format
-
Open the
views.pyfile in themaindirectory and add theHttpResponseandSerializerimports at the top of the file.from django.http import HttpResponse
from django.core import serializers -
Create a new function that receives a parameter
requestwith the nameshow_xmland create a variable in the function itself that stores the result of the query of all data in theMoodEntry.def show_xml(request):
data = MoodEntry.objects.all() -
Add the return function as an
HttpResponsethat contains the serialised data result as XML and thecontent_type="application/xml".def show_xml(request):
data = MoodEntry.objects.all()
return HttpResponse(serializers.serialize("xml", data), content_type="application/xml")Code Explanation:
serializersis used to translate object models into other formats such as in this case XML. -
Open the
urls.pyfile in themaindirectory and import the function that you just created.from main.views import show_main, create_mood_entry, show_xml -
Add the URL path to the
urlpatternsvariable in theurls.pyfile in themaindirectory to access the function that was imported in the previous point....
path('xml/', show_xml, name='show_xml'),
... -
Run the Django project with the
python manage.py runservercommand and go to http://localhost:8000/xml/ in your browser of choice to see the result.
Tutorial: Returning Data in JSON Format
-
Open the
views.pyfile in themaindirectory and create a new function that receives a parameterrequestwith the nameshow_jsonwith a variable in the function itself that stores the result of the query of all data in theMoodEntry.def show_json(request):
data = MoodEntry.objects.all() -
Add the return function as an
HttpResponsethat contains the serialised data result as JSON and thecontent_type="application/json".def show_json(request):
data = MoodEntry.objects.all()
return HttpResponse(serializers.serialize("json", data), content_type="application/json") -
Open the
urls.pyfile in themaindirectory and import the function that you just created.from main.views import show_main, create_mood_entry, show_xml, show_json -
Add the URL path to the
urlpatternsvariable in theurls.pyfile in themaindirectory to access the function that was imported in the previous point....
path('json/', show_json, name='show_json'),
... -
Run the Django project with the
python manage.py runservercommand and go to http://localhost:8000/json/ in your browser of choice to see the result.
Tutorial: Returning Data Based on an ID in XML and JSON Format
-
Open the
views.pyfile in themaindirectory and create two new functions that receive a parameterrequestandidwith the namesshow_xml_by_idandshow_json_by_id. -
Create a variable in the function itself that stores the result of the query of data with the specific ID that exists in the
MoodEntry.data = MoodEntry.objects.filter(pk=id) -
Add the return function as an
HttpResponsethat contains the serialised data result as JSON or XML and thecontent_typewith the value"application/xml"(for XML) or"application/json"(for JSON).-
XML
def show_xml_by_id(request, id):
    data = MoodEntry.objects.filter(pk=id)
return HttpResponse(serializers.serialize("xml", data), content_type="application/xml") -
JSON
def show_json_by_id(request, id):
    data = MoodEntry.objects.filter(pk=id)
    return HttpResponse(serializers.serialize("json", data), content_type="application/json")
-
-
Open the
urls.pyfile in themaindirectory and import the function that you just created.from main.views import show_main, create_mood_entry, show_xml, show_json, show_xml_by_id, show_json_by_id -
Add the URL path to the
urlpatternsvariable in theurls.pyfile in themaindirectory to access the function that was imported in the previous point....
path('xml/<str:id>/', show_xml_by_id, name='show_xml_by_id'),
path('json/<str:id>/', show_json_by_id, name='show_json_by_id'),
... -
Run the Django project with the
python manage.py runservercommand and go to http://localhost:8000/xml/[id]/ or http://localhost:8000/json/[id]/ in your browser of choice to see the result.Note: Adjust the
[id]in the URL above with the ID of the object that you want to see.
Tutorial: Using Postman as a Data Viewer
-
Ensure that the server is running with the
python manage.py runservercommand. -
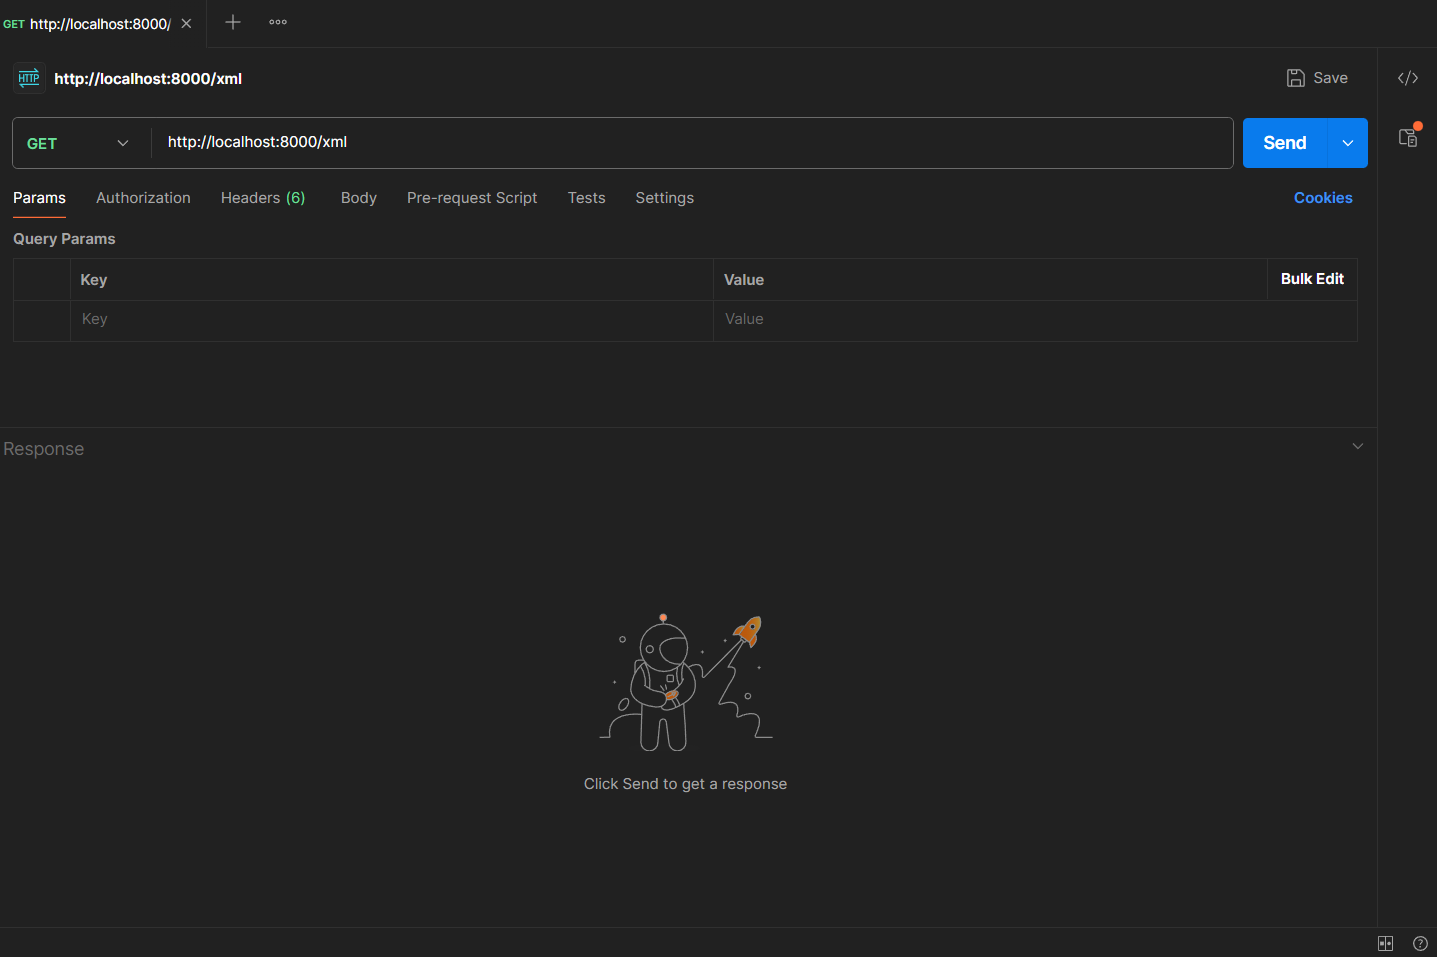
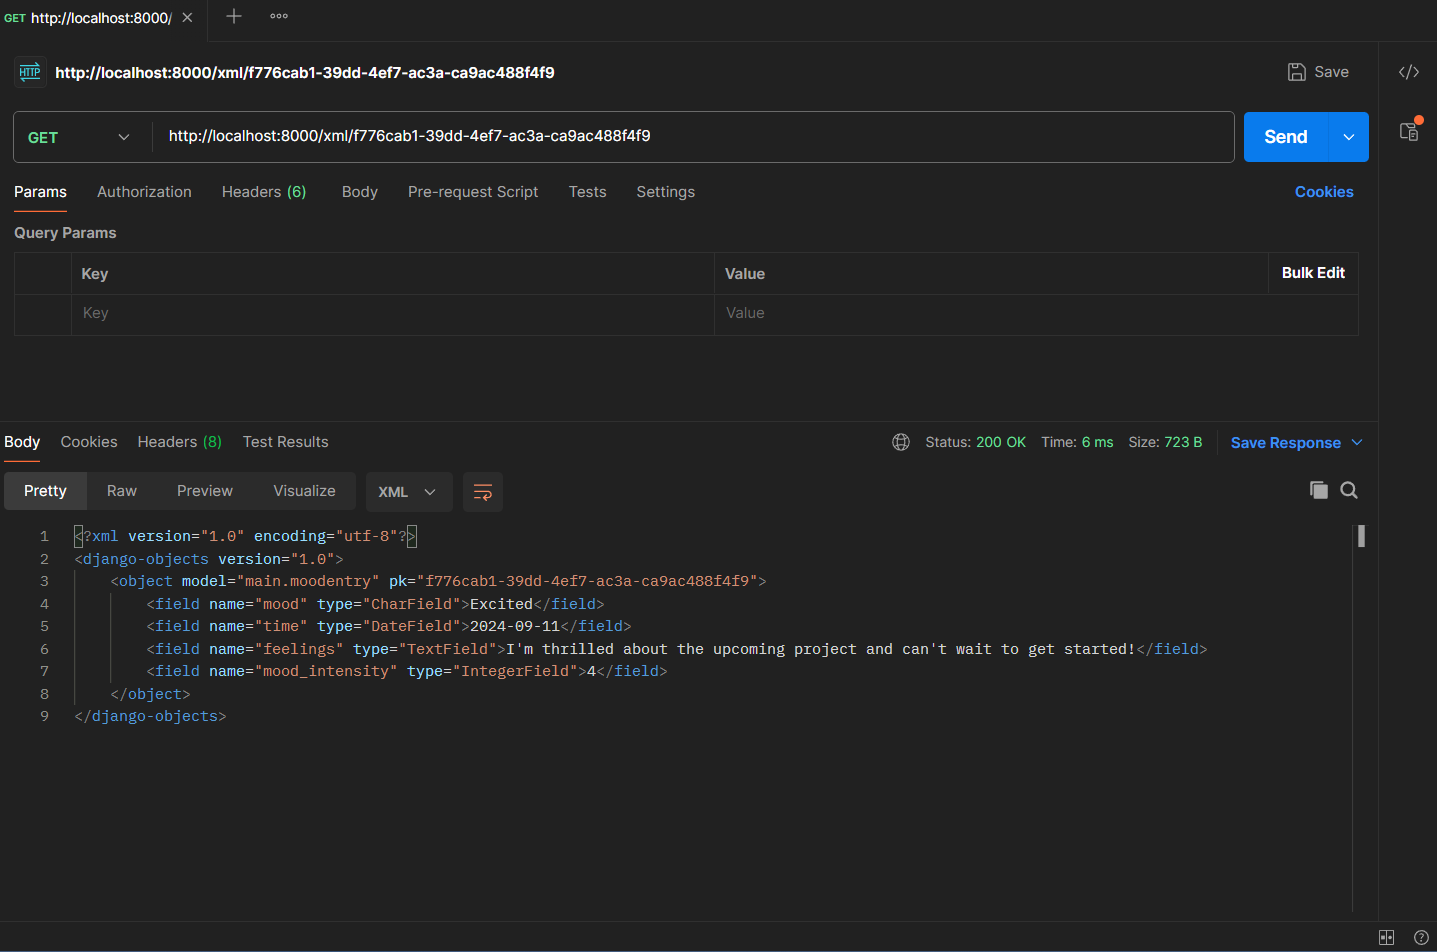
Open Postman and create a new request with the method
GETand url http://localhost:8000/xml/ or http://localhost:8000/json/ to test whether the data is sent correctly.Postman Installation Guide can be found on the Postman official website.
Example:
-
Click the
Sendbutton to send the request. -
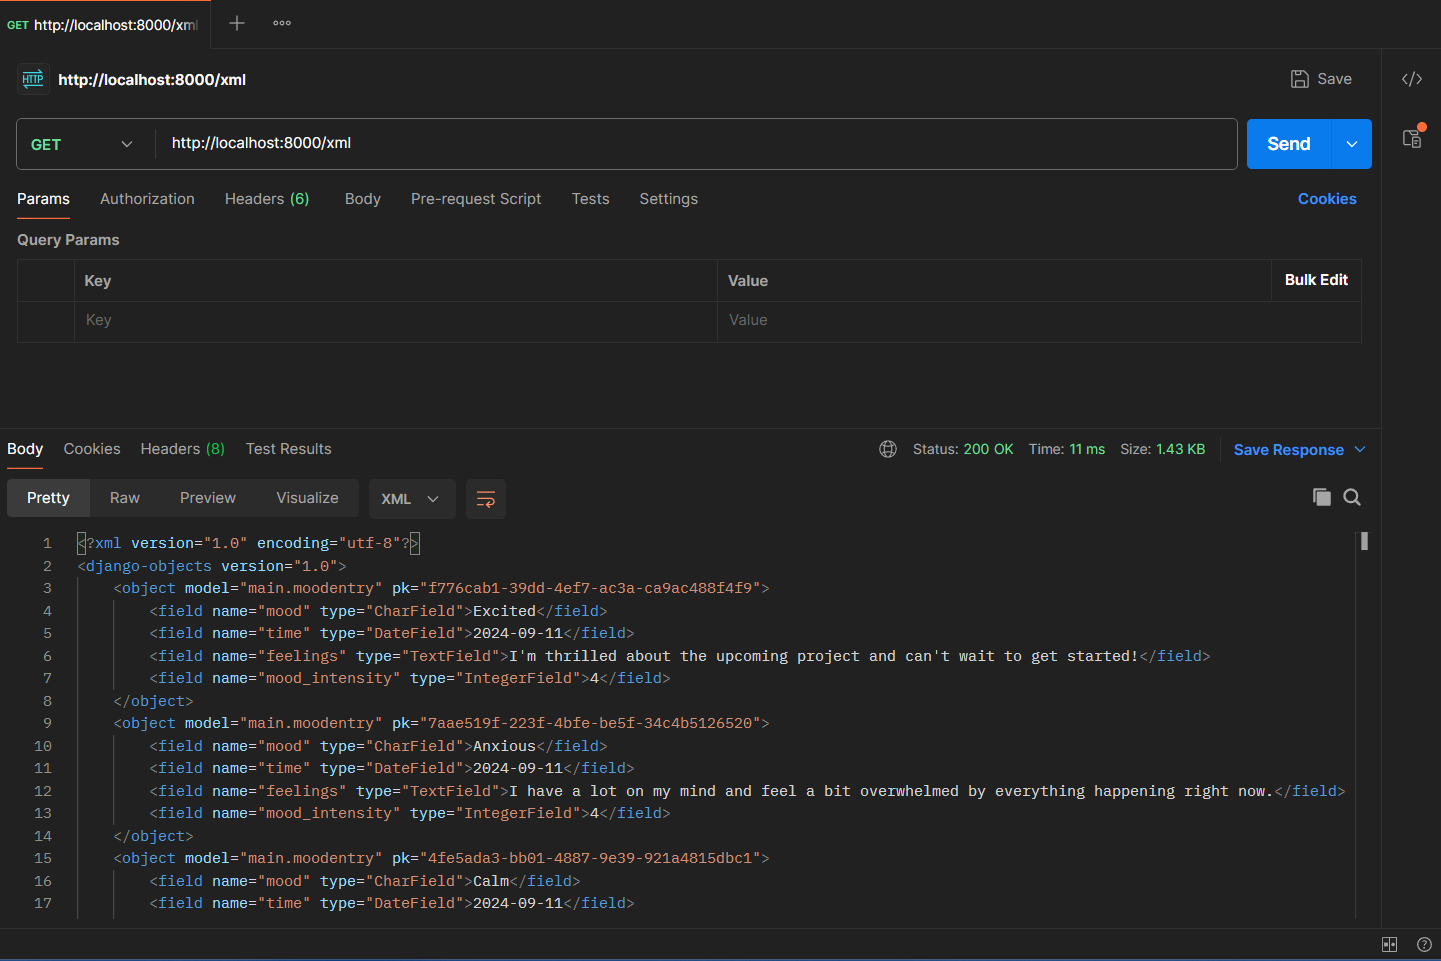
You will see the result of the response from the request in the bottom of Postman.
-
You can also change the url to http://localhost:8000/xml/[id] or http://localhost:8000/json/[id] to test the retrieval of data based on an ID.
Tutorial: Deploying to PWS Automatically With GitHub Actions
As of right now, PWS is not yet stable. You can still follow the instructions on this step, but please do note that the deployment in PWS can still fail.
On the previous tutorials, if you want to deploy to the PWS and push your changes to GitHub, you need to do two separate pushes, to GitHub (git push origin main) and to the PWS (git push pws master). On this tutorial, you will create a script that can help you deploy to the PWS and also push the changes to GitHub with only one push command. You only need to do the steps below carefully.
-
On the root directory of your Django project, create a subdirectory named
.github. In that subdirectory, create another subdirectory namedworkflows. Enter that directory (.github/workflows/). -
Create a file named
deploy.yml. Fill the files with the code below.name: Push to PWS
on:
push:
branches: [ main ]
paths-ignore:
- '**.md'
pull_request:
branches: [ main ]
paths-ignore:
- '**.md'
jobs:
build-and-push:
runs-on: ubuntu-latest
steps:
- name: Checkout code
uses: actions/checkout@v2
with:
fetch-depth: 0
- name: Set up Git
run: |
git config --global user.name 'github-actions[bot]'
git config --global user.email 'github-actions[bot]@users.noreply.github.com'
- name: Check PWS remote, pull, merge, and push
env:
PWS_URL: ${{ secrets.PWS_URL }}
run: |
# Check if master branch exists locally
if ! git show-ref --verify --quiet refs/heads/master; then
echo "Creating master branch"
git branch master
fi
# Switch to master branch
git checkout master
# Push to master branch and capture the output
push_output=$(git push $PWS_URL main:master 2>&1)
if [[ $? -ne 0 ]]; then
echo "Push failed with output: $push_output"
echo "Error: Unable to push changes. Please check the error message above and resolve any conflicts manually."
exit 1
fi
echo "Push successful with output: $push_output"warningDo not push this code yet.
-
On your GitHub repository, go to Settings > Secrets and variables > Actions. You will be directed to a page with this interface.
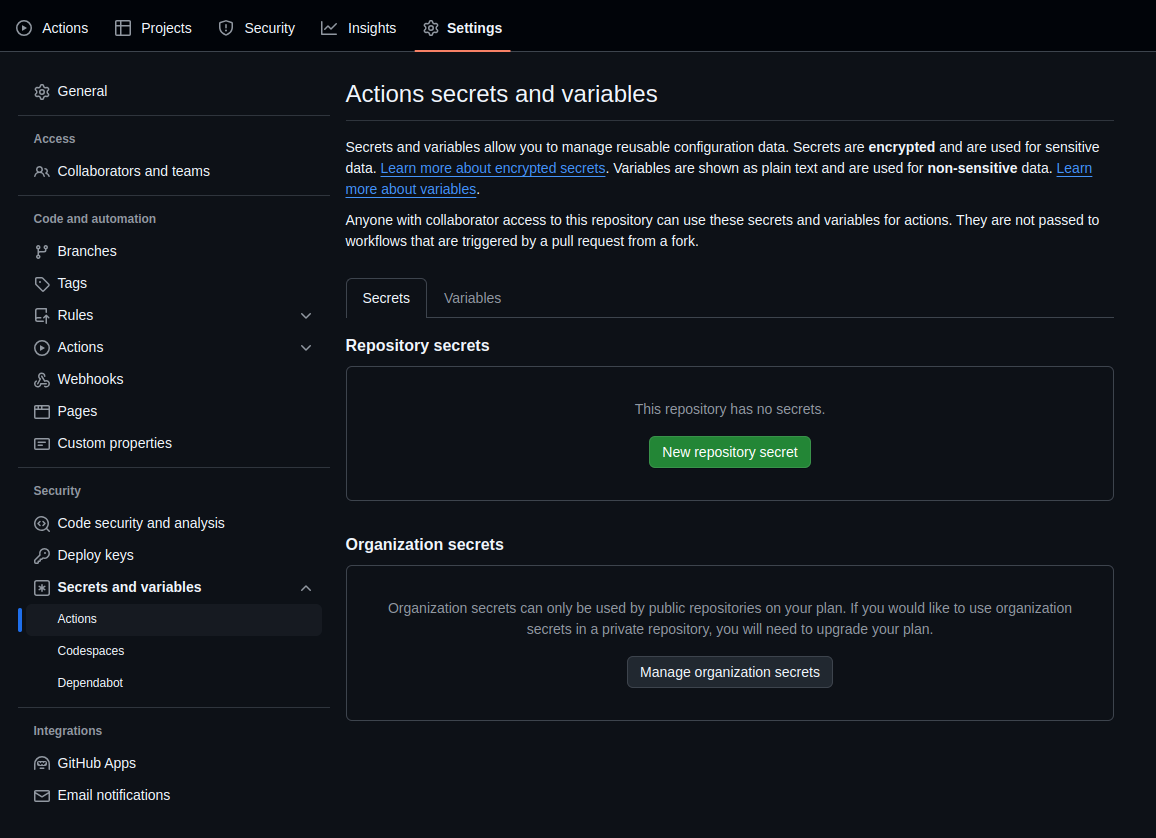
Press
New repository secretto add a secret variable on your repository. -
Fill in
NamewithPWS_URL. Then, fill theSecretwith data using this formathttps://
<sso.username>:<PWS project password>@pbp.cs.ui.ac.id/<sso.username>/<project name>
For example, if your SSO username is hanni.pham, your project password is abcd1234, and your project name is supernatural, then you need to fill your Secret as shown here:
https://hanni.pham:abcd1234@pbp.cs.ui.ac.id/hanni.pham/supernatural
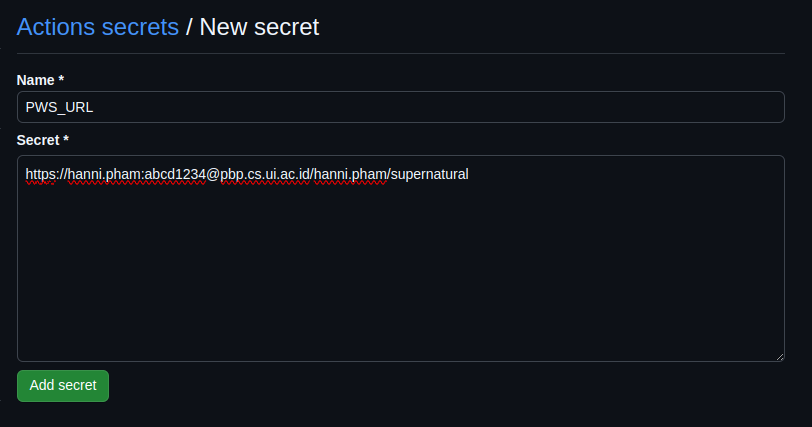
If you are sure that the URL that you wrote is correct, press Add Secret to add the repository secret.
-
On the
settings.pyfile on your project, add this line of code to the bottom-most of the file.CSRF_TRUSTED_ORIGINS = ["http://localhost","http://127.0.0.1","http://<YOUR_PWS_URL>", "https://<YOUR_PWS_URL>"]Make sure to replace
<YOUR_PWS_URL>to the deployment URL of your PWS project. -
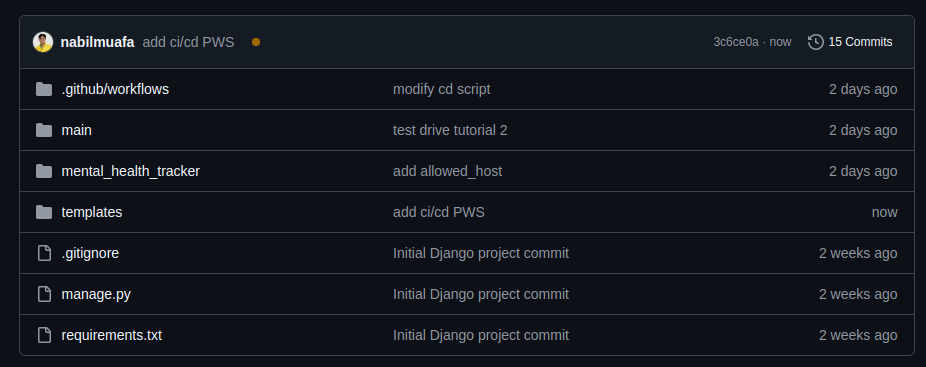
Do git add, commit, and push to GitHub. After that, open your repository page. Wait for a moment, and you should see a yellow indicator next to your commit message.
-
After the yellow indicator turns to a green checkmark, you can check your project page on PWS. There should be a new deployment that is building.
tipIf the indicator turns to a red cross, that could mean there are some steps that you did not do correctly. If you have checked your
deploy.ymlfile is correct, you can try to re-add the repository secret on step 4.
After adding this script, you don't need to do git push pws master every time you want to deploy to the PWS. Now, every time you push to GitHub on the main branch, GitHub Actions will automatically push your project to PWS according to the last commit that you have pushed, therefore triggering a build process on your PWS project.
Conclusion
-
After completing this tutorial, the web page you should see should look like this.

-
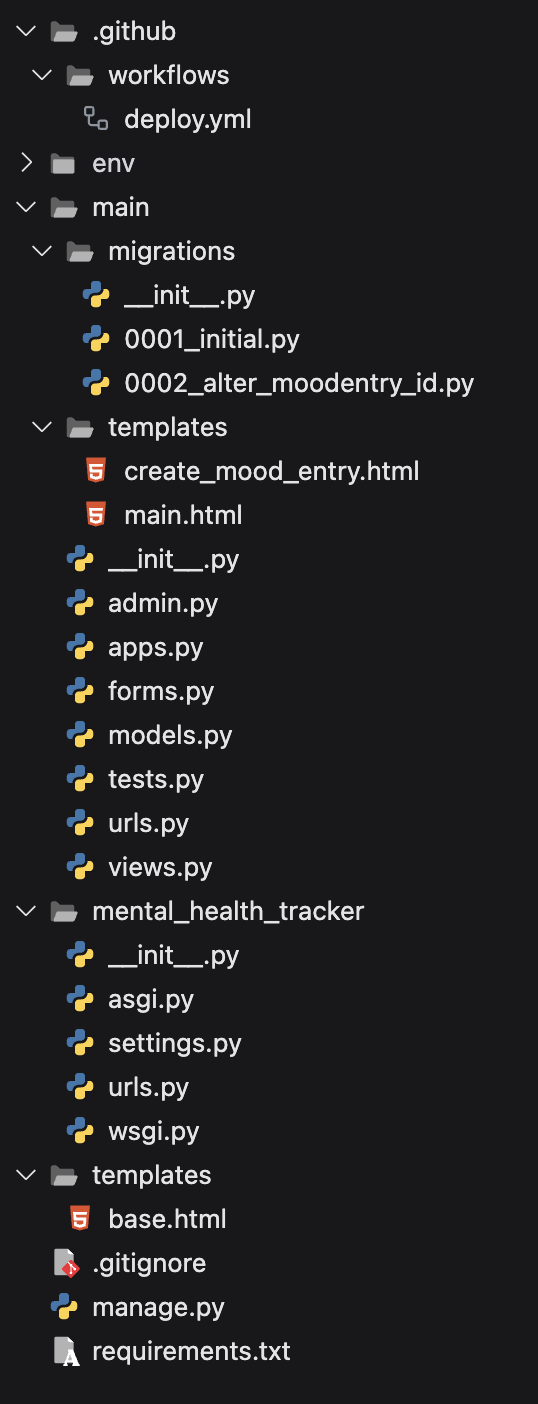
At the end of this tutorial, the local directory structure should look like this.
-
Before performing this step, ensure that the local directory structure is correct. Then, perform
add,commit, andpushto update the GitHub repository. -
Run the following command to perform
add,commit, andpush.git add .
git commit -m "<commit_message>"
git push -u origin <main_branch>- Change
<commit_message>according to your preference. Example:git commit -m "finished tutorial 2". - Change
<main_branch>according to the name of the main branch. Example:git push -u origin mainorgit push -u origin master.
- Change
Additional Reference
Contributors
- Martin Marcelino Tarigan
- Sabrina Atha Shania
- Muhammad Daffa'I Rafi Prasetyo
- Resanda Dezca Asyam
- Muhammad Nabil Mu'afa
- Muhammad Oka (EN Translation)
Credits
This tutorial was developed based on PBP Odd 2024 and PBP Even 2024 written by the 2024 Platform-Based Programming Teaching Team. All tutorials and instructions included in this repository are designed so that students who are taking Platform-Based Programming courses can complete the tutorials during lab sessions.