Tutorial 0: Git and Django Configuration and Installation
Platform-Based Programming (CSGE602022) — organized by Faculty of Computer Science, University of Indonesia, Odd Semester 2025/2026
Last updated: August 27th, 09:00 AM WIB
Learning Objectives
After completing this tutorial, students are expected to be able to:
- Understand basic Git commands needed for working on application projects.
- Create local and remote Git repositories (GitHub).
- Add remotes between local Git repositories and remote repositories on GitHub.
- Understand Git branching and be able to perform merge requests/pull requests.
- Understand the concept and implementation of environment variables.
- Deploy Django projects to PWS.
Tutorial: Creating a GitHub Account (Skip If Already Have One)
Introduction to Git and GitHub
This initial introduction will help you understand the basics of Git and the web-based git hosting platform known as GitHub.
Git: Version Control System for Codebase
- Git is a version control system that helps you track changes to your project's source code.
- With Git, you can monitor all revisions that have been made to your project over time.
GitHub: Collaboration Platform Using Git
- GitHub is a web-based platform that allows you to store, manage, and collaborate on projects using Git.
- It provides a secure container for hosting your projects and interacting with team members through Git.
Why Is It Important?
- Git and GitHub play important roles in modern software development and team collaboration.
- Both allow teams to track code changes, store versions, and work together on projects efficiently.
With a basic understanding of Git and GitHub, you're ready to go further into the world of collaborative and structured software development.
Step 1: Creating an Account on GitHub
The next step is to create an account on GitHub, which will enable you to start collaborating on projects using Git.
-
Open the GitHub Website
- Open a web browser and access GitHub.
-
Create an Account
- On the GitHub homepage, look for the Sign up button in the upper right corner of the page.
- Click that button to start the account registration process.
-
Fill in the Registration Form
- Fill in the registration form with the required information, such as the username you want to use, a valid email address, and a secure password.
- Make sure you store this information securely for logging into your account in the future.
-
Verify Account Through Email
- After filling in the form, GitHub will send a verification email to the email address you provided.
- Open that email and follow the instructions to verify your account.
-
GitHub Account Ready to Use
- After verification is complete, you will have a GitHub account ready to use for collaborating on projects and tracking changes using Git.
- A GitHub account is the gateway that helps you collaborate on projects and store your projects on this platform.
- Make sure the registration information you provide is accurate and secure.
- If you're confused, you can follow the tutorial at this link.
Congratulations, You Have Created a GitHub Account
You now have a GitHub account that can be used to store projects, collaborate with others, and much more.
Tutorial: IDE Installation
IDE (Integrated Development Environment) is software that helps developers write, edit, and manage code. Here are the steps to install an IDE.
Step 1: Choosing a Text Editor or IDE
Choose a text editor or IDE that suits your preferences. Some popular options you can consider include:
Step 2: Installation Process
- Go to the official website of the IDE you chose.
- Follow the instructions provided to download the IDE installer.
- Run the installer and follow the on-screen instructions to complete the installation process.
Step 3: Starting to Use the IDE
- After the installation process is complete, open the installed IDE.
- Explore the interface and features provided by the IDE to help you in project development.
- Make sure you choose an IDE that suits the type of project you will be working on.
- Don't hesitate to explore IDE features (examples: extensions or plugins) and utilize supporting resources, such as documentation and tutorials, to increase productivity in software development.
Tutorial: Git Installation and Configuration
Step 1: Installing Git
If Git is not yet installed on your system, you can follow these steps to install it.
- Open the official Git website here.
- Select the appropriate operating system (Windows, macOS, or Linux) and download the appropriate installer.
- Run the downloaded installer and follow the on-screen instructions to complete the installation process.
- As an addition, don't forget to check "Git Credential Manager Core" to ease Git integration with GitHub.

Step 2: Initial Git Configuration
After Git is installed, the following steps will help you set up the initial configuration before starting to use Git.
- Create a new folder/directory to store your Git project, then enter that directory.
- Copy the path to the directory you created.
- Open the terminal or command prompt on your system, then move to the directory you created by running the command
cd <directory_path> - Initialize a new repository with the
git initcommand. This command will create an empty Git repository inside the directory you specified.
Step 3: Configuring Username and Email
Before starting to contribute to the repository, configure your username and email address to be associated with your commits.
Set the username and email that will be associated with your work to this Git repository by running the commands below. Adjust with the username and email you use on GitHub.
git config --global user.name "<NAME>"
git config --global user.email "<EMAIL>"
Example:
git config --global user.name "pakbepe"
git config --global user.email "pak.bepe@cs.ui.ac.id"
Note that the --global flag will change the global configuration for the entire system. What global configuration means is you're telling Git: "Whenever I use Git on this computer, consider my name and email to always be this."
So:
--global = applies to all Git projects you open on that computer.
- Make sure to replace
<NAME>and<EMAIL>with your personal information - If you only need internal configuration you only need to use this code
git config user.name "<NAME>"
git config user.email "<EMAIL>"
Example:
git config user.name "pakbepe"
git config user.email "pak.bepe@cs.ui.ac.id"
- Internal configuration means the name and email you use for login only applies to the current Git project you're working on. So only for the Git folder you're currently active in (for example: 1 project only).
Step 4: Authentication Configuration
To later connect your Git account with your GitHub account, there are extra configurations you need to add. You just need to run both commands below:
Windows
git credential-manager configure
git config --global credential.credentialStore wincredman
Unix (macOS, Linux)
git credential-manager configure
git config --global credential.credentialStore keychain
- If the
git credential-managercommand cannot be executed, you can try thegit-credential-managerorgit-credential-manager-corecommand. - On macOS, if both commands don't work, you can try downloading git credential manager using Homebrew with the command
brew install git-credential-manager-core. - If macOS doesn't have Homebrew, you can download it by following the instructions from this website.
Step 5: Configuration Verification
To ensure the configuration has been set correctly in the local repository, you can run the following command.
git config --list
Tutorial: Basic Git Usage
A repository is a storage place for software projects, which includes all revisions and changes that have been made to the code. To execute Git commands, you can do so on repositories on GitHub, a collaborative platform for managing projects using Git.
You need to know that this basic Git usage tutorial will not be submitted and is only for practice. The file you will submit is only the Django project, the steps for creating which are also included in this tutorial.
Step 1: Initiating a Repository on GitHub
The first step in using Git is to initiate a repository on GitHub to start tracking changes to your project.
-
Open GitHub through a web browser.
-
Create a New Repository
- On the GitHub homepage, create a new repository named
my-first-repo. - Open the page of the repository you just created. Make sure to set the project visibility as "Public" and leave other settings at default values.
- On the GitHub homepage, create a new repository named
-
Determine Local Directory
- Choose a local directory on your computer that has been initialized with Git. This is where you will store the local version of your project.
-
Add README.md File
- Create a new file named
README.mdin your project's local directory. - Fill the README.md file with information such as name, student ID, and class. Example:
Name: Pak Bepe
Student ID: 2401234567
Class: PBP A - Create a new file named
-
Check Status and Perform Tracking
- Open command prompt or terminal, then run
git statusin the directory you have chosen. This command will display files that are not yet tracked (untracked). - Use the
git add README.mdcommand to mark the README.md file as a file to be committed (tracked).
- Open command prompt or terminal, then run
-
Commit Changes
- Run
git statusagain and make sure the README.md file is already marked as a file to be committed. - Continue by running
git commit -m "<YOUR COMMENT>"to create a commit with a comment message appropriate to the changes you made.
- Run
This step will prepare you to start tracking changes to your project using Git.
- Good practice in giving commit comments is to briefly explain what you did. Generally, commit comments are written in English. One example of a commit comment you can use for the example above is
Create README.md file. - Good commit comments can help you and your team members understand the purpose of those changes.
- Avoid comments that are too general or ambiguous, such as
Fix bugsorUpdate file.
Step 2: Connecting Local Repository with Repository on GitHub
After initiating a local repository, the next step is to connect it with a repository on GitHub so you can collaborate and store changes on that online platform.
-
Create New Main Branch
- In the terminal or command prompt, run the
git branch -M maincommand to create a new main branch named "main". - Make sure the letter "M" in the -M command is written in capital letters.
- In the terminal or command prompt, run the
-
Connect with Repository on GitHub
- Use the
git remote add <REMOTE_NAME> <REPO_URL>command to connect the local repository with the repository on GitHub. <REMOTE_NAME>is the name you will use to reference that remote repository. By convention, the nameoriginis used for the main/primary repository.<REPO_URL>is the HTTPS URL of the repository you created on GitHub.- You can get this repository URL on the GitHub page when you successfully create a new repository on GitHub.
Usage example:
git remote add origin https://github.com/pakbepe/test.gitIn the example above:
- origin = remote name (can be replaced with another name if desired)
- https://github.com/pakbepe/test.git = GitHub repository URL
Additional Tips:
- To see the list of remotes that have been added:
git remote -v - To remove remote:
git remote remove <REMOTE_NAME> - To change remote URL:
git remote set-url <REMOTE_NAME> <NEW_URL>
- Use the
-
Perform First Save to GitHub
- Finally, perform the first save to GitHub by running the
git push -u origin maincommand. - This command will send all changes in the current branch (in this case the main branch) in the local repository to the main branch in the GitHub repository.
- If this is your first time pushing to GitHub and you're using Windows OS, after installation, a window should appear asking you to sign in to GitHub. Click "Sign in with your browser", then follow the instructions in that window.
- Finally, perform the first save to GitHub by running the
-
Perform Re-checking
- Refresh your repository page, your README.md file should now be visible.
- This step is important to maintain consistency between local repositories and repositories on GitHub.
- This process allows you to start collaborating and storing project changes in a structured way on the GitHub platform.
- README.md is a file that contains a brief explanation of the project, such as its purpose, how to run it, and its main features, so that others can easily understand and use the project.
- More information about git master / main and its branching can be seen here.
Step 3: Cloning a Repository
Cloning a repository is the process of duplicating the entire content from a repository on GitHub to a local computer so it can be viewed, edited, and run offline on your computer. The steps are as follows.
-
Open the repository page on GitHub that you created earlier.
-
Copy Clone URL
- Click the Code button in the upper right corner of the repository page on GitHub.
- Choose the HTTPS option to copy the clone URL.
-
Clone Repository to Local Computer
- Open terminal or command prompt in a directory different from where your previous local repository was.
- Run the
git clone <CLONE_URL>command (replace CLONE_URL with the URL you copied). - This command will duplicate the entire repository to your local computer.
Currently, you have three repositories:
- Original repository on local computer.
- Online repository on GitHub connected to the local repository.
- New repository resulting from the cloning process connected to the GitHub repository.
This step allows you to work with repositories in various places easily.
Step 4: Branching on a Repository
At this stage you will learn about using branches in Git. Using branches allows you to develop features or fix bugs in a separate environment before merging them back to the main branch.
What Is a Branch in Git?
- A branch in Git is a separate branch of source code that allows independent development of features or changes.
- This allows teams to work on features or bug fixes without disturbing the existing code in the main branch.
-
Creating and Switching to New Branch
- In the original local repository directory (not the clone), run the
git checkout -b <BRANCH_NAME>command in terminal or command prompt to create and switch to a new branch. Example:git checkout -b major_branch - Add a major attribute to the README.md file. Example:
Name: Pak Bepe
Student ID: 2401234567
Class: PBP A
Hobby: Sleeping
Major: Computer Science Information Systems - In the original local repository directory (not the clone), run the
-
Save Changes and Push to GitHub
- After adding the major attribute, save that file.
- Perform add, commit, and push to GitHub by running the commands you have mastered before.
- Run the
git push -u origin <BRANCH_NAME>command. Make sure to replace<BRANCH_NAME>according to the name of the new branch that has been created.
-
Merge Branches Using Pull Request
- Open your repository page on GitHub again.
- Automatically, a pop-up with the Compare & pull request button will appear. If not, the alternative is to press the Pull Request button and then select the New pull request option.
- After that, GitHub will compare the changes in both branches that want to be merged.
- If there are no conflicts, press the Merge pull request button which will merge changes from the branch you want to merge into the main branch (main).
- If there are conflicts, you must look at the file that is usually red in your text editor and resolve the conflict by choosing merge or one of them according to needs before approving the Merge pull request.
- By doing the steps above, all changes from both branches will be integrated into the main branch, creating unity between those changes.
- If you want to switch between existing branches, run
git checkout <BRANCH_NAME>in terminal. The-bflag in the previous commands is used to create a new branch and switch to that branch in one step. - Conflicts occur when changes made on one branch collide with changes made on another branch. For example, if two developers change the same part of the same file at the same time, Git cannot automatically decide which changes should be applied.
- If there are conflicts or changes that collide with each other, this platform will ask you to determine which changes should be taken.
- Important to understand the concept of branching in Git, because this allows organized and separate development, before all changes are combined back into the main code.
Tutorial: Django Installation and Django Project Initialization
Django is a popular framework for developing web applications using the Python programming language. In this tutorial, you will learn the steps to install Django and initialize a demo project as a starter.
This Django project must be created in a folder that will be referred to as a directory different from my-first-repo as taught in the previous steps. Make sure you have changed directories in the terminal and are no longer inside my-first-repo.
To change directories please use this code
cd ~
mkdir <NEW_FOLDER_NAME>
cd <NEW_FOLDER_NAME>
Notes:
- mkdir functions to create a new folder
- cd functions to change folders
- cd ~ functions to change to the main folder on your computer
Step 1: Creating Directory and Activating Virtual Environment
-
Create a new directory named
football-newsand enter it. -
Inside that directory, open command prompt (Windows) or terminal shell (Unix).
-
Create a virtual environment by running the following command.
Windows:
python -m venv envUnix (macOS, Linux):
python3 -m venv env -
This virtual environment is useful for isolating packages and dependencies from applications so they don't clash with other versions on your computer. You can activate the virtual environment with the following command.
- Windows:
env\Scripts\activate- Unix (Mac/Linux):
source env/bin/activatetipFor Windows users, if you experience problems with words PSSecurityException, UnauthorizedAccess, running scripts is disabled on this system, do the following steps.
- Open PowerShell with administrator access.
- Run the
Set-ExecutionPolicy Unrestricted -Forcecommand. - Please try again to activate the virtual environment in your terminal.
-
The virtual environment will be active and marked with (env) in the terminal input line.
Step 2: Preparing Dependencies and Creating Django Project
Dependencies are components or modules required by software to function, including libraries, frameworks, or packages. This allows developers to utilize existing code, speeding up development, but also requires careful management to ensure proper version compatibility. Using virtual environments helps isolate dependencies between different projects.
-
In the same directory, create a requirements.txt file and add some dependencies.
django
gunicorn
whitenoise
psycopg2-binary
requests
urllib3
python-dotenv -
Install the existing dependencies with the following command. Don't forget to run the virtual environment first before running the following command.
pip install -r requirements.txt -
Create a Django project named
football_newswith the following command.django-admin startproject football_news .warningMake sure the . character is written at the end of the command.
Step 3: Environment Variables and Project Configuration
-
Create a .env file in the root project directory (where the manage.py file is located).

-
Open the .env file and add the following configuration:
PRODUCTION=FalseEnvironment variables are variables stored outside the program code and used to store configuration information such as database credentials, API keys, or environment settings. This allows the same code to run in different environments without needing to change the code.
-
Also create a .env.prod file in the same directory for production configuration:
DB_NAME=<database name>
DB_HOST=<database host>
DB_PORT=<database port>
DB_USER=<database username>
DB_PASSWORD=<database password>
SCHEMA=tutorial
PRODUCTION=True
Difference between .env and .env.prod:
- .env: Used for local development. Because PRODUCTION=False, the application will use a simpler SQLite database for testing and development
- .env.prod: Used for production deployment. Because PRODUCTION=True, the application will use PostgreSQL database with credentials provided by ITF Fasilkom UI
Database credentials for variables DB_NAME, DB_HOST, DB_PORT, DB_USER, and DB_PASSWORD can be obtained from the ITF Fasilkom UI email (noreply@cs.ui.ac.id) sent to you. These credentials will be used when deploying on PWS.
infoExplanation of each variable:
- DB_NAME: PostgreSQL database name
- DB_HOST: Database server host/address
- DB_PORT: Database connection port
- DB_USER: Username for database connection
- DB_PASSWORD: Password for database connection
- SCHEMA: Database schema name. ITF provides 3 schemas: tutorial, tugas_individu, and tugas_kelompok. For this tutorial we use tutorial, for other assignments adjust according to the required schema
- PRODUCTION: Determines application mode (False = development with SQLite, True = production with PostgreSQL)
Example .env.prod configuration:
DB_NAME=d1a2b3c4d5e6f7
DB_HOST=192.168.1.100
DB_PORT=5432
DB_USER=postgres
DB_PASSWORD=ABCdef123456
SCHEMA=tutorial
PRODUCTION=True -
Modify the settings.py file to use environment variables. Add the following code at the top of the file (after import Path):
import os
from dotenv import load_dotenv
# Load environment variables from .env file
load_dotenv() -
Add both strings below to ALLOWED_HOSTS in settings.py for development purposes:
...
ALLOWED_HOSTS = ["localhost", "127.0.0.1"]
...
In the context of deployment, ALLOWED_HOSTS functions as a list of hosts allowed to access the web application. By setting the above values, you allow access from local hosts, meaning it can only be accessed from your network only. However, if you deploy the application to a server, make sure you add the host from that server to ALLOWED_HOSTS.
-
Add the
PRODUCTIONconfiguration right above theDEBUGcode insettings.py.PRODUCTION = os.getenv('PRODUCTION', 'False').lower() == 'true' -
Change the database configuration in settings.py. Find the DATABASES section and replace with:
# Database configuration
if PRODUCTION:
    # Production: use PostgreSQL with credentials from environment variables
    DATABASES = {
        'default': {
            'ENGINE': 'django.db.backends.postgresql',
            'NAME': os.getenv('DB_NAME'),
            'USER': os.getenv('DB_USER'),
            'PASSWORD': os.getenv('DB_PASSWORD'),
            'HOST': os.getenv('DB_HOST'),
            'PORT': os.getenv('DB_PORT'),
            'OPTIONS': {
                'options': f"-c search_path={os.getenv('SCHEMA', 'public')}"
            }
        }
    }
else:
    # Development: use SQLite
    DATABASES = {
        'default': {
            'ENGINE': 'django.db.backends.sqlite3',
            'NAME': BASE_DIR / 'db.sqlite3',
        }
    }
Step 4: Running the Server
-
Make sure the manage.py file exists in the directory currently active in your terminal. Run database migration first with the command:
- Windows:
python manage.py migrate- Unix:
python3 manage.py migrate -
After migration is complete, run the Django server with the command:
- Windows:
python manage.py runserver- Unix:
python3 manage.py runserver -
Open http://localhost:8000 in a web browser to see the rocket animation as a sign that your Django application has been successfully created.

Step 5: Stopping Server and Deactivating Virtual Environment
-
To stop the server, press
Ctrl+C(Windows/Linux) orControl+C(Mac) in the terminal. -
Deactivate the virtual environment with the command:
deactivateCongratulations! You have successfully created a Django application from scratch.
Tutorial: Upload Project to GitHub Repository
-
Create a new GitHub repository named
football-newswith public visibility. -
Initialize the local football-news directory as a Git repository.
tipRemember the previous tutorial steps. Also make sure you run the
git initcommand in the football-news directory, not outside it or in another directory inside football-news.Run the following command in the terminal:
git initThis command creates a .git folder used to track file changes locally.
-
Add
.gitignorefile- Add a
.gitignorefile and fill that file with the following text.
# Django
*.log
*.pot
*.pyc
**pycache**
db.sqlite3
media
# Backup files
*.bak
# If you are using PyCharm
# User-specific stuff
.idea/**/workspace.xml
.idea/**/tasks.xml
.idea/**/usage.statistics.xml
.idea/**/dictionaries
.idea/**/shelf
# AWS User-specific
.idea/**/aws.xml
# Generated files
.idea/**/contentModel.xml
.DS_Store
# Sensitive or high-churn files
.idea/**/dataSources/
.idea/**/dataSources.ids
.idea/**/dataSources.local.xml
.idea/**/sqlDataSources.xml
.idea/**/dynamic.xml
.idea/**/uiDesigner.xml
.idea/**/dbnavigator.xml
# Gradle
.idea/**/gradle.xml
.idea/**/libraries
# File-based project format
*.iws
# IntelliJ
out/
# JIRA plugin
atlassian-ide-plugin.xml
# Python
*.py[cod]
*$py.class
# Distribution / packaging
.Python build/
develop-eggs/
dist/
downloads/
eggs/
.eggs/
lib/
lib64/
parts/
sdist/
var/
wheels/
*.egg-info/
.installed.cfg
*.egg
*.manifest
*.spec
# Installer logs
pip-log.txt
pip-delete-this-directory.txt
# Unit test / coverage reports
htmlcov/
.tox/
.coverage
.coverage.*
.cache
.pytest_cache/
nosetests.xml
coverage.xml
*.cover
.hypothesis/
# Jupyter Notebook
.ipynb_checkpoints
# pyenv
.python-version
# celery
celerybeat-schedule.*
# SageMath parsed files
*.sage.py
# Environments
.env*
!.env.example*
.venv
env/
venv/
ENV/
env.bak/
venv.bak/
# mkdocs documentation
/site
# mypy
.mypy_cache/
# Sublime Text
*.tmlanguage.cache
*.tmPreferences.cache
*.stTheme.cache
*.sublime-workspace
*.sublime-project
# sftp configuration file
sftp-config.json
# Package control specific files Package
Control.last-run
Control.ca-list
Control.ca-bundle
Control.system-ca-bundle
GitHub.sublime-settings
# Visual Studio Code
.vscode/*
!.vscode/settings.json
!.vscode/tasks.json
!.vscode/launch.json
!.vscode/extensions.json
.history- The
.gitignorefile is a configuration file used in Git repositories to determine files and directories that should be ignored by Git. - Files listed in
.gitignorewill not be included in Git version control (not pushed to GitHub repository). - This file needs to be created because sometimes there are files that don't need to be tracked by Git, such as files generated by compilation processes, temporary files, or personal configuration files.
- Add a
-
Connect local repository with the GitHub repository that has been created.
git remote add origin https://github.com/username/football-news.gitReplace username with your GitHub username.
This command adds a remote named origin that points to your GitHub repository. By adding this remote, Git will know where to send your code when pushing.
-
Create main branch named master.
git branch -M master -
Perform add, commit, and push from the local repository directory.
git add .
git commit -m "Tutorial 0"
git push origin master
- The football-news repository you just created will be the foundation for the following tutorials. This repository will continue to be used and developed throughout the tutorials you follow.
- At the end of the semester, you will see that this tutorial repository has developed into a complete application, made by yourself. So, you might include this in your portfolio!
- Therefore, make sure you manage this repository well and follow the next tutorials to develop your skills in platform-based programming.
Tutorial: Creating Account and Deployment through PWS (Pacil Web Service)
-
Access the PWS page at https://pbp.cs.ui.ac.id. You will be directed to the login page.
-
Access the register page by clicking the Register Here button. On this page, please fill in your data as requested.
-
After the registration process is complete, you can return to the login page. Please enter the username and password you just registered, then login.
-
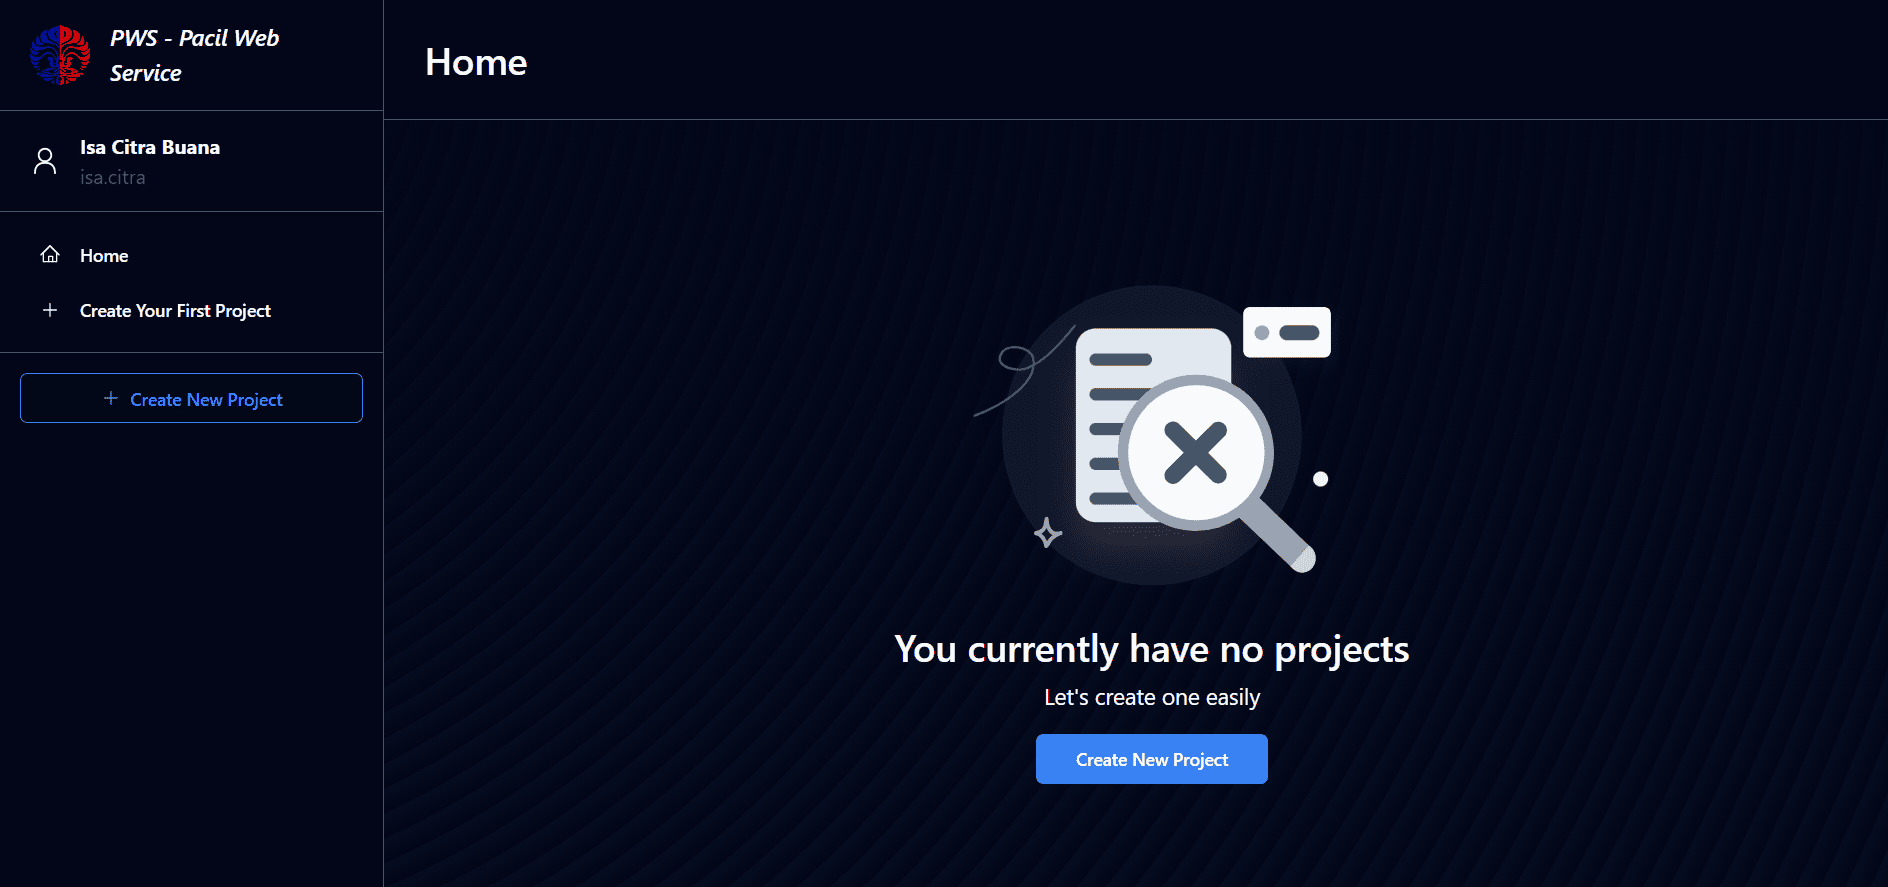
If the login process is successful, you will be directed to the home page of PWS.
-
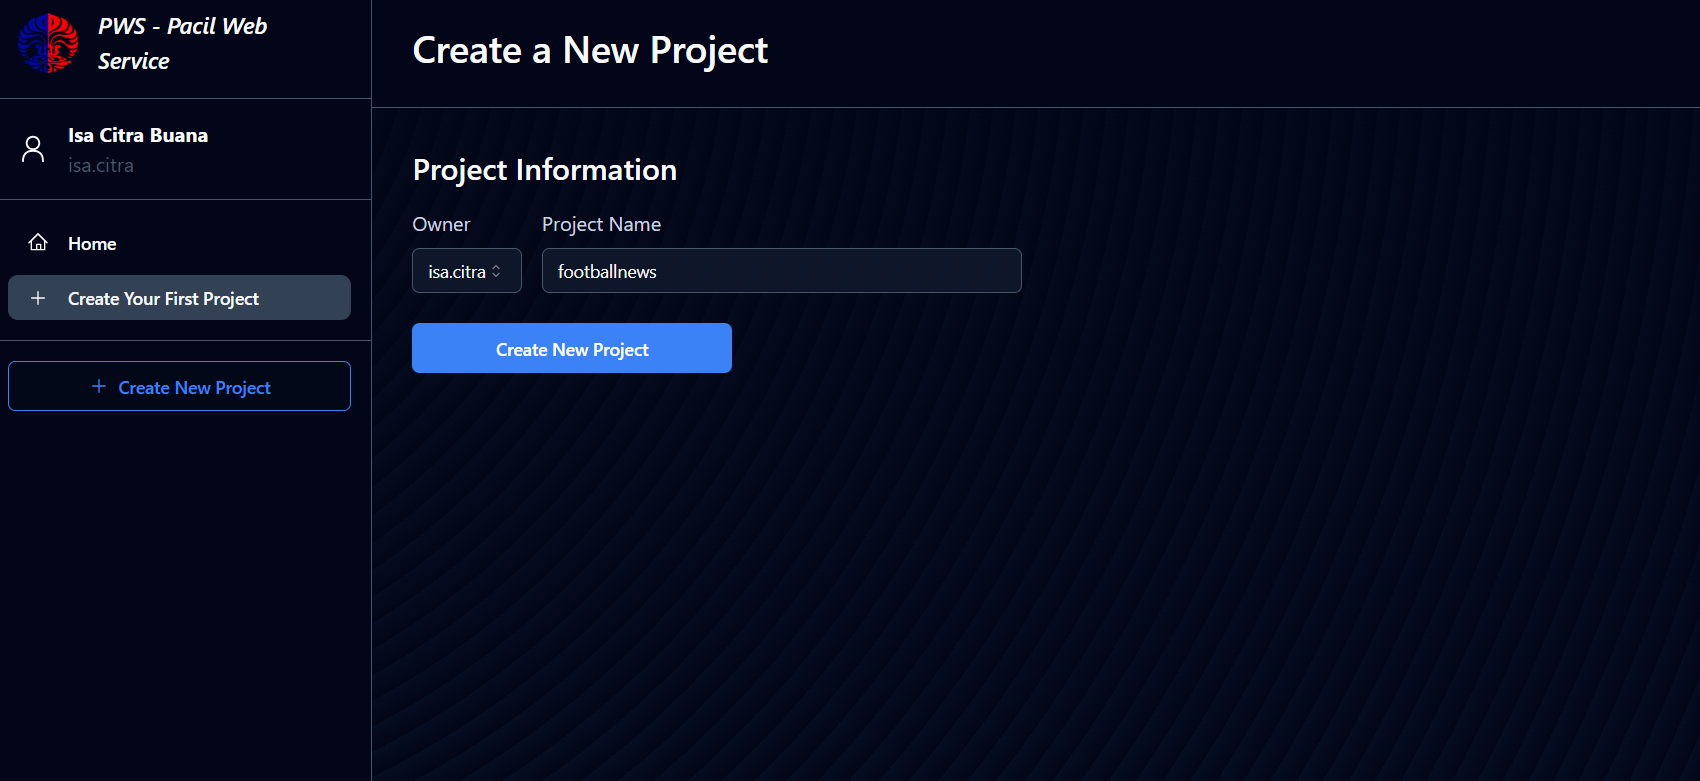
Create a new project by pressing the Create New Project button. You will be directed to the page for creating a new project. On this page, fill in Project Name with
footballnews. After that, press Create New Project below it.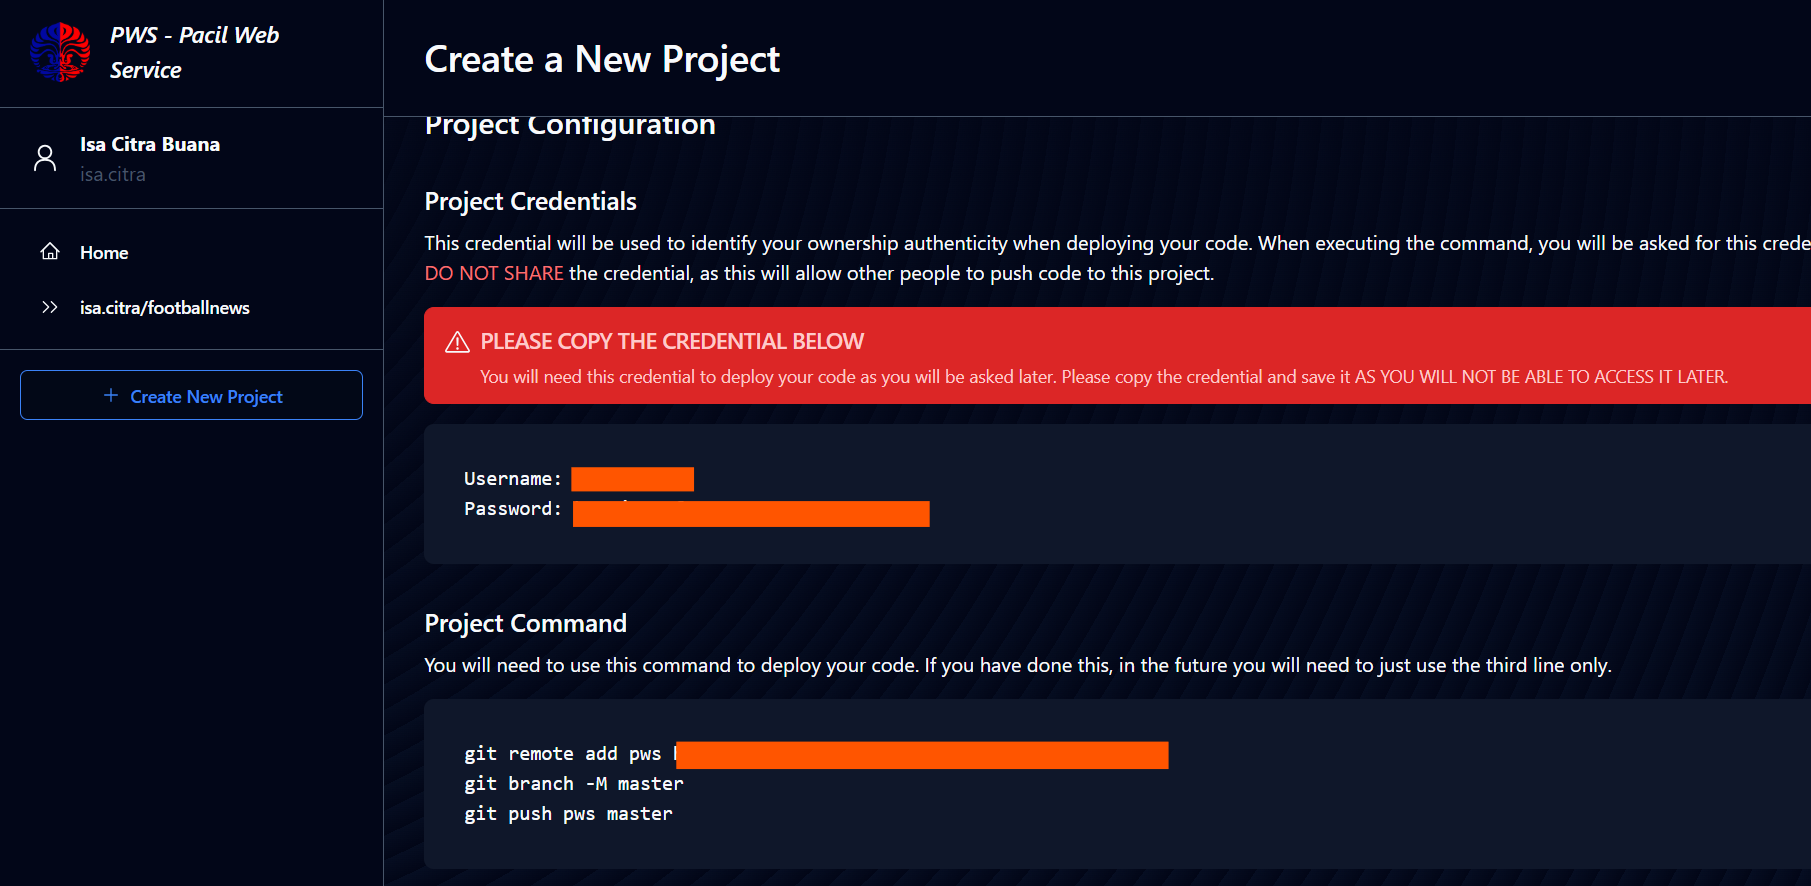 info
infoIn creating other projects later such as assignments or group projects, you can fill in Project Name with other names as you wish. However, there is a limitation that the project name must consist of alphanumeric characters only.
-
Two new pieces of information will appear, namely Project Credentials and Project Command. Save the credentials you obtained in a safe place, because henceforth these credentials will not be visible again. Don't run the Project Command instructions yet.

-
Then, on the sidebar, click the project you created. Select the Environment tab.
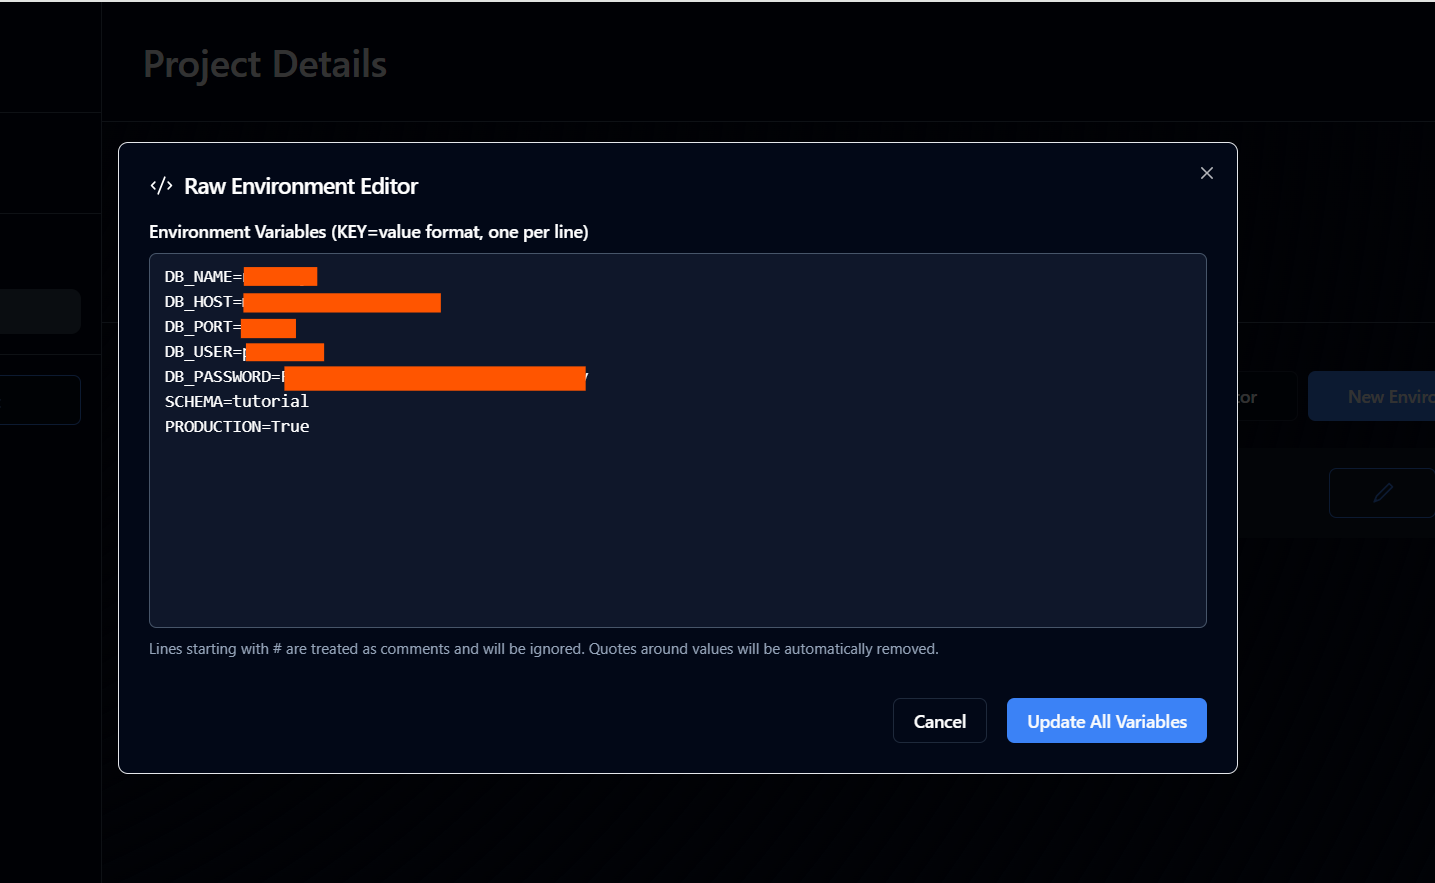 On that tab, click Raw Editor and copy paste the contents of the .env.prod file you previously created.
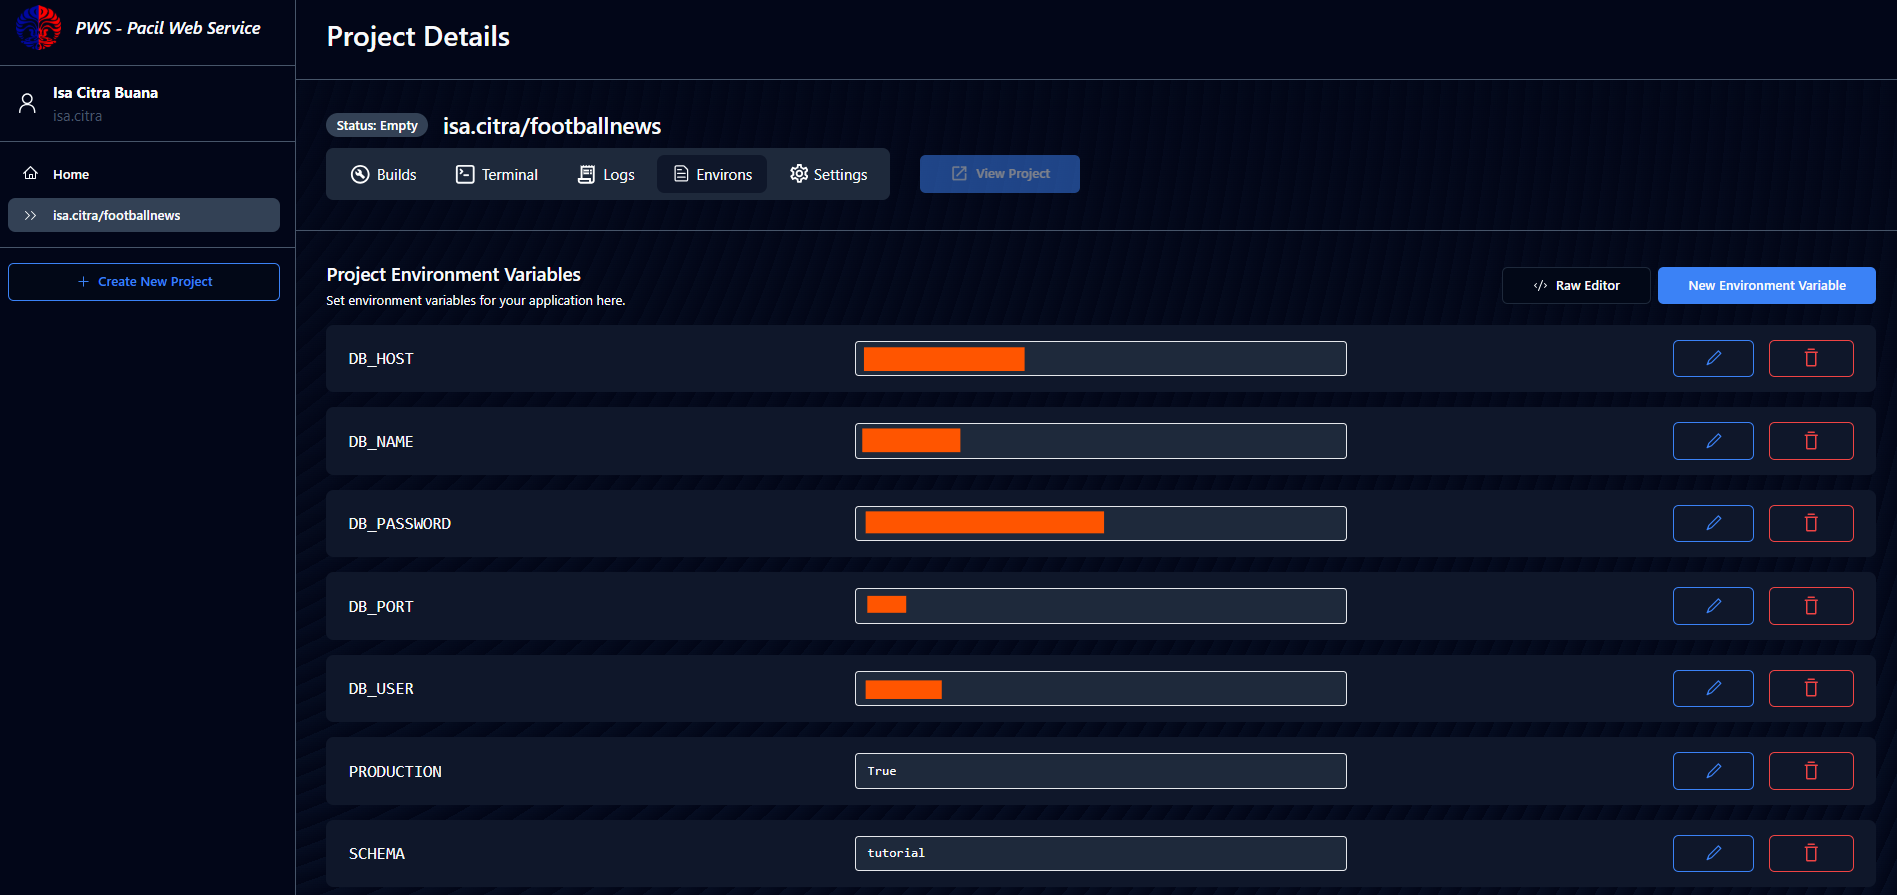 Don't forget to make sure that
 SCHEMA=tutorialandPRODUCTION=True, then click Update All Variables. Next make sure that the environment variables in your PWS project have been saved properly.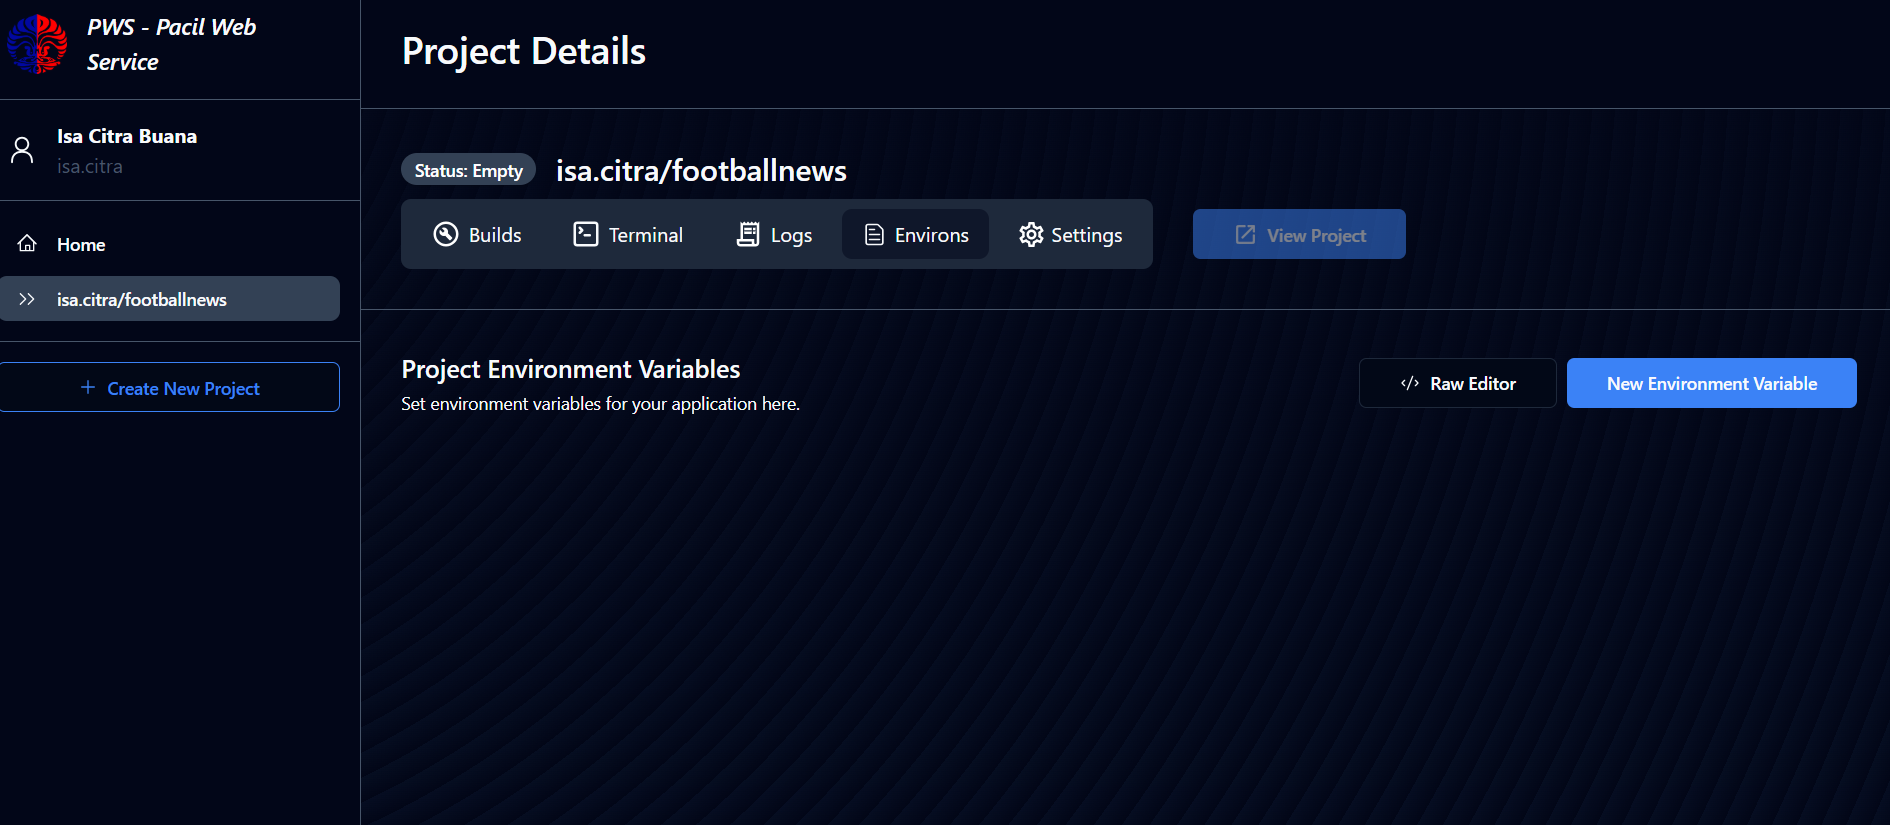
-
In the
settings.pyfile of the Django project you created earlier, add the PWS deployment URL to ALLOWED_HOSTS.infoThe PWS deployment URL has the format
<username-sso>-<project name>.pbp.cs.ui.ac.id. If there is a dot character (.) in your SSO username, replace that character with a hyphen (-). For example, if your SSO username ispak.bepe25and your project name isfootballnews, your PWS deployment URL ispak-bepe25-footballnews.pbp.cs.ui.ac.id....
ALLOWED_HOSTS = ["localhost", "127.0.0.1", "<Your PWS deployment URL>"]
...You need to do this step so that your Django project can be accessed through the PWS deployment URL. Perform
git add,commit, andpushthese changes to your GitHub repository.warningBefore you go to the next step, make sure your repository structure is the same as

-
Run the command found in the Project Command information on the PWS page. When you push to PWS, there will be a window asking for
usernameandpassword. Use the credentials you received from your tutorial project in PWS, not SSO credentials.
-
On the PWS site sidebar, click the project you created. You can see your current deployment status. If the status is
Building, it means your project is still in the deployment process. If the status isRunning, then your project can already be accessed on the deployment URL. You can press theView Projectbutton found on your project page. -
If in the future there are changes to your Django project that you want to push to PWS, you only need to run the command:
git push pws masterafter doing add and commit. You don't need to repeat the commands in the Project Command information again.
Additional: PWS Troubleshooting
Build Failed
If there are problems such as failed builds, there are several solutions you can try.
-
Try to pay attention again to the structure of your Django project files. Usually indicates that the files in your Django project are incomplete, so your Django project is not detected by PWS. There are several things you can try to check:
- Repository Contents: Make sure your repository structure is the same as the example repository display shown in step 7 in the PWS deployment tutorial section.
requirements.txtfile: Make sure the file name is exactly the same, notrequirement.txt(missing letter 's') orrequirements.txt.txt(double extension).gitignorefile: Make sure the.gitignorefile starts with a dot and has no extension at the end. Also make sure the.gitignorefile is located in the root folder along with themanage.pyfile,envdirectory,footballnewsdirectory,requirements.txtfile, hidden.gitdirectory, anddb.sqlite3database file.
tipIf you are a Windows user, check the
File name extensionsoption in Windows Explorer to see the extensions of the files you have. With this, you can do troubleshooting more easily.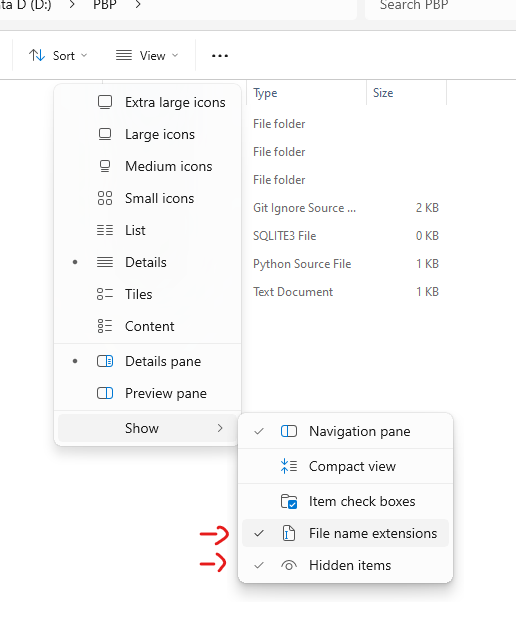
- Make sure the
envdirectory anddb.sqlite3database file are not tracked/not pushed by Git. If it has already happened, you can add a.gitignorefile, then run thegit rm --cached -r env db.sqlite3command before doingadd,commit, andpush. This needs to be done so that theenvdirectory anddb.sqlite3file are no longer tracked by Git. - If you are sure that your Django project file structure is complete but deployment still fails, make sure you push to PWS using the
masterbranch.
Not Saving Credentials
If you forget to save the credentials you got when creating a project in PWS, what you can do is regenerate the credential on the Settings tab in that project.
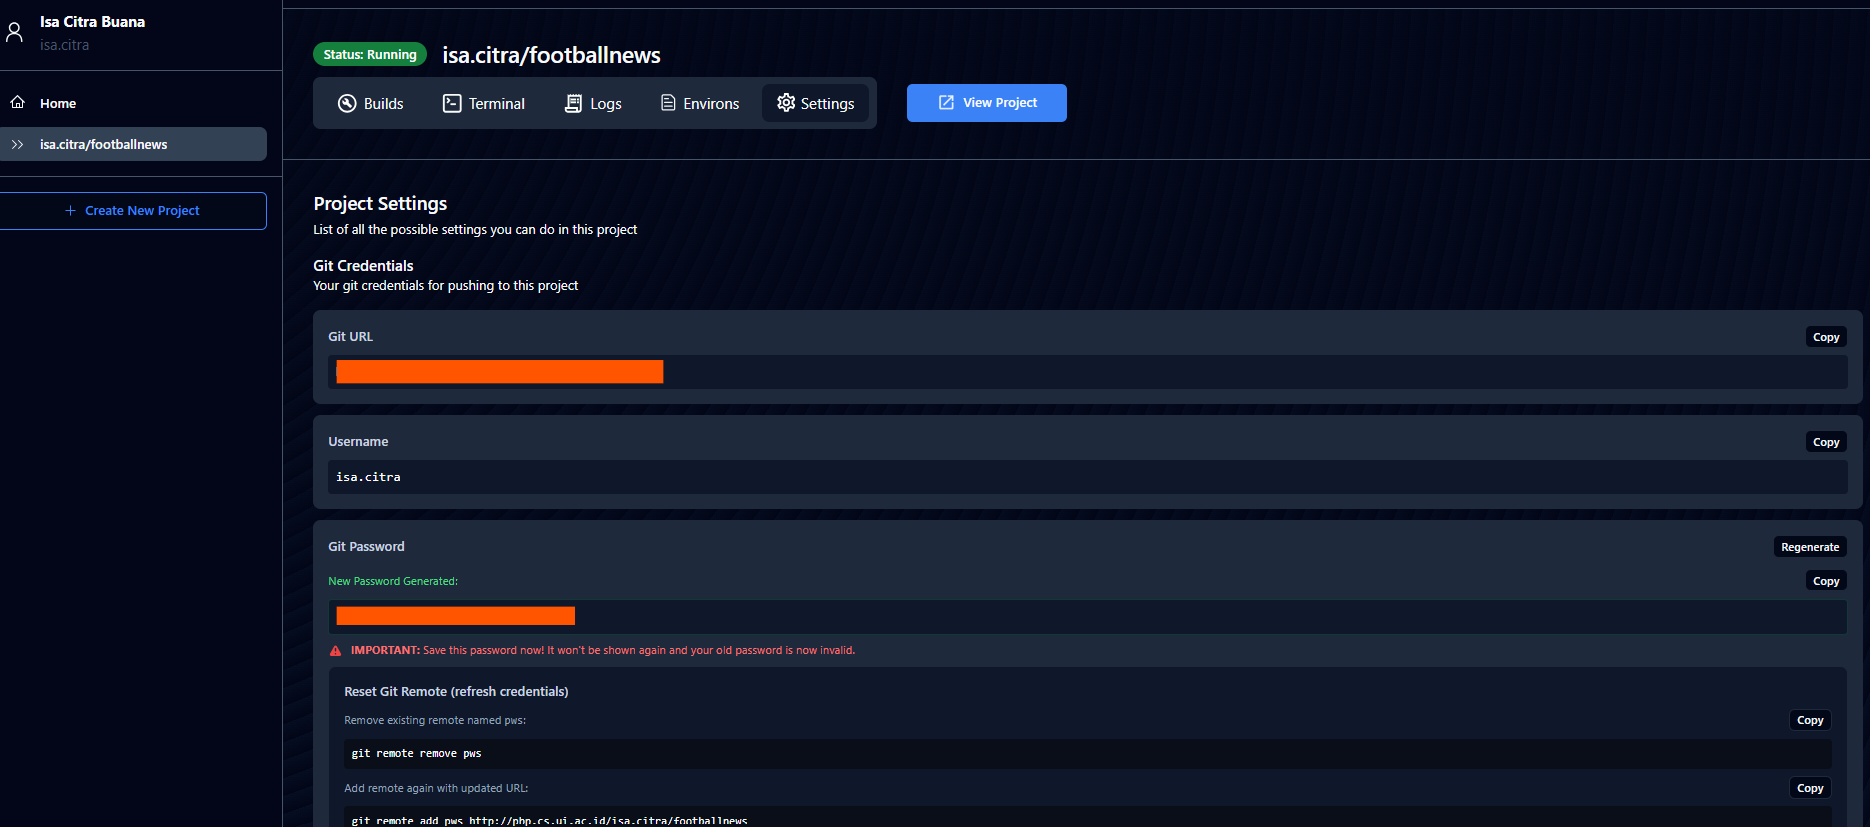
Don't forget to follow the steps explained on that tab. Another solution is to create a new project.
Changing PWS Remote URL in Local Repository
If you create a new project in PWS to overcome problems in the previous project, you need to change the remote URL in your local repository to the remote URL from the new project. If you don't change it, then the git push pws master command you will run later will not push to your new project, but will still try to push to your old project.
To change the remote URL, you just need to change the first command found in the new PWS project display. Change the git remote add pws <link> command to git remote set-url pws <link>, then run the subsequent commands as usual.
Error 502 (Bad Gateway) on web
During the first deployment, you might see a 502 (Bad Gateway) error in the browser. This is normal because PWS is running the database migration process before the application server (gunicorn) is ready to receive requests.
![]()
You can check the progress in the Logs tab on the PWS project dashboard. Wait until the Listening at log appears (usually 15-20 seconds). Since logs don't update via streaming, refresh the log page if necessary.

Error 400 (Bad Request) on web
Error 400 (Bad Request) usually occurs because your PWS deployment domain has not been added to ALLOWED_HOSTS in the settings.py file.
Final Words
Congratulations! You have completed the tutorial on using Git, GitHub, IDE installation, Django project development, and deployment to PWS!
Additional message, make sure you understand every code you write. Don't just copy-paste without understanding it first. If you experience difficulties later, don't hesitate to ask teaching assistants or friends. Keep up the spirit in taking PBP courses for the next semester, and don't forget to enjoy every process. Good luck!
Additional References
Contributors
- Marla Marlena
- Isa Citra Buana
- Regina Meilani Aruan (English Translator)
Credits
This tutorial is developed based on PBP Odd Semester 2025 and PBP Odd Semester 2024 written by the Teaching Team and Teaching Assistants of Platform-Based Programming 2025 and 2024. All tutorials and instructions listed in this repository are designed in such a way that students taking the Platform-Based Programming course can complete the tutorial during lab sessions.