Tutorial 3: Authentication, Session, Cookies and Selenium
Platform-Based Programming (CSGE602022) — conducted by Faculty of Computer Science, University of Indonesia, Odd Semester 2025/2026
Learning Objectives
After completing this tutorial, students are expected to be able to:
- Understand basic concepts of authentication in web development.
- Understand the role and function of cookies and sessions in web development.
- Understand how cookies and sessions work in web development.
- Implement cookies and sessions in web projects.
- Get an introduction to using selenium.
HTTP Introduction
HTTP (HyperText Transfer Protocol) is a protocol used for communication between client and server. HTTP is stateless, which means every transaction/activity performed is considered as a completely new transaction/activity, so no previous data is stored for the current transaction/activity.
Some basic concepts about HTTP:
-
Client/Server: Interaction occurs between client/server. The client is the party that makes requests and the server is the party that provides responses.
-
Stateless: Every activity (request/response) is independent, not stored from previous activities.
-
OSI Layer/Model: The Open Systems Interconnection (OSI) model explains 7 layers used by computer systems to communicate over networks. The 7-layer OSI model consists of Application Layer, Presentation Layer, Session Layer, Transport Layer, Network Layer, Data Link Layer, and Physical Layer.
-
Application Layer: In the OSI Model mentioned above, websites run on the application layer. Meanwhile, the request/response process occurs on the transport Layer which generally uses TCP protocol that determines how data will be sent. Application Layer doesn't care what is done by transport Layer (how data is sent, processed, etc.) because application layer only focuses on request and response.
Other OSI layers will be taught in Computer Networks/Data Communication Networks courses. You can search for it yourself if you're curious.
-
Client Actions Method: There are methods used by clients when making requests. Examples: GET, POST, PUT, DELETE, etc. More detailed explanations can be read here.
-
Server Status Code: Status codes given by the server for a request on a web page. Examples: 200 (OK), 404 (Page Not Found), 500 (Internal Server Error), etc. More detailed explanations can be read here.
-
Headers: Small information sent along with request and response. This information is useful as additional data used to process request/response. Example: In headers, there is
content-type:json. This means the content type requested/sent isjson. Headers also store cookies data.
Introduction to Cookies & Session
All communication between clients and servers is done through HTTP protocol, where HTTP is a stateless protocol. This means states are independent of each other. This requires client computers running browsers to create TCP connections to the server every time they make a request.
Without persistent connections between client and server, software on each side (endpoint) cannot rely solely on TCP connections to perform holding state or holding session state.
What is meant by holding state?
For example, you want to access a page A on a website that requires the accessor to have logged in to the web. Then you login to the web and successfully open page A. When you want to move to page B on the same web, without a holding state process you will be asked to login again. This is what will happen every time you access different pages even though they're still on the same web.
The process of telling "who" is currently logged in and storing this data is known as a form of dialog between client-server and is the basis of session - a semi-permanent exchange of information. It's difficult to make HTTP perform holding state (because HTTP is a stateless protocol). Therefore, techniques are needed to overcome this problem, namely Cookie and Session.
How to perform holding state?
One of the most widely used ways to perform holding state is by using session ID stored as a cookie on the client computer. Session ID can be considered as a token (character string) to identify unique sessions on specific web applications. Rather than storing all kinds of information as cookies on the client like username, name, and password, only the Session ID is stored.
This Session ID can then be mapped to a data structure on the web server side. In that data structure, you can store all the information you need. This approach is much safer for storing user information, rather than storing it in cookies. This way, information cannot be misused by clients or suspicious connections.
Additionally, this approach is more "appropriate" if there's a lot of data to be stored. This is because cookies can only store a maximum of 4 KB of data. Imagine you've logged in to a web/application and got a session ID (session identifier). To be able to perform holding state on stateless HTTP, browsers usually send a session ID to the server on every request. This way, every time a request comes, the server will react (more or less) "Oh, this is the right person!". Then the server will look for state information in server memory or in the database based on the session ID received, then return the requested data.
An important difference to remember is that cookie data is stored on the client side, while session data is usually stored on the server side. For more detailed discussion about stateless, stateful, cookie, and session can be read here.
Here's a brief table explaining the differences between cookies, session, and local storage briefly.
| Cookies | Local Storage | Sessions | |
|---|---|---|---|
| Capacity | 4 KB | 5 MB | 5 MB |
| Browser Technology | HTML4/HTML5 | HTML5 | HTML5 |
| Accessibility | All windows | All windows | Same tab |
| Expiry | Set manually | Forever | When tab is closed |
Pre-Tutorial Notes
Before you start, and to help you follow tutorial 3 well, we expect the following results from tutorial 2:
- The
football_newsdirectory structure locally is as follows
   football_news
   ├── env
   ├── football_news
   │   ├── __init__.py
   │   ├── asgi.py
   │   ├── settings.py
   │   ├── urls.py
   │   └── wsgi.py
   ├── main
   │   ├── migrations
   │   │   ├── __init__.py
   │   │   ├── 0001_initial.py
   │   ├── templates
   │   │   ├── create_news.html
   │   │   └── main.html
   │   │   └── news_detail.html
   │   ├── __init__.py
   │   ├── admin.py
   │   ├── apps.py
   │   ├── forms.py
   │   ├── models.py
   │   ├── tests.py
   │   ├── urls.py
   │   └── views.py
   ├── templates
   │   └── base.html
   ├── .gitignore
   ├── manage.py
   └── requirements.txt
For clarity, the football_news repository structure is as follows.
Tutorial: Creating Registration Function and Form
In the previous tutorial, we tried to create a form to add news. How was it? Easy, right? In this tutorial we will make the main page (main) restricted by creating accounts for users. So, users who want to access the main page main must log in first to get access.
-
Activate the virtual environment first in the terminal. (Hint: Remember tutorial 0!)
-
Open
views.pyin the main subdirectory of your project. Add imports forUserCreationFormandmessagesat the top.from django.contrib.auth.forms import UserCreationForm
from django.contrib import messagesCode Explanation:
UserCreationFormis a built-in form import that makes it easy to create user registration forms in web applications. With this form, new users can easily register on your website without having to write code from scratch. -
Add the
registerfunction below toviews.py. This function serves to generate registration forms automatically and generate user accounts when data is submitted from the form.def register(request):
form = UserCreationForm()
if request.method == "POST":
form = UserCreationForm(request.POST)
if form.is_valid():
form.save()
messages.success(request, 'Your account has been successfully created!')
return redirect('main:login')
context = {'form':form}
return render(request, 'register.html', context)Code Explanation:
form = UserCreationForm(request.POST)is used to create a newUserCreationFormfrom what was imported earlier by entering QueryDict based on input from user inrequest.POST.form.is_valid()is used to validate the input contents of the form.form.save()is used to create and save data from the form.messages.success(request, 'Your account has been successfully created!')is used to display messages to users after performing an action.return redirect('main:show_main')is used to perform redirect after form data is successfully saved.
-
Create a new HTML file named
register.htmlin themain/templatesdirectory. The contents ofregister.htmlcan be filled with the following template.{% extends 'base.html' %}
{% block meta %}
<title>Register</title>
{% endblock meta %}
{% block content %}
<div>
<h1>Register</h1>
<form method="POST">
{% csrf_token %}
<table>
{{ form.as_table }}
<tr>
<td></td>
<td><input type="submit" name="submit" value="Register" /></td>
</tr>
</table>
</form>
{% if messages %}
<ul>
{% for message in messages %}
<li>{{ message }}</li>
{% endfor %}
</ul>
{% endif %}
</div>
{% endblock content %}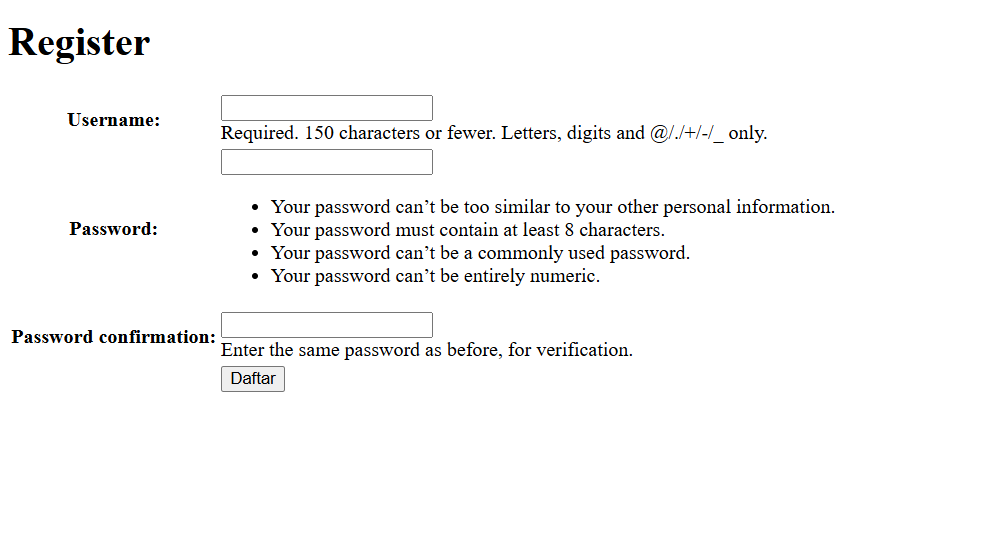 tip
tipWe use the
{{ form.as_table }}tag to make it easy to create forms in table form. For more information, you can read it here -
Open
urls.pyin themainsubdirectory and import the function you just created.from main.views import register -
Add
path urltourlpatternsto access the function that was imported earlier.urlpatterns = [
...
path('register/', register, name='register'),
]
We have added an account registration form and created a register mechanism. Next, we will create a login form so users can authenticate accounts.
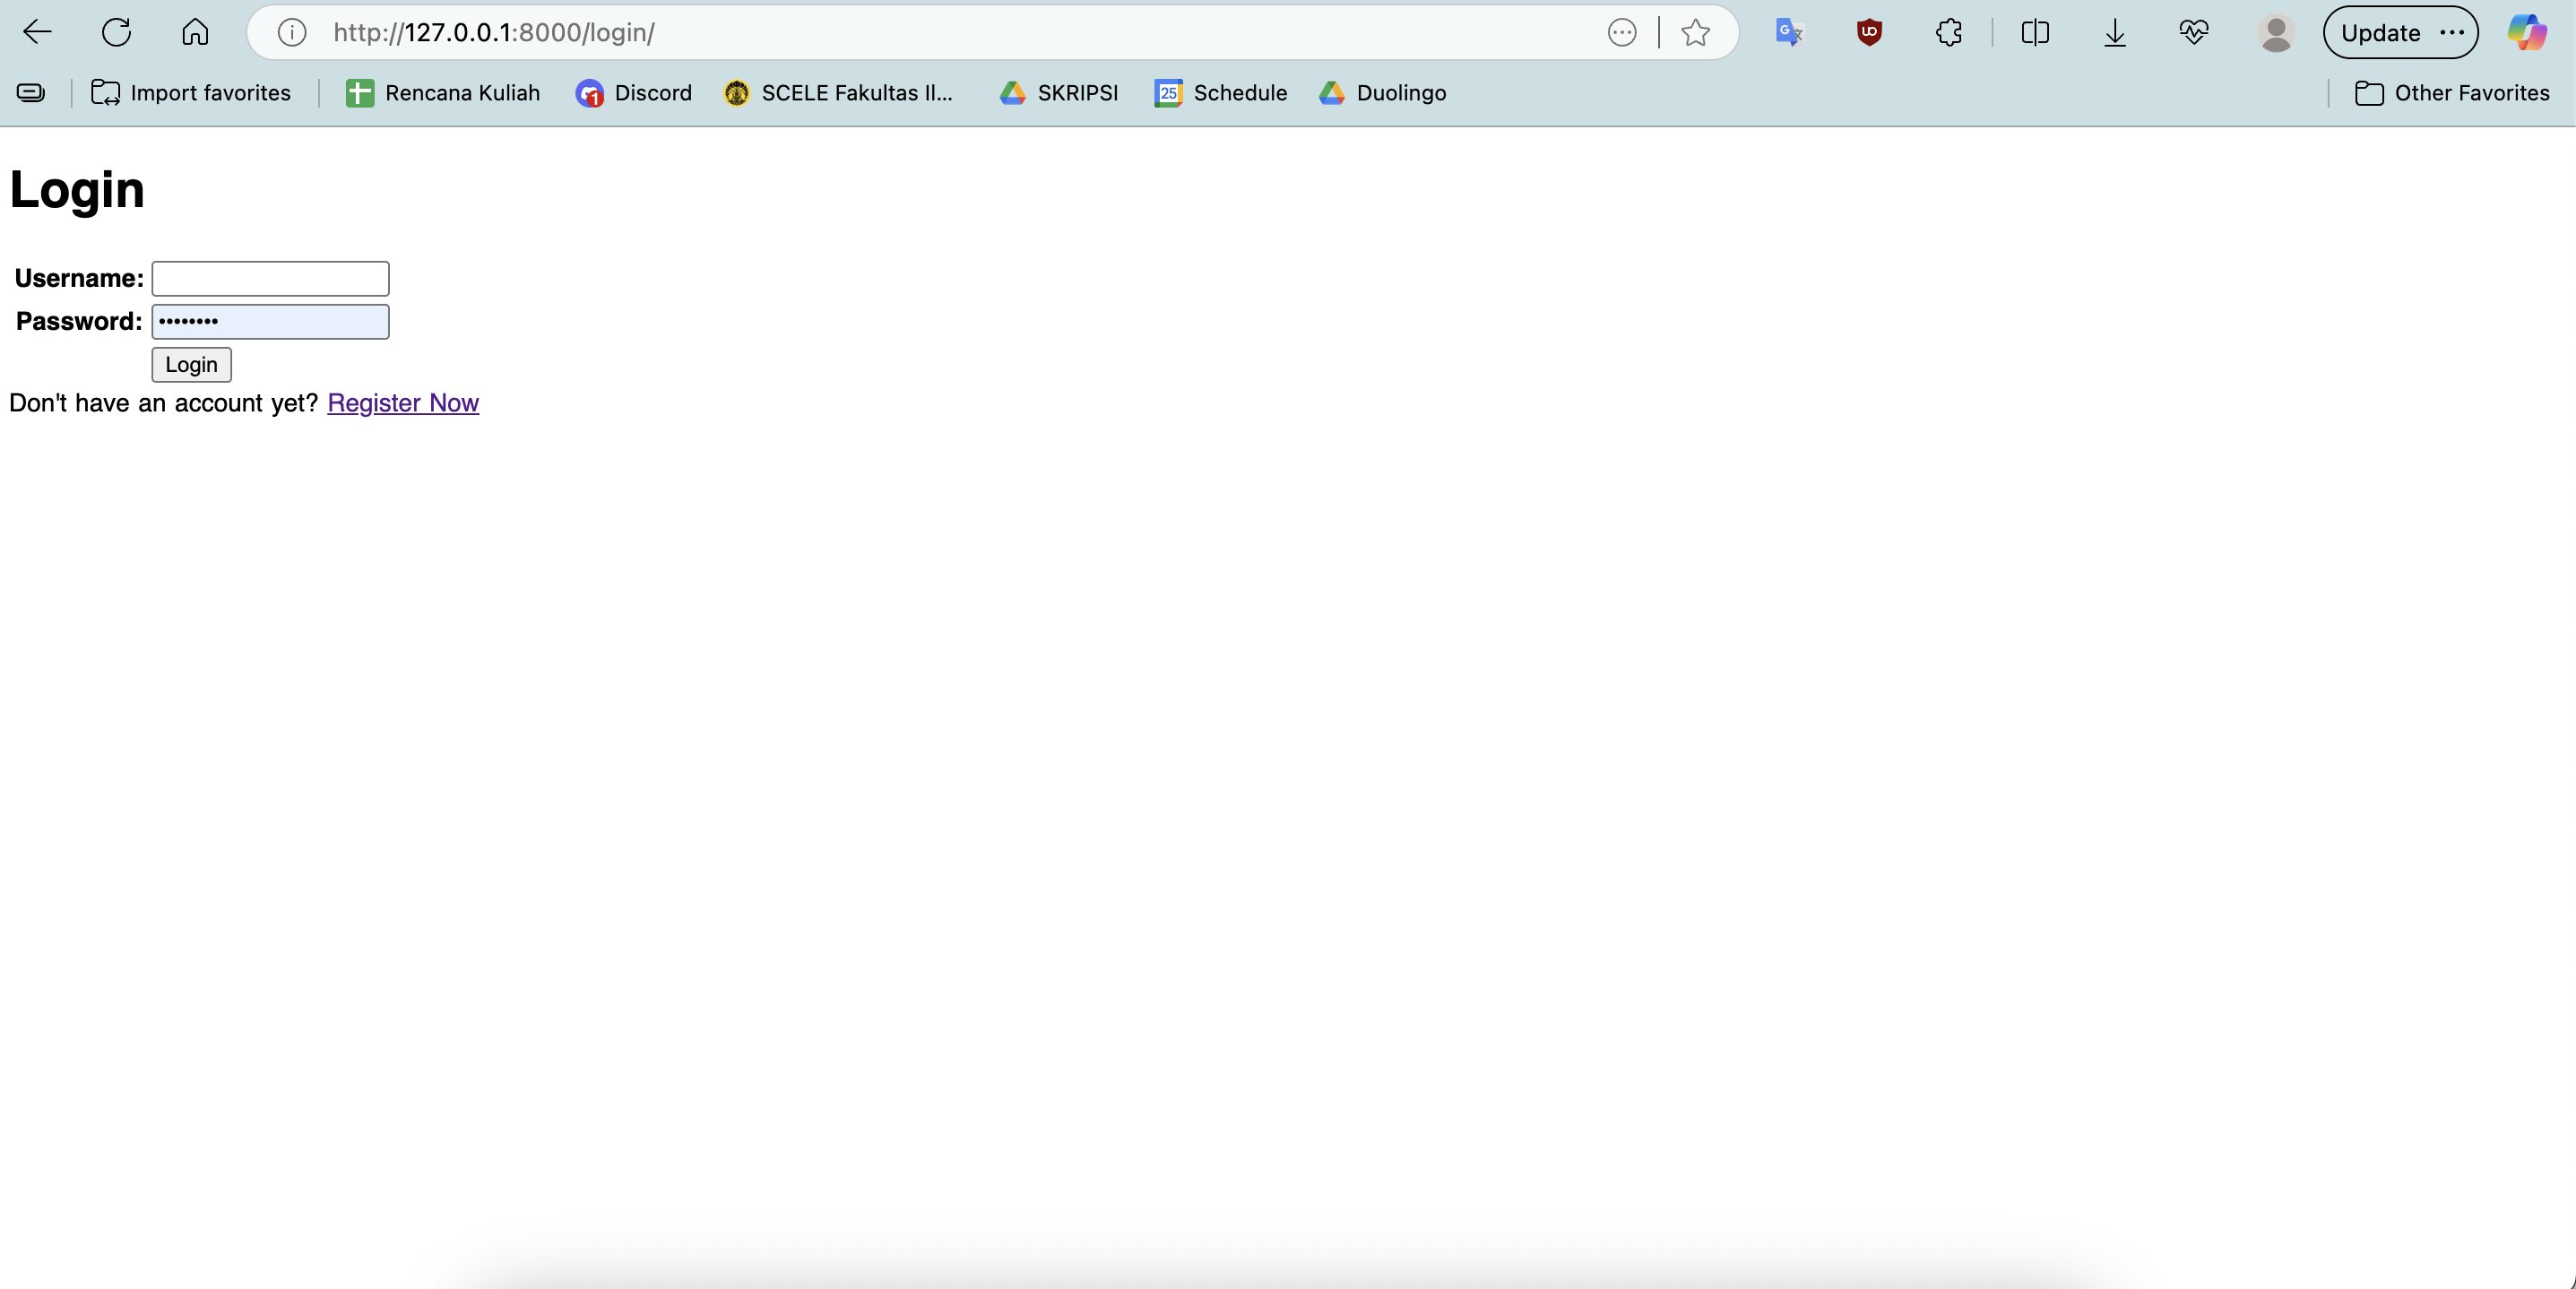
Tutorial: Creating Login Function
-
Open
views.pyagain in the main subdirectory. Add imports forauthenticate,login, andAuthenticationFormat the top.from django.contrib.auth.forms import UserCreationForm, AuthenticationForm
from django.contrib.auth import authenticate, loginCode Explanation: In short, the
authenticateandloginfunctions imported above are Django built-in functions that can be used to perform authentication and login (if authentication is successful). More details can be read here. -
Add the
login_userfunction below toviews.py. This function serves to authenticate users who want to login.def login_user(request):
if request.method == 'POST':
form = AuthenticationForm(data=request.POST)
if form.is_valid():
user = form.get_user()
login(request, user)
return redirect('main:show_main')
else:
form = AuthenticationForm(request)
context = {'form': form}
return render(request, 'login.html', context)Code Explanation:
if request.method == 'POST'is used to check whether the user is sending a login request through the login page. If yes, the form must be validated first before logging into the Django system.login(request, user)is used to perform the login process. If the user is valid, this function will create a session for the user who successfully logs in.- The
else:block is executed when the user first accesses the login page. Django will create anAuthenticationFormobject based on the user's request, then render it on the page through context.
-
Create a new HTML file named
login.htmlin themain/templatesdirectory. The contents oflogin.htmlcan be filled with the following template.{% extends 'base.html' %}
{% block meta %}
<title>Login</title>
{% endblock meta %}
{% block content %}
<div class="login">
<h1>Login</h1>
<form method="POST" action="">
{% csrf_token %}
<table>
{{ form.as_table }}
<tr>
<td></td>
<td><input class="btn login_btn" type="submit" value="Login" /></td>
</tr>
</table>
</form>
{% if messages %}
<ul>
{% for message in messages %}
<li>{{ message }}</li>
{% endfor %}
</ul>
{% endif %} Don't have an account yet?
<a href="{% url 'main:register' %}">Register Now</a>
</div>
{% endblock content %}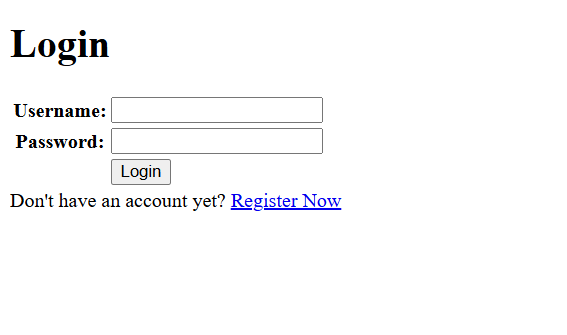
-
Open
urls.pyin the main subdirectory and import the function you just created.from main.views import login_user -
Add path url to
urlpatternsto access the function that was imported earlier.urlpatterns = [
...
path('login/', login_user, name='login'),
]
We have added a login account form and created a login mechanism. Next, we will create a logout mechanism and add a logout button on the main page.
Tutorial: Creating Logout Function
-
Open
views.pyagain in the main subdirectory. Add thelogoutimport at the top, along withauthenticateandlogin.from django.contrib.auth import authenticate, login, logout -
Add the function below to the
views.pyfunction. This function serves to perform the logout mechanism.def logout_user(request):
logout(request)
return redirect('main:login')Code Explanation:
logout(request)is used to delete the session of the currently logged in user.return redirect('main:login')directs the user to the login page in the Django application.
-
Open the
main.htmlfile in themain/templatesdirectory and add the code snippet below after the hyperlink tag for Add News....
<a href="{% url 'main:logout' %}">
<button>Logout</button>
</a>
...Code Explanation:
{% url 'main:logout' %}is used to direct to URLs dynamically based onapp_nameandnamethat have been defined inurls.py. In general, the writing is with{% url 'app_name:view_name' %}:app_nameis the name app defined in theurls.pyfile. If the app uses theapp_nameattribute inurls.py, then this will be used to refer to that app. Ifapp_nameis not defined then the app name used is the name of the app folder created.view_nameis the name of the desired URL, defined through thenameparameter inpath()inurls.py.
-
Open
urls.pyin the main subdirectory and import the function you created earlier.from main.views import logout_user -
Add path url to
urlpatternsto access the function that was imported earlier.urlpatterns = [
...
path('logout/', logout_user, name='logout'),
]
We have created a logout mechanism and completed the authentication system in this project.
Tutorial: Restricting Access to Main and News Detail Pages
Restricting access to those pages means limiting who can open those pages, for example only users who are logged in or admins.
-
Open
views.pyagain in the main subdirectory. Add thelogin_requiredimport at the top.from django.contrib.auth.decorators import login_requiredCode Explanation:
- This line of code imports the
login_requireddecorator from Django's authentication system. - Decorators can be used to add functionality to a function without changing the contents of the function code.
- Further explanation about decorators can be read here.
- This line of code imports the
-
Add the code snippet
@login_required(login_url='/login')above theshow_mainandshow_newsfunctions to implement the decorator we just imported....
@login_required(login_url='/login')
def show_main(request):
...
@login_required(login_url='/login')
def show_news(request):
...Code Explanation:
- These lines of code apply the
login_requireddecorator to theshow_mainandshow_newsfunctions, so that the main page and news detail can only be accessed by users who are logged in (authenticated).- Further explanation about
login_requiredcan be read in the Django documentation.
- Further explanation about
- These lines of code apply the
After adding page access restrictions, run the Django project with the python manage.py runserver command and open http://localhost:8000/ in your web browser of choice. The page that appears should not be the main page, but the login page if the user is in a logout state.
Tutorial: Using Data From Cookies
-
Logout first if you are running a Django application.
-
Open
views.pyagain in the main subdirectory. Add imports forHttpResponseRedirect,reverse, anddatetimeat the top.import datetime
from django.http import HttpResponseRedirect
from django.urls import reverse -
Change the code section in the
login_userfunction to save a new cookie namedlast_loginwhich contains the timestamp of the last time the user logged in. We can get this by replacing the existing code in theif form.is_valid()block to look like this....
if form.is_valid():
user = form.get_user()
login(request, user)
response = HttpResponseRedirect(reverse("main:show_main"))
response.set_cookie('last_login', str(datetime.datetime.now()))
return response
...warningPay attention to the indentation of your modified code!
Code Explanation:
login(request, user)functions to perform login using Django's authentication system.response = HttpResponseRedirect(reverse("main:show_main"))will set redirect to the main page afterresponseis received.response.set_cookie('last_login', str(datetime.datetime.now()))functions to register thelast_logincookie inresponsewith the current timestamp content.
-
In the
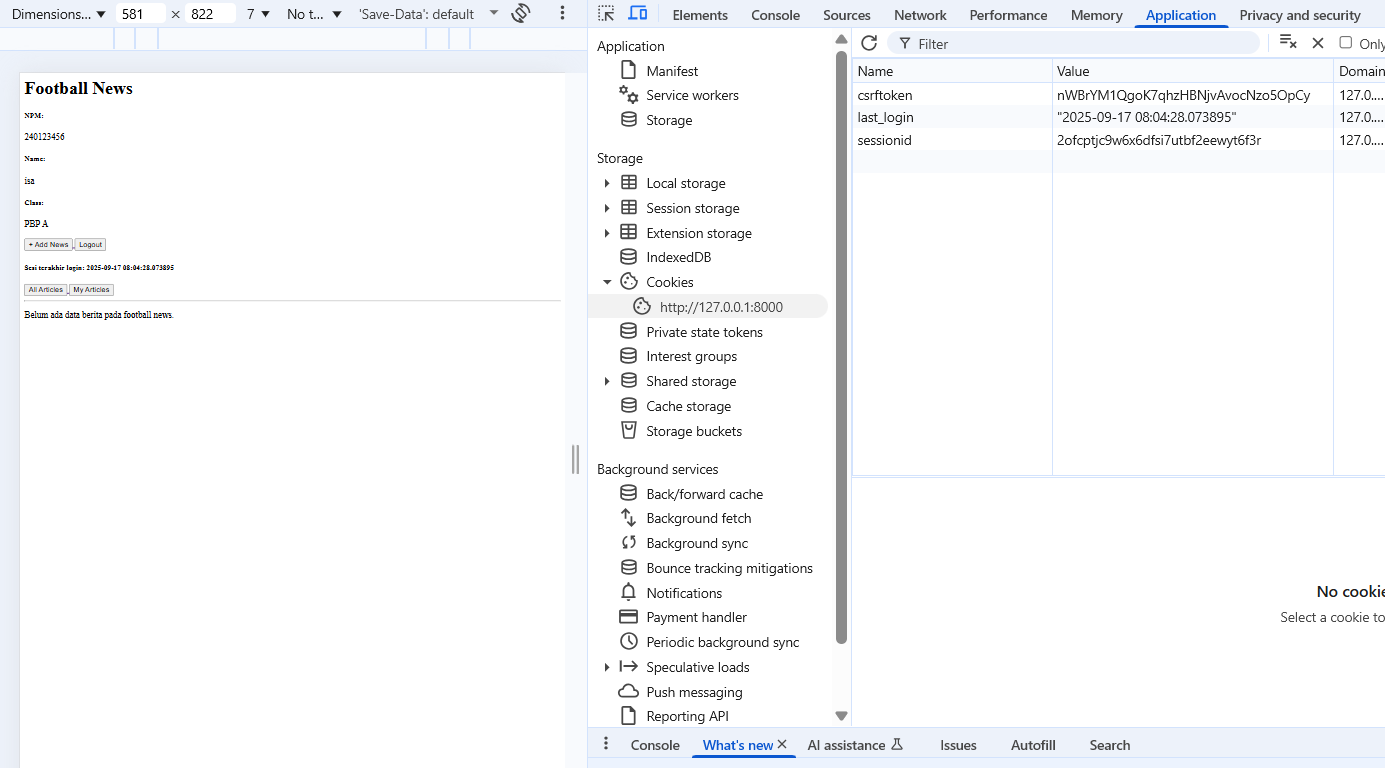
show_mainfunction, add the code snippet'last_login': request.COOKIES['last_login']to thecontextvariable. Here's an example of code that has been changed.context = {
'npm' : '240123456',
'name': 'Haru Urara',
'class': 'PBP A',
'news_list': news_list
'last_login': request.COOKIES.get('last_login', 'Never')
}Code Explanation:
- We access cookies registered in
requestwithrequest.COOKIES.get('last_login', 'Never'). - The
.get()method is used to safely retrieve cookie values - if thelast_logincookie doesn't exist or has been deleted, it will return the default valueNever. - The last time the user logged in can now be displayed on the web page by accessing the
last_loginkey.
- We access cookies registered in
-
Change the
logout_userfunction to delete thelast_logincookie after logging out.def logout_user(request):
logout(request)
response = HttpResponseRedirect(reverse('main:login'))
response.delete_cookie('last_login')
return responseCode Explanation:
response.delete_cookie('last_login')functions to delete thelast_logincookie from the list of cookies inresponse.
-
Open the
main.htmlfile in themain/templatesdirectory and add the following code snippet after the logout button to display the data of the last time the user logged in....
<h5>Last login session: {{ last_login }}</h5>
... -
Please refresh the login page (or run your Django project with the
python manage.py runservercommand if the Django project is not running yet) and try to login. Yourlast_logindata will appear on the main page. -
If you're using a Chromium browser like Google Chrome or Microsoft Edge, you can see the
last_logincookie data by accessing the Developer Tools panel (Ctrl + Shift + I or Cmd + Option + I) and opening theApplicationtab.- Click the
Cookiessection in theStoragegroup and you can see the available cookies data. Besideslast_login, you can also seesessionidandcsrftokendata. Here's an example of how it looks.
- Click the
-
If you logout and open the cookie history section, the
last_logincookie created earlier will disappear and be recreated when you login again.
Before continuing to the next tutorial, try to create at least one account in the Django project.
Tutorial: Connecting the News Model with User
Finally, we will connect each News object with the user who created it. That way, each user who is logged in can only see news that they created themselves.
To do this, follow these steps:
-
Open the
models.pyfile in the main subdirectory, then add the following line to the import section (along with other existing imports):...
from django.contrib.auth.models import User
... -
In the
Newsmodel that has been created, add the following code snippet:class News(models.Model):
user = models.ForeignKey(User, on_delete=models.CASCADE, null=True) # add this
...Code Explanation:
- The code snippet above functions to connect one news with one user through a relationship
- Each news can be associated with a user (many-to-one relationship)
null=Trueallows existing news to remain valid without having to have a useron_delete=models.CASCADEmeans if a user is deleted, all news belonging to that user will also be deleted
success💡 TIPS You will learn more about
ForeignKeyin the Database course.
Further explanation regardingForeignKeyin Django can be read here. -
Create model migration file with
python manage.py makemigrations. Then run model migration withpython manage.py migrate.success💡 Reminder Every time you make changes to models, such as adding or changing attributes, you MUST migrate to reflect those changes.
-
Open
views.pyagain in the main subdirectory, and change the code snippet in thecreate_newsfunction to the following:@login_required(login_url='/login')
def create_news(request):
form = NewsForm(request.POST or None)
if form.is_valid() and request.method == 'POST':
news_entry = form.save(commit = False)
news_entry.user = request.user
news_entry.save()
return redirect('main:show_main')
context = {
'form': form
}
return render(request, "create_news.html", context)Code Explanation:
- The
commit=Falseparameter in the code snippet above is used so that Django doesn't immediately save the form result object to the database. This way, we have the opportunity to modify the object first before it's saved. - In this case, we use that opportunity to fill the
userfield with the valuerequest.user, which is the logged-in user. This way, every object created will automatically be connected to the user who created it.
- The
-
Modify the
show_mainfunction so that the final form becomes like this:...
@login_required(login_url='/login')
def show_main(request):
filter_type = request.GET.get("filter", "all") # default 'all'
if filter_type == "all":
news_list = News.objects.all()
else:
news_list = News.objects.filter(user=request.user)
context = {
'npm': '240123456',
'name': request.user.username,
'class': 'PBP A',
'news_list': news_list,
'last_login': request.COOKIES.get('last_login', 'Never')
}
return render(request, "main.html",context)
...Code Explanation:
- The
show_mainfunction displays the main page after user login and is equipped with article filter based on author. This filter is taken from thefilterquery parameter in the URL, with two options:"my"to display only articles written by the currently logged in user, and"all"to display all articles. - Additionally, user information such as
nameis taken directly from the username of the currently logged in user.
- The
-
Add My and All filter buttons on the
main.htmlpage{% extends 'base.html' %}
{% block content %}
<h1>Football News</h1>
<h5>NPM: </h5>
<p>{{ npm }}</p>
<h5>Name:</h5>
<p>{{ name }}</p>
<h5>Class:</h5>
<p>{{ class }}</p>
<a href="{% url 'main:create_news' %}">
<button>+ Add News</button>
</a>
<a href="{% url 'main:logout' %}">
<button>Logout</button>
</a>
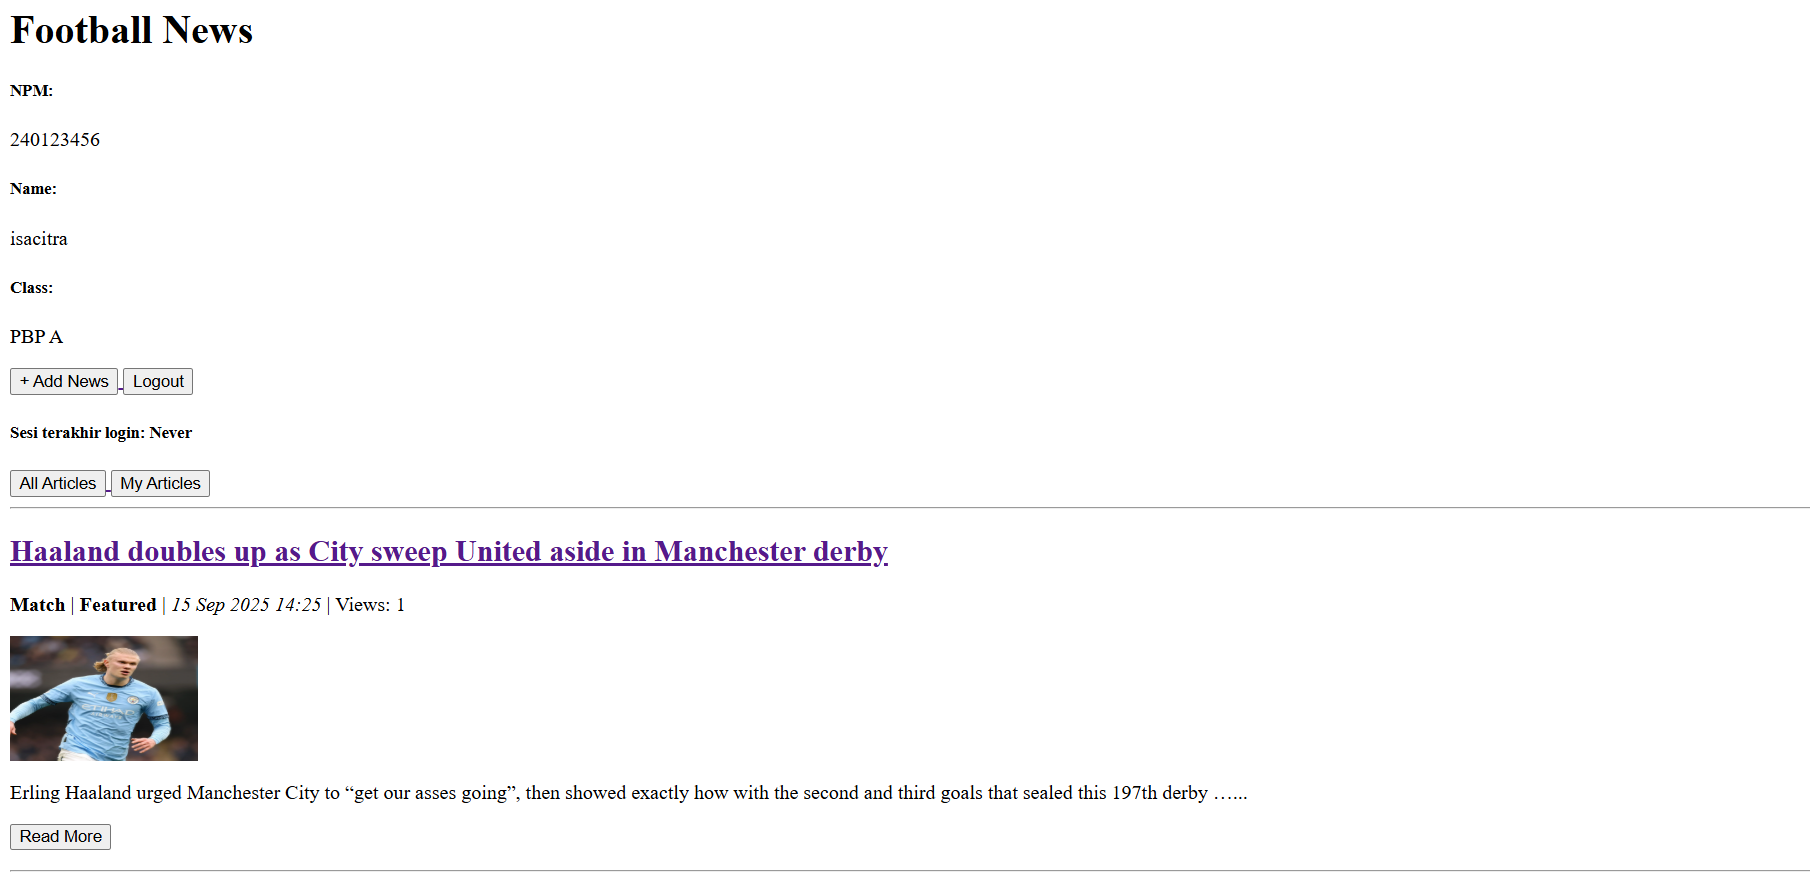
<h5>Last login session: {{ last_login }}</h5>
<hr>
<!-- Add this code -->
<a href="?filter=all">
<button type="button">All Articles</button>
</a>
<a href="?filter=my">
<button type="button">My Articles</button>
</a>
...
-
Then display the author name in
news_detail.html{% extends 'base.html' %}
{% block content %}
<p><a href="{% url 'main:show_main' %}"><button>← Back to News List</button></a></p>
<h1>{{ news.title }}</h1>
<p><b>{{ news.get_category_display }}</b>{% if news.is_featured %} |
<b>Featured</b>{% endif %}{% if news.is_news_hot %} |
<b>Hot</b>{% endif %} | <i>{{ news.created_at|date:"d M Y, H:i" }}</i>
| Views: {{ news.news_views }}</p>
{% if news.thumbnail %}
<img src="{{ news.thumbnail }}" alt="News thumbnail" width="300">
<br /><br />
{% endif %}
<p>{{ news.content }}</p>
<!-- Add this code -->
{% if news.user %}
<p>Author: {{ news.user.username }}</p>
{% else %}
<p>Author: Anonymous</p>
{% endif %}
{% endblock content %}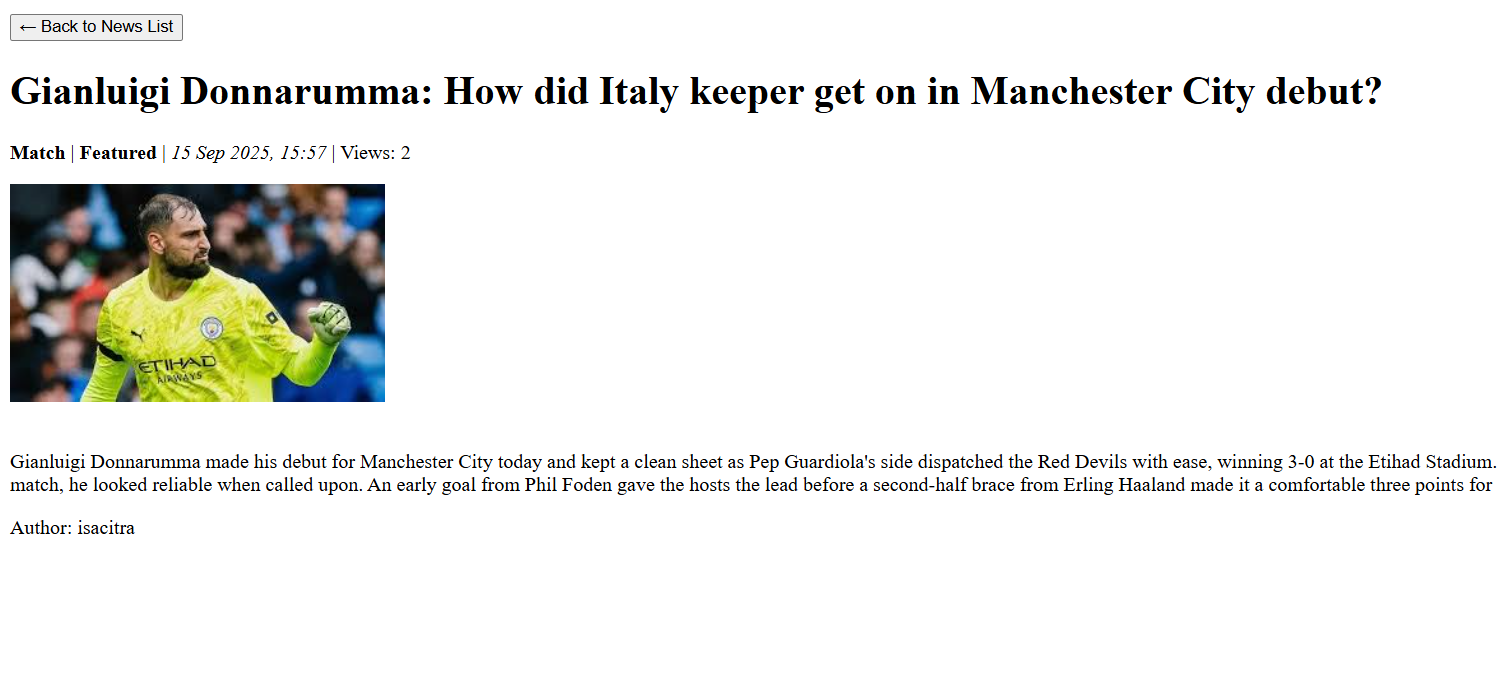
Author information reflects the article creator, not the currently logged in user. Please try using two different accounts to ensure this.
-
Run your Django project with the
python manage.py runservercommand and open http://localhost:8000/ in your favorite browser to see the results. Try creating a new account and logging in with the newly created account. Observe the main page, thenewsthat was created with the previous account will not be displayed on the new account user's page. This means you have successfully connectedNewsobjects with theUserwho created them.
Tutorial: Introduction to Selenium (OPTIONAL)
Selenium is a free tool used to automate web browsers. With Selenium, we can write programs that can control browsers as if they were being used by humans, for example to click buttons, fill out forms, navigate between pages, and extract data from a website. The advantage of Selenium is that it can be used in various major browsers like Chrome, Firefox, Edge, and Safari without having to make many code changes, because it follows the official W3C WebDriver standard.
What is webdriver?
WebDriver is the main component in Selenium that functions as a "bridge" between the program code we write and the browser we control. In other words, WebDriver allows code to communicate with the browser so that the automation process can run in reality.
Example of Using Selenium WebDriver
The following code is a simple way to use Selenium WebDriver to open the Chrome browser, visit a page, then close the browser.
from selenium import webdriver

# Create WebDriver instance for Chrome
driver = webdriver.Chrome()

# Open selenium.dev web page
driver.get("http://selenium.dev")

# Close browser when done
driver.quit()
Unlike unit tests that test functions individually, Selenium is used for functional testing - that is, testing web applications as real users do.
Selenium can:
- Open web pages
- Click buttons or links
- Fill out forms then submit
- Navigate between pages
- Verify displayed content
This way, we can test the entire application flow from start to finish. Frontend, backend, and database can be tested together, not just one component at a time.
Creating Functional Tests in Django
-
Add
seleniumtorequirements.txt. Then runpip install -r requirements.txt. -
Open
tests.pyin themaindirectory and add the following imports:from django.test import TestCase, Client
from .models import News
from django.test import LiveServerTestCase
from selenium import webdriver
from selenium.webdriver.common.by import By
from selenium.webdriver.support.ui import WebDriverWait
from selenium.webdriver.support import expected_conditions as EC
from selenium.webdriver.support.ui import Select
from django.contrib.auth.models import User -
Next, create the
FootballNewsFunctionalTesttest class as follows after theMainTestcode block:class FootballNewsFunctionalTest(LiveServerTestCase):
@classmethod
def setUpClass(cls):
super().setUpClass()
# Create single browser instance for all tests
cls.browser = webdriver.Chrome()
@classmethod
def tearDownClass(cls):
super().tearDownClass()
# Close browser after all tests complete
cls.browser.quit()
def setUp(self):
# Create user for testing
self.test_user = User.objects.create_user(
username='testadmin',
password='testpassword'
)
def tearDown(self):
# Clean up browser state between tests
self.browser.delete_all_cookies()
self.browser.execute_script("window.localStorage.clear();")
self.browser.execute_script("window.sessionStorage.clear();")
# Navigate to blank page to reset state
self.browser.get("about:blank")
def login_user(self):
"""Helper method to login user"""
self.browser.get(f"{self.live_server_url}/login/")
username_input = self.browser.find_element(By.NAME, "username")
password_input = self.browser.find_element(By.NAME, "password")
username_input.send_keys("testadmin")
password_input.send_keys("testpassword")
password_input.submit()
def test_login_page(self):
# Test login functionality
self.login_user()
# Check if login is successful
wait = WebDriverWait(self.browser, 120)
wait.until(EC.presence_of_element_located((By.TAG_NAME, "h1")))
h1_element = self.browser.find_element(By.TAG_NAME, "h1")
self.assertEqual(h1_element.text, "Football News")
logout_link = self.browser.find_element(By.PARTIAL_LINK_TEXT, "Logout")
self.assertTrue(logout_link.is_displayed())
def test_register_page(self):
# Test register functionality
self.browser.get(f"{self.live_server_url}/register/")
# Check if register page opens
h1_element = self.browser.find_element(By.TAG_NAME, "h1")
self.assertEqual(h1_element.text, "Register")
# Fill register form
username_input = self.browser.find_element(By.NAME, "username")
password1_input = self.browser.find_element(By.NAME, "password1")
password2_input = self.browser.find_element(By.NAME, "password2")
username_input.send_keys("newuser")
password1_input.send_keys("complexpass123")
password2_input.send_keys("complexpass123")
password2_input.submit()
# Check redirect to login page
wait = WebDriverWait(self.browser, 120)
wait.until(EC.text_to_be_present_in_element((By.TAG_NAME, "h1"), "Login"))
login_h1 = self.browser.find_element(By.TAG_NAME, "h1")
self.assertEqual(login_h1.text, "Login")
def test_create_news(self):
# Test create news functionality (requires login)
self.login_user()
# Go to create news page
add_button = self.browser.find_element(By.PARTIAL_LINK_TEXT, "Add News")
add_button.click()
# Fill form
title_input = self.browser.find_element(By.NAME, "title")
content_input = self.browser.find_element(By.NAME, "content")
category_select = self.browser.find_element(By.NAME, "category")
thumbnail_input = self.browser.find_element(By.NAME, "thumbnail")
is_featured_checkbox = self.browser.find_element(By.NAME, "is_featured")
title_input.send_keys("Test News Title")
content_input.send_keys("Test news content for selenium testing")
thumbnail_input.send_keys("https://example.com/image.jpg")
# Set category (select 'match' from dropdown)
select = Select(category_select)
select.select_by_value("match")
# Check is_featured checkbox
is_featured_checkbox.click()
# Submit form
title_input.submit()
# Check if returned to main page and news appears
wait = WebDriverWait(self.browser, 120)
wait.until(EC.text_to_be_present_in_element((By.TAG_NAME, "h1"), "Football News"))
h1_element = self.browser.find_element(By.TAG_NAME, "h1")
self.assertEqual(h1_element.text, "Football News")
# Check if news title appears on page
wait.until(EC.element_to_be_clickable((By.PARTIAL_LINK_TEXT, "Test News Title")))
news_title = self.browser.find_element(By.PARTIAL_LINK_TEXT, "Test News Title")
self.assertTrue(news_title.is_displayed())
def test_news_detail(self):
# Test news detail page
# Login first because of @login_required decorator
self.login_user()
# Create news for testing
news = News.objects.create(
title="Detail Test News",
content="Content for detail testing",
user=self.test_user
)
# Open news detail page
self.browser.get(f"{self.live_server_url}/news/{news.id}/")
# Check if detail page opens correctly
self.assertIn("Detail Test News", self.browser.page_source)
self.assertIn("Content for detail testing", self.browser.page_source)
def test_logout(self):
# Test logout functionality
self.login_user()
# Click logout button - text is inside button, not link
logout_button = self.browser.find_element(By.XPATH, "//button[contains(text(), 'Logout')]")
logout_button.click()
# Check if redirected to login page
wait = WebDriverWait(self.browser, 120)
wait.until(EC.text_to_be_present_in_element((By.TAG_NAME, "h1"), "Login"))
h1_element = self.browser.find_element(By.TAG_NAME, "h1")
self.assertEqual(h1_element.text, "Login")
def test_filter_main_page(self):
# Test filter functionality on main page
#
# Create news for testing
News.objects.create(
title="My Test News",
content="My news content",
user=self.test_user
)
News.objects.create(
title="Other User News",
content="Other content",
user=self.test_user # Same user for simplicity
)
self.login_user()
# Test filter "All Articles"
wait = WebDriverWait(self.browser, 120)
wait.until(EC.element_to_be_clickable((By.PARTIAL_LINK_TEXT, "All Articles")))
all_button = self.browser.find_element(By.PARTIAL_LINK_TEXT, "All Articles")
all_button.click()
self.assertIn("My Test News", self.browser.page_source)
self.assertIn("Other User News", self.browser.page_source)
# Test filter "My Articles"
my_button = self.browser.find_element(By.PARTIAL_LINK_TEXT, "My Articles")
my_button.click()
self.assertIn("My Test News", self.browser.page_source) -
Next, run the functional test with
python manage.py test main.tests.FootballNewsFunctionalTest.
Voila!! You have successfully used Selenium in your website.
Note: Selenium functional tests can experience flaky behavior (inconsistent results) due to resource usage and network latency factors. If tests sometimes fail without code changes, try running them again several times.
Conclusion
Congratulations! You have successfully completed Tutorial 3.
After completing the entire tutorial above, hopefully you now better understand the use of forms, authentication, sessions, and cookies in the Django framework.
-
After completing this tutorial, your web page display should look like this.
-
Login page display
-
Register page display
-
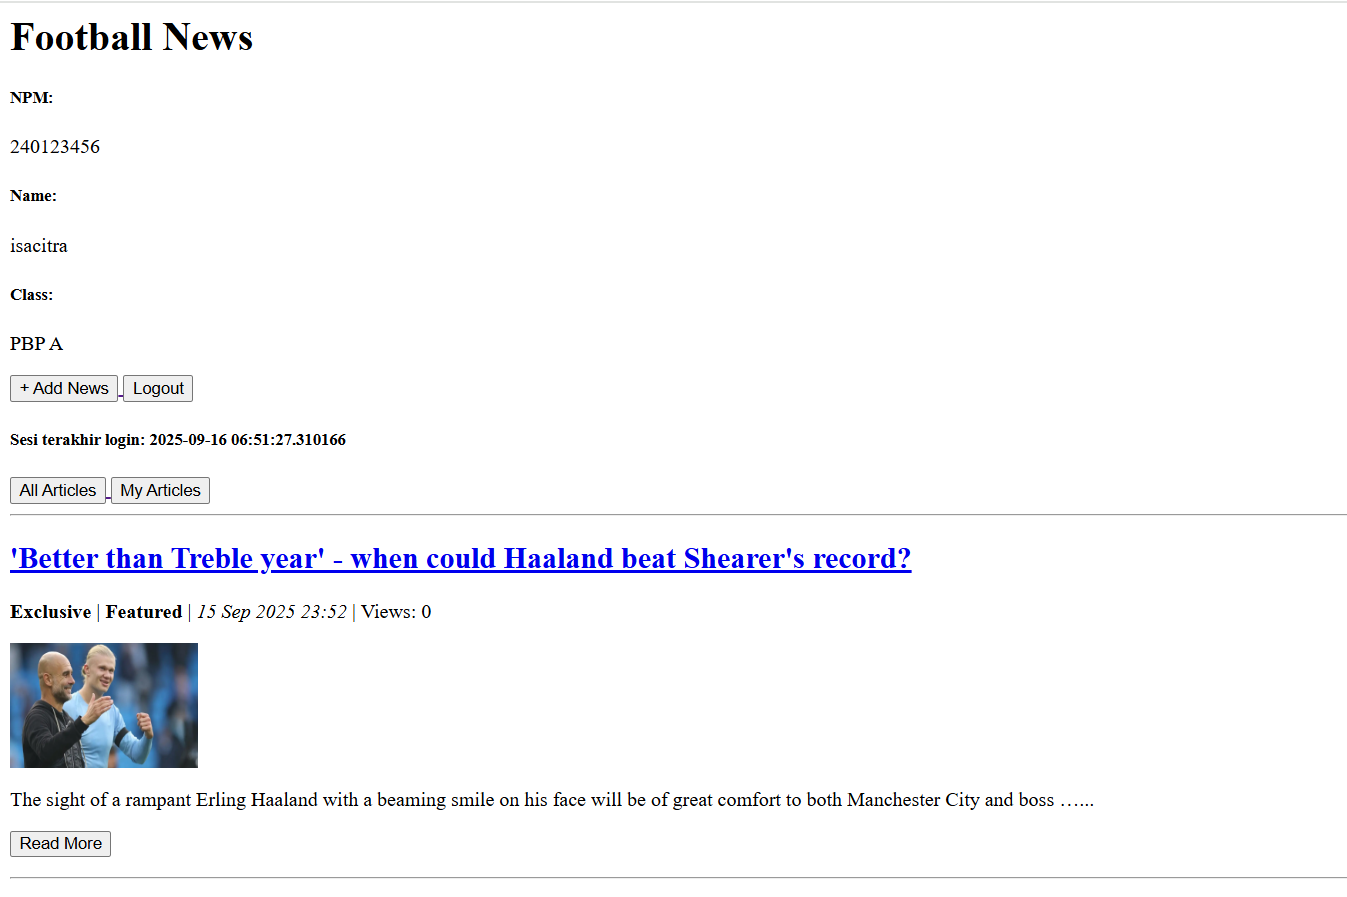
Main page display after successful Login
-
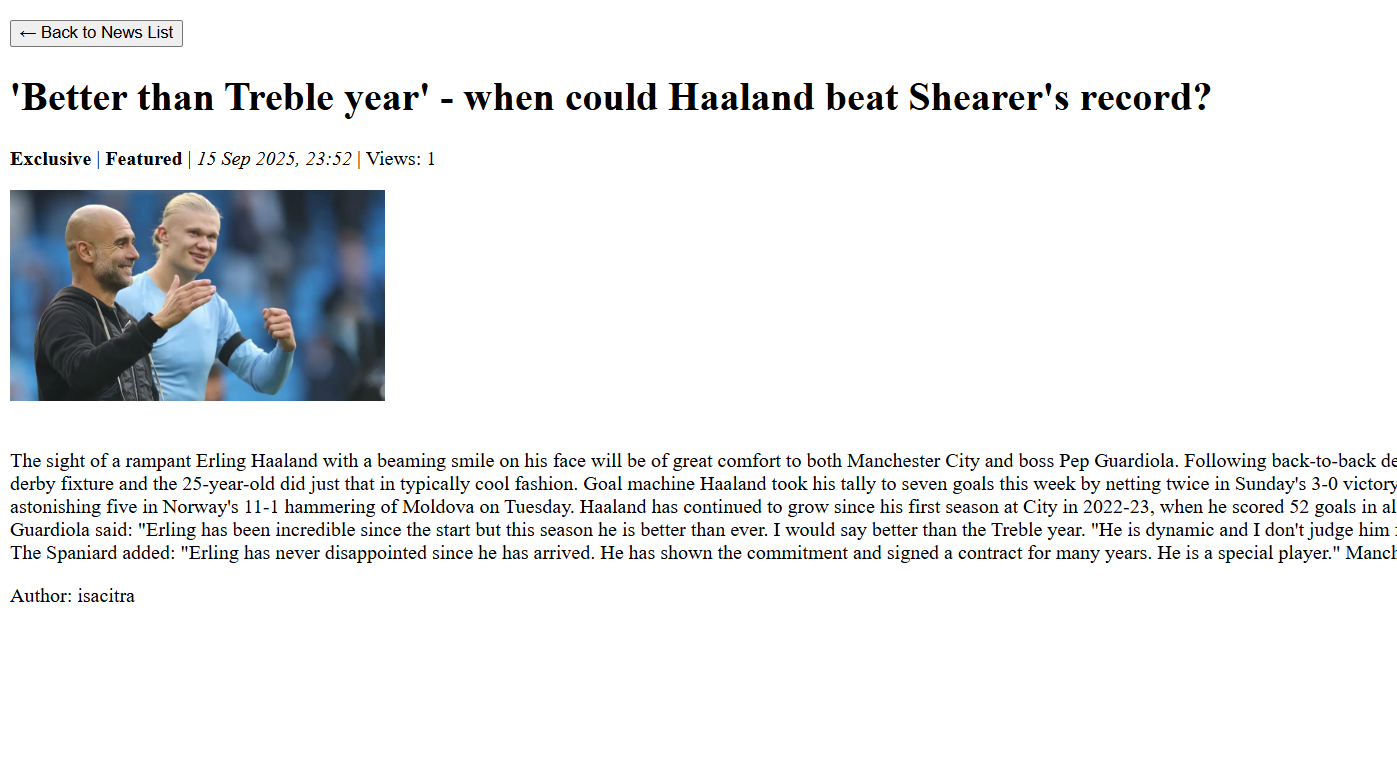
News detail page display
-
-
At the end of this tutorial, the local structure looks like this.

-
Before taking this step, make sure the local directory structure is correct. Then, do
add,commitandpushto update the GitHub repository. -
Run the following command to perform
add,commit, andpushto GitHub and PWS.git add .
git commit -m "<commit_message>"
git push origin master
git push pws master- Change
<commit_message>as desired. Example:git commit -m "tutorial 3 completed".
- Change
When writing comments on commits, make sure the comments are clear, concise, and formal. This way, other developers can easily understand the intent and changes you made in that commit.
Additional References
Contributors
- Marla Marlena (NDF)
- Farrell Zidane Raihandrawan (REL)
- Ezar Akhdan (EZR)
- Nevin Thang (FDN)
- Muhammad Milian Alkindi (MMA)
- Grace Karina (GAE)
Credits
This tutorial is developed based on PBP Odd 2025 and PBP Odd 2024 written by Teaching Staff and Teaching Assistants of Platform-Based Programming 2025 and 2024. All tutorials and instructions listed in this repository are designed so that students taking Platform-Based Programming courses can complete the tutorial during lab sessions.