Tutorial 8: Flutter Networking, Authentication, and Integration
Platform-Based Programming (CSGE602022) — organized by Faculty of Computer Science, Universitas Indonesia, Odd Semester 2025/2026
Learning Objectives
After completing this tutorial, students are expected to be able to:
- Understand the structure and creation of models in Flutter.
- Understand how to fetch, process, and display data from web services.
- Understand basic state management using Provider in Flutter.
- Perform authentication with Django web service using Flutter application.
Models in Flutter
In this tutorial, we will call a web service and display the results on the Flutter page we created. However, before calling the web service, we need to define the model that we will use when calling the web service. Models in Flutter use the principle of classes similar to what was learned in OOP (Object-Oriented Programming).
The code below is an example and is not mandatory to follow. However, this example is highly recommended to be read because the concept will be used in the following sections.
Here is an example of a class in Flutter.
class Car {
    Car({
        required this.id,
        required this.model,
        required this.brand,
        required this.color,
        this.releaseDate
    });

    int id;
    String model;
    String brand;
    String color;
    DateTime releaseDate;
}
If you experience an error when creating a class, add the required keyword to each class parameter in the constructor section.
So far, we have successfully created a class. Next, some other code can be added to form a Car model. This Car is a model that represents the response from web service calls.
To achieve this, the dart:convert library is needed, which can be imported at the top of the file.
import 'dart:convert';
...
In the Car class, add the following code.
factory Car.fromJson(Map<String, dynamic> json) => Car(
    id: json["id"],
    model: json["model"],
    brand: json["brand"],
    color: json["color"],
    releaseDate: json["releaseDate"],
);

Map<String, dynamic> toJson() => {
    "id": id,
    "model": model,
    "brand": brand,
    "color": color,
    "releaseDate": releaseDate,
};
Add the following code outside the Car class.
Car carFromJson(String str) => Car.fromJson(json.decode(str));
String carToJson(Car data) => json.encode(data.toJson());
Eventually, the code will be formed as follows to display one Car object from the web service.
import 'dart:convert';

Car carFromJson(String str) => Car.fromJson(json.decode(str));
String carToJson(Car data) => json.encode(data.toJson());

class Car {
    Car({
        required this.id,
        required this.model,
        required this.brand,
        required this.color,
        this.releaseDate
    });

    int id;
    String model;
    String brand;
    String color;
    DateTime releaseDate;

    factory Car.fromJson(Map<String, dynamic> json) => Car(
        id: json["id"],
        model: json["model"],
        brand: json["brand"],
        color: json["color"],
        releaseDate: json["releaseDate"],
    );

    Map<String, dynamic> toJson() => {
        "id": id,
        "model": model,
        "brand": brand,
        "color": color,
        "releaseDate": releaseDate,
    };
}
Explanation
There are several additional codes such as the toJson and fromJson methods inside the Car class. This will be necessary because when we make a request to a web service/API with the GET method, we generally get the call result in JSON format. Of course, this depends on the web service implementation, but in this example we will use JSON. Therefore, we need to convert data with the fromJson method so that Flutter can then recognize the JSON as an object from the Car class. In addition, there is also a toJson method that can be used when we want to send data to the web service in JSON format (such as POST or PUT).
Here is an example response from a web service with the GET method that can be converted to the Car model class.
{
    "id": 1,
    "model": "Mercedes-AMG F1 W16 E PERFORMANCE",
    "brand": "Mercedes-AMG PETRONAS",
    "color": "Black",
    "releaseDate": "2025-02-24T00:00:00+0000"
}
Then, what if the response from the web service is a collection (list) containing JSON objects? It's actually the same as the code above, only there is a slight change in the carFromJson and carToJson methods.
The code is as follows.
List<Car> carFromJson(String str) => List<Car>.from(json.decode(str).map((car) => Car.fromJson(car)));

String carToJson(List<Car> data) => json.encode(List<dynamic>.from(data.map((car) => car.toJson())));
Here is an example response from a web service with the GET method that can be converted to the Car model.
[
    {
        "id": 1,
        "model": "Mercedes-AMG F1 W16 E PERFORMANCE",
        "brand": "Mercedes-AMG PETRONAS",
        "color": "Black",
        "releaseDate": "2025-02-24T00:00:00+0000"
    },
    {
        "id": 2,
        "model": "FW47",
        "brand": "Williams Racing",
        "color": "Blue",
        "releaseDate": "2025-02-14T00:00:00+0000"
    },
    {
        "id": 3,
        "model": "SF-25",
        "brand": "Scuderia Ferrari HP",
        "color": "Red",
        "releaseDate": "2025-02-18T00:00:00+0000"
    }
]
Fetching Data from Web Service in Flutter
When developing an application, sometimes we need to retrieve external data from outside our application (Internet) to be displayed in our application. This tutorial aims to understand how to fetch data from a web service in Flutter.
In general, there are several steps when you want to display data from another web service to the Flutter application, namely:
-
Add the
httpdependency to the project; this dependency is used to exchange HTTP requests. -
Create a model according to the response from the data originating from the web service.
-
Make an HTTP request to the web service using the
httpdependency. -
Convert the object obtained from the web service to the model we created in the second step.
-
Display the data that has been converted to the application with
FutureBuilder.
Further explanation can be read at this link.
Basic State Management using Provider
Provider is a wrapper around InheritedWidget to make InheritedWidget easier to use and more reusable. InheritedWidget itself is a base class for Flutter widgets that efficiently propagate information to other widgets that are in one tree.
Benefits of using Provider are as follows.
- Allocating resources becomes simpler.
- Lazy-loading.
- Reduces boilerplate every time you create a new class.
- Supported by Flutter Devtool so that
providercan be tracked from Devtool. - Increased scalability for classes that utilize complex listening mechanisms.
To learn more about provider, please visit the Provider package page.
Tutorial: Django-Flutter Authentication Integration
Authentication Setup on Django for Flutter
Follow these steps to integrate the authentication system in Django.
-
Create a
django-appnamedauthenticationin the Django project you created earlier. -
Add
authenticationtoINSTALLED_APPSin the main project'ssettings.pyof your Django application.infoIf you forgot how to do steps 1 and 2, try reading Tutorial 1 again.
-
Run the command
pip install django-cors-headersto install the required library. Don't forget to activate the Python virtual environment first. Also don't forget to adddjango-cors-headerstorequirements.txt. -
Add
corsheaderstoINSTALLED_APPSin the main project'ssettings.pyof your Django application. -
Add
corsheaders.middleware.CorsMiddlewaretoMIDDLEWAREin the main project'ssettings.pyof your Django application. -
Add the following variables to the main project's
settings.pyof your Django application....
CORS_ALLOW_ALL_ORIGINS = True
CORS_ALLOW_CREDENTIALS = True
CSRF_COOKIE_SECURE = True
SESSION_COOKIE_SECURE = True
CSRF_COOKIE_SAMESITE = 'None'
SESSION_COOKIE_SAMESITE = 'None'
... -
For integration to Django from Android emulator, add
10.0.2.2toALLOWED_HOSTSin thesettings.pyfile.ALLOWED_HOSTS = [..., ..., "10.0.2.2"]
Remember the "..." sign means your existing code, so just add what is requested.
-
Create a view method for login in
authentication/views.py.from django.contrib.auth import authenticate, login as auth_login
...
import
@csrf_exempt
def login(request):
username = request.POST['username']
password = request.POST['password']
user = authenticate(username=username, password=password)
if user is not None:
if user.is_active:
auth_login(request, user)
# Login status successful.
return JsonResponse({
"username": user.username,
"status": True,
"message": "Login successful!"
# Add other data if you want to send data to Flutter.
}, status=200)
else:
return JsonResponse({
"status": False,
"message": "Login failed, account is disabled."
}, status=401)
else:
return JsonResponse({
"status": False,
"message": "Login failed, please check your username or password."
}, status=401) -
Create a
urls.pyfile in theauthenticationfolder and add URL routing to the function you created with the endpointlogin/.from django.urls import path
from authentication.views import login
app_name = 'authentication'
urlpatterns = [
path('login/', login, name='login'),
] -
Finally, add
path('auth/', include('authentication.urls')),to thefootball_news/urls.pyfile.
Authentication System Integration in Flutter
To facilitate the creation of an authentication system, the teaching assistant team has created a Flutter package that can be used to contact the Django web service (including GET and POST operations).
The package can be accessed through the following link: pbp_django_auth
Follow these steps to integrate the authentication system in Flutter.
-
Install the package provided by the teaching assistant team by running the following command in the Terminal. Run it in the root directory of your Flutter project.
flutter pub add provider
flutter pub add pbp_django_auth -
To use this package, you need to modify the root widget to provide
CookieRequestlibrary to all child widgets usingProvider.For example, if your application in the
main.dartfile was previously like this:import 'package:flutter/material.dart';
import 'package:football_news/screens/menu.dart';
void main() {
runApp(const MyApp());
}
class MyApp extends StatelessWidget {
const MyApp({super.key});
// This widget is the root of your application.
Widget build(BuildContext context) {
return MaterialApp(
title: 'Flutter Demo',
theme: ThemeData(
// This is the theme of your application.
//
// TRY THIS: Try running your application with "flutter run". You'll see
// the application has a purple toolbar. Then, without quitting the app,
// try changing the seedColor in the colorScheme below to Colors.green
// and then invoke "hot reload" (save your changes or press the "hot
// reload" button in a Flutter-supported IDE, or press "r" if you used
// the command line to start the app).
//
// Notice that the counter didn't reset back to zero; the application
// state is not lost during the reload. To reset the state, use hot
// restart instead.
//
// This works for code too, not just values: Most code changes can be
// tested with just a hot reload.
colorScheme: ColorScheme.fromSwatch(primarySwatch: Colors.blue)
.copyWith(secondary: Colors.blueAccent[400]),
),
home: MyHomePage(),
);
}
}Change it to:
import 'package:flutter/material.dart';
import 'package:football_news/screens/menu.dart';
import 'package:pbp_django_auth/pbp_django_auth.dart';
import 'package:provider/provider.dart';
void main() {
runApp(const MyApp());
}
class MyApp extends StatelessWidget {
const MyApp({super.key});
// This widget is the root of your application.
Widget build(BuildContext context) {
return Provider(
create: (_) {
CookieRequest request = CookieRequest();
return request;
},
child: MaterialApp(
title: 'Football News',
theme: ThemeData(
// This is the theme of your application.
//
// TRY THIS: Try running your application with "flutter run". You'll see
// the application has a purple toolbar. Then, without quitting the app,
// try changing the seedColor in the colorScheme below to Colors.green
// and then invoke "hot reload" (save your changes or press the "hot
// reload" button in a Flutter-supported IDE, or press "r" if you used
// the command line to start the app).
//
// Notice that the counter didn't reset back to zero; the application
// state is not lost during the reload. To reset the state, use hot
// restart instead.
//
// This works for code too, not just values: Most code changes can be
// tested with just a hot reload.
colorScheme: ColorScheme.fromSwatch(primarySwatch: Colors.blue)
.copyWith(secondary: Colors.blueAccent[400]),
),
home: MyHomePage(),
),
);
}
}This will create a new
Providerobject that will share theCookieRequestinstance with all components in the application.infoMake sure you add
import 'package:pbp_django_auth/pbp_django_auth.dart';andimport 'package:provider/provider.dart';at the top of the file -
Create a new file in the
screensfolder namedlogin.dart. -
Fill the
login.dartfile with the following code.import 'package:football_news/screens/menu.dart';
import 'package:flutter/material.dart';
import 'package:pbp_django_auth/pbp_django_auth.dart';
import 'package:provider/provider.dart';
void main() {
runApp(const LoginApp());
}
class LoginApp extends StatelessWidget {
const LoginApp({super.key});
Widget build(BuildContext context) {
return MaterialApp(
title: 'Login',
theme: ThemeData(
useMaterial3: true,
colorScheme: ColorScheme.fromSwatch(primarySwatch: Colors.blue)
.copyWith(secondary: Colors.blueAccent[400]),
),
home: const LoginPage(),
);
}
}
class LoginPage extends StatefulWidget {
const LoginPage({super.key});
State<LoginPage> createState() => _LoginPageState();
}
class _LoginPageState extends State<LoginPage> {
final TextEditingController _usernameController = TextEditingController();
final TextEditingController _passwordController = TextEditingController();
Widget build(BuildContext context) {
final request = context.watch<CookieRequest>();
return Scaffold(
appBar: AppBar(
title: const Text('Login'),
),
body: Center(
child: SingleChildScrollView(
padding: const EdgeInsets.all(16.0),
child: Card(
elevation: 8,
shape: RoundedRectangleBorder(
borderRadius: BorderRadius.circular(12.0),
),
child: Padding(
padding: const EdgeInsets.all(20.0),
child: Column(
mainAxisSize: MainAxisSize.min,
children: [
const Text(
'Login',
style: TextStyle(
fontSize: 24.0,
fontWeight: FontWeight.bold,
),
),
const SizedBox(height: 30.0),
TextField(
controller: _usernameController,
decoration: const InputDecoration(
labelText: 'Username',
hintText: 'Enter your username',
border: OutlineInputBorder(
borderRadius: BorderRadius.all(Radius.circular(12.0)),
),
contentPadding:
EdgeInsets.symmetric(horizontal: 12.0, vertical: 8.0),
),
),
const SizedBox(height: 12.0),
TextField(
controller: _passwordController,
decoration: const InputDecoration(
labelText: 'Password',
hintText: 'Enter your password',
border: OutlineInputBorder(
borderRadius: BorderRadius.all(Radius.circular(12.0)),
),
contentPadding:
EdgeInsets.symmetric(horizontal: 12.0, vertical: 8.0),
),
obscureText: true,
),
const SizedBox(height: 24.0),
ElevatedButton(
onPressed: () async {
String username = _usernameController.text;
String password = _passwordController.text;
// Check credentials
// TODO: Change the URL and don't forget to add trailing slash (/) at the end of URL!
// To connect Android emulator with Django on localhost, use URL http://10.0.2.2/
// If you using chrome, use URL http://localhost:8000
final response = await request
.login("http://[YOUR_APP_URL]/auth/login/", {
'username': username,
'password': password,
});
if (request.loggedIn) {
String message = response['message'];
String uname = response['username'];
if (context.mounted) {
Navigator.pushReplacement(
context,
MaterialPageRoute(
builder: (context) => MyHomePage()),
);
ScaffoldMessenger.of(context)
..hideCurrentSnackBar()
..showSnackBar(
SnackBar(
content:
Text("$message Welcome, $uname.")),
);
}
} else {
if (context.mounted) {
showDialog(
context: context,
builder: (context) => AlertDialog(
title: const Text('Login Failed'),
content: Text(response['message']),
actions: [
TextButton(
child: const Text('OK'),
onPressed: () {
Navigator.pop(context);
},
),
],
),
);
}
}
},
style: ElevatedButton.styleFrom(
foregroundColor: Colors.white,
minimumSize: Size(double.infinity, 50),
backgroundColor: Theme.of(context).colorScheme.primary,
padding: const EdgeInsets.symmetric(vertical: 16.0),
),
child: const Text('Login'),
),
const SizedBox(height: 36.0),
GestureDetector(
onTap: () {
showDialog(
context: context,
builder: (context) => AlertDialog(
title: const Text('Info'),
content: const Text(
'We will create the register page later',
),
actions: [
TextButton(
child: const Text('OK'),
onPressed: () {
Navigator.pop(context);
},
),
],
),
);
},
child: Text(
'Don\'t have an account? Register',
style: TextStyle(
color: Theme.of(context).colorScheme.primary,
fontSize: 16.0,
),
),
),
],
),
),
),
),
),
);
}
} -
In the
main.dartfile, in the WidgetMaterialApp(...), changehome: MyHomePage()tohome: const LoginPage() -
In this step, you will add a register function to your project. Before that, you must modify the
authenticationmodule in the Django project you were working on earlier. Add the following view method to theauthentication/views.pyyou created.
from django.contrib.auth.models import User
import json

...

@csrf_exempt
def register(request):
    if request.method == 'POST':
        data = json.loads(request.body)
        username = data['username']
        password1 = data['password1']
        password2 = data['password2']

        # Check if the passwords match
        if password1 != password2:
            return JsonResponse({
                "status": False,
                "message": "Passwords do not match."
            }, status=400)

        # Check if the username is already taken
        if User.objects.filter(username=username).exists():
            return JsonResponse({
                "status": False,
                "message": "Username already exists."
            }, status=400)

        # Create the new user
        user = User.objects.create_user(username=username, password=password1)
        user.save()

        return JsonResponse({
            "username": user.username,
            "status": 'success',
            "message": "User created successfully!"
        }, status=200)

    else:
        return JsonResponse({
            "status": False,
            "message": "Invalid request method."
        }, status=400)
- Add a new path in
authentication/urls.pywith the following code
from authentication.views import login, register  # Add register in this line
...
path('register/', register, name='register'),
-
In the Flutter project, create a new file in the
screensfolder namedregister.dart. -
Fill the
register.dartfile with the following code.import 'dart:convert';
import 'package:flutter/material.dart';
import 'package:football_news/screens/login.dart';
import 'package:pbp_django_auth/pbp_django_auth.dart';
import 'package:provider/provider.dart';
class RegisterPage extends StatefulWidget {
const RegisterPage({super.key});
State<RegisterPage> createState() => _RegisterPageState();
}
class _RegisterPageState extends State<RegisterPage> {
final _usernameController = TextEditingController();
final _passwordController = TextEditingController();
final _confirmPasswordController = TextEditingController();
Widget build(BuildContext context) {
final request = context.watch<CookieRequest>();
return Scaffold(
appBar: AppBar(
title: const Text('Register'),
leading: IconButton(
icon: const Icon(Icons.arrow_back),
onPressed: () {
Navigator.pop(context);
},
),
),
body: Center(
child: SingleChildScrollView(
padding: const EdgeInsets.all(16.0),
child: Card(
elevation: 8,
shape: RoundedRectangleBorder(
borderRadius: BorderRadius.circular(12.0),
),
child: Padding(
padding: const EdgeInsets.all(20.0),
child: Column(
mainAxisSize: MainAxisSize.min,
children: <Widget>[
const Text(
'Register',
style: TextStyle(
fontSize: 24.0,
fontWeight: FontWeight.bold,
),
),
const SizedBox(height: 30.0),
TextFormField(
controller: _usernameController,
decoration: const InputDecoration(
labelText: 'Username',
hintText: 'Enter your username',
border: OutlineInputBorder(
borderRadius: BorderRadius.all(Radius.circular(12.0)),
),
contentPadding:
EdgeInsets.symmetric(horizontal: 12.0, vertical: 8.0),
),
validator: (value) {
if (value == null || value.isEmpty) {
return 'Please enter your username';
}
return null;
},
),
const SizedBox(height: 12.0),
TextFormField(
controller: _passwordController,
decoration: const InputDecoration(
labelText: 'Password',
hintText: 'Enter your password',
border: OutlineInputBorder(
borderRadius: BorderRadius.all(Radius.circular(12.0)),
),
contentPadding:
EdgeInsets.symmetric(horizontal: 12.0, vertical: 8.0),
),
obscureText: true,
validator: (value) {
if (value == null || value.isEmpty) {
return 'Please enter your password';
}
return null;
},
),
const SizedBox(height: 12.0),
TextFormField(
controller: _confirmPasswordController,
decoration: const InputDecoration(
labelText: 'Confirm Password',
hintText: 'Confirm your password',
border: OutlineInputBorder(
borderRadius: BorderRadius.all(Radius.circular(12.0)),
),
contentPadding:
EdgeInsets.symmetric(horizontal: 12.0, vertical: 8.0),
),
obscureText: true,
validator: (value) {
if (value == null || value.isEmpty) {
return 'Please confirm your password';
}
return null;
},
),
const SizedBox(height: 24.0),
ElevatedButton(
onPressed: () async {
String username = _usernameController.text;
String password1 = _passwordController.text;
String password2 = _confirmPasswordController.text;
// Check credentials
// TODO: Change the URL and don't forget to add trailing slash (/) at the end of URL!
// To connect Android emulator with Django on localhost, use URL http://10.0.2.2/
// If you using chrome, use URL http://localhost:8000
final response = await request.postJson(
"http://[YOUR_APP_URL]/auth/register/",
jsonEncode({
"username": username,
"password1": password1,
"password2": password2,
}));
if (context.mounted) {
if (response['status'] == 'success') {
ScaffoldMessenger.of(context).showSnackBar(
const SnackBar(
content: Text('Successfully registered!'),
),
);
Navigator.pushReplacement(
context,
MaterialPageRoute(
builder: (context) => const LoginPage()),
);
} else {
ScaffoldMessenger.of(context).showSnackBar(
const SnackBar(
content: Text('Failed to register!'),
),
);
}
}
},
style: ElevatedButton.styleFrom(
foregroundColor: Colors.white,
minimumSize: Size(double.infinity, 50),
backgroundColor: Theme.of(context).colorScheme.primary,
padding: const EdgeInsets.symmetric(vertical: 16.0),
),
child: const Text('Register'),
),
],
),
),
),
),
),
);
}
}
Before continuing to the next section, make sure you have replaced your URL in the "[YOUR_APP_URL]" section so that your application can run.
- In the
screens/login.dartfile, import theregister.dartfile and update theonTapfunction in theGestureDetectorwidget in the Register section to navigate to theRegisterPage.
...
import 'package:football_news/screens/register.dart';
...
GestureDetector(
  onTap: () {
    Navigator.push(
      context,
      MaterialPageRoute(
        builder: (context) => const RegisterPage(),
      ),
    );
  },
  child: Text(
    'Don\'t have an account? Register',
    style: TextStyle(
      color: Theme.of(context).colorScheme.primary,
      fontSize: 16.0,
    ),
  ),
),
...
- Run your Flutter application and try doing the register and login flow to ensure the authentication integration works properly.
Before trying register and login, make sure the website you created in the previous tutorial is already running in the terminal!
Don't continue to the next section if your register and login flow is still not working properly, please recheck the placement of your code before asking for teaching assistant help.
Tutorial: Creating Custom Models
In creating models that match JSON data, we can use the Quicktype website with the following steps.
- Open the
JSONendpoint that you created earlier in tutorial 2.
The JSON endpoint means when your web URL displays JSON data at the URL http://localhost:8000/json/. An example of JSON data can be seen in the left image in point no. 3.
-
Copy the
JSONdata and open the Quicktype website. -
On the Quicktype website, change the name to
NewsEntry, source type toJSON, and language toDart.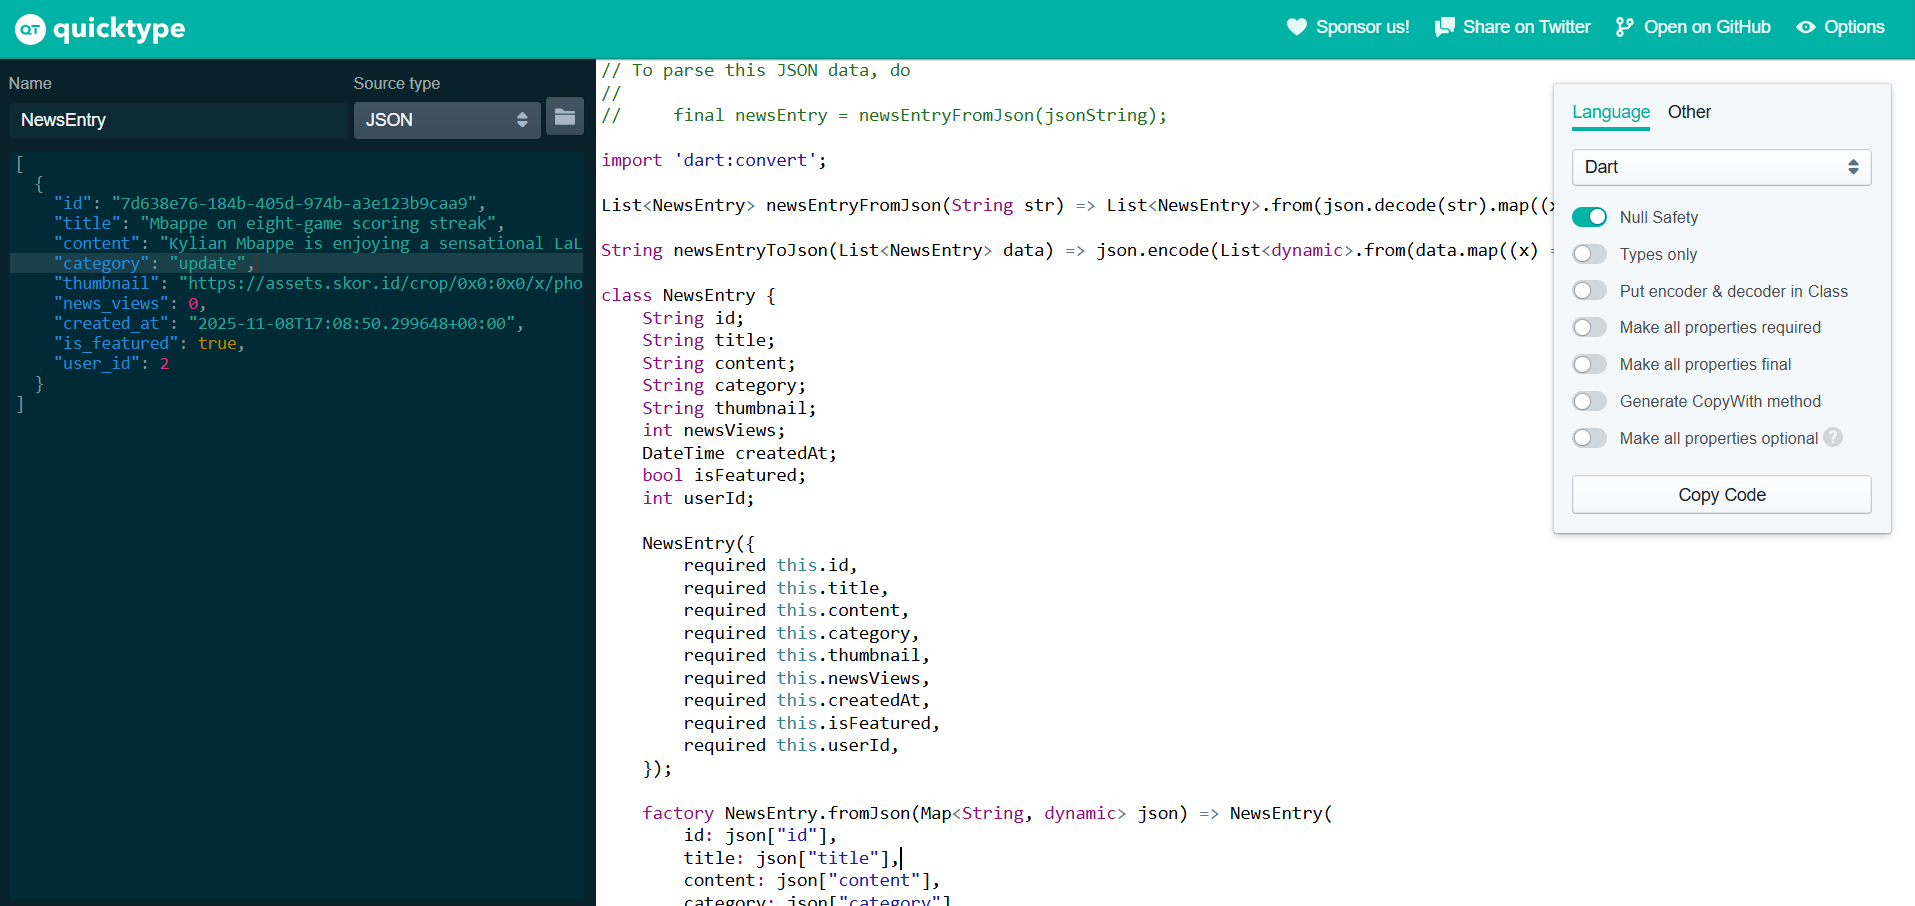
-
Paste the JSON data that was copied earlier into the textbox available on Quicktype.
-
Click the
Copy Codeoption on Quicktype.
After getting the model code through Quicktype, reopen the Flutter project and create a new models/ folder in the lib/ subdirectory. Create a new file in that folder named news_entry.dart, and paste the code that was copied from Quicktype.
Tutorial: Implementing Fetch Data from Django to Display in Flutter
Adding HTTP Dependency
To execute HTTP requests, we need an additional package, namely the http package.
-
Run
flutter pub add httpin the Flutter project terminal to add thehttppackage. -
In the
android/app/src/main/AndroidManifest.xmlfile, add the following code to allow Internet access in the Flutter application being created....
<application>
...
</application>
<!-- Required to fetch data from the Internet. -->
<uses-permission android:name="android.permission.INTERNET" />
...
Integrating News List Data from Django
Django Steps
Before starting integration in Flutter, we need to add a proxy endpoint to overcome CORS issues with images.
- Add the following import at the top of the
main/views.pyfile.
import requests
- Add the following view function in
main/views.py.
def proxy_image(request):
    image_url = request.GET.get('url')
    if not image_url:
        return HttpResponse('No URL provided', status=400)

    try:
        # Fetch image from external source
        response = requests.get(image_url, timeout=10)
        response.raise_for_status()

        # Return the image with proper content type
        return HttpResponse(
            response.content,
            content_type=response.headers.get('Content-Type', 'image/jpeg')
        )
    except requests.RequestException as e:
        return HttpResponse(f'Error fetching image: {str(e)}', status=500)
- Add a new path in
main/urls.py.
from main.views import ..., proxy_image
app_name = 'main'
urlpatterns = [
    # ... other paths
    path('proxy-image/', proxy_image, name='proxy_image'),
]
- Restart your Django application.
Flutter Steps
- Create a new file in the
lib/widgetsdirectory namednews_entry_card.dart.
import 'package:flutter/material.dart';
import 'package:football_news/models/news_entry.dart';
class NewsEntryCard extends StatelessWidget {
final NewsEntry news;
final VoidCallback onTap;
const NewsEntryCard({
super.key,
required this.news,
required this.onTap,
});
Widget build(BuildContext context) {
return Container(
margin: const EdgeInsets.symmetric(horizontal: 16, vertical: 12),
child: InkWell(
onTap: onTap,
child: Card(
shape: RoundedRectangleBorder(
borderRadius: BorderRadius.circular(8.0),
side: BorderSide(color: Colors.grey.shade300),
),
elevation: 2,
child: Padding(
padding: const EdgeInsets.all(16.0),
child: Column(
mainAxisAlignment: MainAxisAlignment.start,
crossAxisAlignment: CrossAxisAlignment.start,
children: [
// Thumbnail
ClipRRect(
borderRadius: BorderRadius.circular(6),
child: Image.network(
'http://localhost:8000/proxy-image/?url=${Uri.encodeComponent(news.thumbnail)}',
height: 150,
width: double.infinity,
fit: BoxFit.cover,
errorBuilder: (context, error, stackTrace) => Container(
height: 150,
color: Colors.grey[300],
child: const Center(child: Icon(Icons.broken_image)),
),
),
),
const SizedBox(height: 8),
// Title
Text(
news.title,
style: const TextStyle(
fontSize: 18.0,
fontWeight: FontWeight.bold,
),
),
const SizedBox(height: 6),
// Category
Text('Category: ${news.category}'),
const SizedBox(height: 6),
// Content preview
Text(
news.content.length > 100
? '${news.content.substring(0, 100)}...'
: news.content,
maxLines: 2,
overflow: TextOverflow.ellipsis,
style: const TextStyle(color: Colors.black54),
),
const SizedBox(height: 6),
// Featured indicator
if (news.isFeatured)
const Text(
'Featured',
style: TextStyle(
color: Colors.amber,
fontWeight: FontWeight.bold
),
),
],
),
),
),
),
);
}
}
- Create a new file in the
lib/screensdirectory namednews_entry_list.dart.
import 'package:flutter/material.dart';
import 'package:football_news/models/news_entry.dart';
import 'package:football_news/widgets/left_drawer.dart';
import 'package:football_news/screens/news_detail.dart';
import 'package:football_news/widgets/news_entry_card.dart';
import 'package:provider/provider.dart';
import 'package:pbp_django_auth/pbp_django_auth.dart';
class NewsEntryListPage extends StatefulWidget {
const NewsEntryListPage({super.key});
State<NewsEntryListPage> createState() => _NewsEntryListPageState();
}
class _NewsEntryListPageState extends State<NewsEntryListPage> {
Future<List<NewsEntry>> fetchNews(CookieRequest request) async {
// TODO: Replace the URL with your app's URL and don't forget to add a trailing slash (/)!
// To connect Android emulator with Django on localhost, use URL http://10.0.2.2/
// If you using chrome, use URL http://localhost:8000
final response = await request.get('http://[YOUR_APP_URL]/json/');
// Decode response to json format
var data = response;
// Convert json data to NewsEntry objects
List<NewsEntry> listNews = [];
for (var d in data) {
if (d != null) {
listNews.add(NewsEntry.fromJson(d));
}
}
return listNews;
}
Widget build(BuildContext context) {
final request = context.watch<CookieRequest>();
return Scaffold(
appBar: AppBar(
title: const Text('News Entry List'),
),
drawer: const LeftDrawer(),
body: FutureBuilder(
future: fetchNews(request),
builder: (context, AsyncSnapshot snapshot) {
if (snapshot.data == null) {
return const Center(child: CircularProgressIndicator());
} else {
if (!snapshot.hasData) {
return const Column(
children: [
Text(
'There are no news in football news yet.',
style: TextStyle(fontSize: 20, color: Color(0xff59A5D8)),
),
SizedBox(height: 8),
],
);
} else {
return ListView.builder(
itemCount: snapshot.data!.length,
itemBuilder: (_, index) => NewsEntryCard(
news: snapshot.data![index],
onTap: () {
// Show a snackbar when news card is clicked
ScaffoldMessenger.of(context)
..hideCurrentSnackBar()
..showSnackBar(
SnackBar(
content: Text("You clicked on ${snapshot.data![index].title}"),
),
);
},
),
);
}
}
},
),
);
}
}
- Add the
news_entry_list.dartpage towidgets/left_drawer.dartby adding the following code.
// Add this import at the top
import 'package:football_news/screens/news_entry_list.dart';

// Add this ListTile in your drawer
ListTile(
    leading: const Icon(Icons.add_reaction_rounded),
    title: const Text('News List'),
    onTap: () {
        // Route to news list page
        Navigator.push(
            context,
            MaterialPageRoute(builder: (context) => const NewsEntryListPage()),
        );
    },
),
- Change the function of the
See Football Newsbutton on the main page to redirect to theNewsEntryListPage. You can do redirection by addingelse ifafter theif(...){...}code at the end ofonTap: () { }in thewidgets/news_card.dartfile.
// Add this import at the top
import 'package:football_news/screens/news_entry_list.dart';

// Add this condition in your onTap handler
else if (item.name == "See Football News") {
    Navigator.push(
        context,
        MaterialPageRoute(
            builder: (context) => const NewsEntryListPage()
        ),
    );
}
Integrating News Detail Data from Django
- Create a new file in the
lib/screensdirectory namednews_detail.dart.
import 'package:flutter/material.dart';
import 'package:football_news/models/news_entry.dart';
class NewsDetailPage extends StatelessWidget {
final NewsEntry news;
const NewsDetailPage({super.key, required this.news});
String _formatDate(DateTime date) {
// Simple date formatter without intl package
final months = ['Jan', 'Feb', 'Mar', 'Apr', 'May', 'Jun',
'Jul', 'Aug', 'Sep', 'Oct', 'Nov', 'Dec'];
return '${date.day} ${months[date.month - 1]} ${date.year}, ${date.hour.toString().padLeft(2, '0')}:${date.minute.toString().padLeft(2, '0')}';
}
Widget build(BuildContext context) {
return Scaffold(
appBar: AppBar(
title: const Text('News Detail'),
backgroundColor: Colors.indigo,
foregroundColor: Colors.white,
),
body: SingleChildScrollView(
child: Column(
crossAxisAlignment: CrossAxisAlignment.start,
children: [
// Thumbnail image
if (news.thumbnail.isNotEmpty)
Image.network(
'http://localhost:8000/proxy-image/?url=${Uri.encodeComponent(news.thumbnail)}',
width: double.infinity,
height: 250,
fit: BoxFit.cover,
errorBuilder: (context, error, stackTrace) => Container(
height: 250,
color: Colors.grey[300],
child: const Center(
child: Icon(Icons.broken_image, size: 50),
),
),
),
Padding(
padding: const EdgeInsets.all(16.0),
child: Column(
crossAxisAlignment: CrossAxisAlignment.start,
children: [
// Featured badge
if (news.isFeatured)
Container(
padding: const EdgeInsets.symmetric(
horizontal: 12.0, vertical: 6.0),
margin: const EdgeInsets.only(bottom: 12.0),
decoration: BoxDecoration(
color: Colors.amber,
borderRadius: BorderRadius.circular(20.0),
),
child: const Text(
'Featured',
style: TextStyle(
fontWeight: FontWeight.bold,
fontSize: 12,
),
),
),
// Title
Text(
news.title,
style: const TextStyle(
fontSize: 24.0,
fontWeight: FontWeight.bold,
),
),
const SizedBox(height: 12),
// Category and Date
Row(
children: [
Container(
padding: const EdgeInsets.symmetric(
horizontal: 10.0, vertical: 4.0),
decoration: BoxDecoration(
color: Colors.indigo.shade100,
borderRadius: BorderRadius.circular(12.0),
),
child: Text(
news.category.toUpperCase(),
style: TextStyle(
fontSize: 12,
fontWeight: FontWeight.bold,
color: Colors.indigo.shade700,
),
),
),
const SizedBox(width: 12),
Text(
_formatDate(news.createdAt),
style: TextStyle(
fontSize: 12,
color: Colors.grey[600],
),
),
],
),
const SizedBox(height: 8),
// Views count
Row(
children: [
Icon(Icons.visibility, size: 16, color: Colors.grey[600]),
const SizedBox(width: 4),
Text(
'${news.newsViews} views',
style: TextStyle(
fontSize: 12,
color: Colors.grey[600],
),
),
],
),
const Divider(height: 32),
// Full content
Text(
news.content,
style: const TextStyle(
fontSize: 16.0,
height: 1.6,
),
textAlign: TextAlign.justify,
),
const SizedBox(height: 24),
],
),
),
],
),
),
);
}
}
- Update the
lib/screens/news_entry_list.dartfile to add navigation to the detail page. Change theonTapsection inNewsEntryCardwith the following code.
// Add this import at the top
import 'package:football_news/screens/news_detail.dart';
...
// Update the ListView.builder section
return ListView.builder(
  itemCount: snapshot.data!.length,
  itemBuilder: (_, index) => NewsEntryCard(
    news: snapshot.data![index],
    onTap: () {
      // Navigate to news detail page
      Navigator.push(
        context,
        MaterialPageRoute(
          builder: (context) => NewsDetailPage(
            news: snapshot.data![index],
          ),
        ),
      );
    },
  ),
);
...
Run the application and try adding several NewsEntry on your website. Then, try to see the results through the News List and News Detail pages that you just created in the Flutter application.
Tutorial: Integrating Flutter Form With Django Services
Django Steps
The following steps will be performed on the Django project code.
- Create a new view function in
main/views.pyof your Django application with the following code snippet. Add the following imports at the top of the file.
from django.views.decorators.csrf import csrf_exempt
from django.utils.html import strip_tags
import json
from django.http import JsonResponse
Then add the following view function:
@csrf_exempt
def create_news_flutter(request):
    if request.method == 'POST':
        data = json.loads(request.body)
        title = strip_tags(data.get("title", ""))  # Strip HTML tags
        content = strip_tags(data.get("content", ""))  # Strip HTML tags
        category = data.get("category", "")
        thumbnail = data.get("thumbnail", "")
        is_featured = data.get("is_featured", False)
        user = request.user

        new_news = News(
            title=title,
            content=content,
            category=category,
            thumbnail=thumbnail,
            is_featured=is_featured,
            user=user
        )
        new_news.save()

        return JsonResponse({"status": "success"}, status=200)
    else:
        return JsonResponse({"status": "error"}, status=401)
- Add a new path in
main/urls.pywith the following code.
path('create-flutter/', create_news_flutter, name='create_news_flutter'),
- Restart your Django application.
Flutter Steps
After the Django side is complete, next we move to the form on the Flutter side. The following steps will be performed on the Flutter project code.
- Add the following imports at the top of the
newslist_form.dartfile.
import 'dart:convert';
import 'package:provider/provider.dart';
import 'package:pbp_django_auth/pbp_django_auth.dart';
import 'package:football_news/screens/menu.dart';
- Connect the
newslist_form.dartpage withCookieRequestby adding the following line of code inside thebuildmethod.
Widget build(BuildContext context) {
final request = context.watch<CookieRequest>();
return Scaffold(
// ... rest of your code
);
}
- Change the command in the
onPressed: ()add button to the following code.
onPressed: () async {
  if (_formKey.currentState!.validate()) {
    // TODO: Replace the URL with your app's URL
    // To connect Android emulator with Django on localhost, use URL http://10.0.2.2/
    // If you using chrome,  use URL http://localhost:8000

    final response = await request.postJson(
      "http://[Your_APP_URL]/create-flutter/",
      jsonEncode({
        "title": _title,
        "content": _content,
        "thumbnail": _thumbnail,
        "category": _category,
        "is_featured": _isFeatured,
      }),
    );
    if (context.mounted) {
      if (response['status'] == 'success') {
        ScaffoldMessenger.of(context)
            .showSnackBar(const SnackBar(
          content: Text("News successfully saved!"),
        ));
        Navigator.pushReplacement(
          context,
          MaterialPageRoute(
              builder: (context) => MyHomePage()),
        );
      } else {
        ScaffoldMessenger.of(context)
            .showSnackBar(const SnackBar(
          content: Text("Something went wrong, please try again."),
        ));
      }
    }
  }
},
- Run the application again and try adding new news from your Flutter application.
Tutorial: Implementing Logout Feature
Django Steps
The following steps will be performed on the Django project code.
- Create a view method for logout in
authentication/views.py. Add the following imports at the top of the file.
from django.contrib.auth import logout as auth_logout
from django.views.decorators.csrf import csrf_exempt
from django.http import JsonResponse
Then add the following view function:
@csrf_exempt
def logout(request):
    username = request.user.username
    try:
        auth_logout(request)
        return JsonResponse({
            "username": username,
            "status": True,
            "message": "Logged out successfully!"
        }, status=200)
    except:
        return JsonResponse({
            "status": False,
            "message": "Logout failed."
        }, status=401)
- Add a new path in
authentication/urls.pywith the following code.
from django.urls import path
from authentication.views import login,register,logout

app_name = 'authentication'

urlpatterns = [
    path('login/', login, name='login'),
    path('register/', register, name='register'),
    path('logout/', logout, name='logout')
]
Flutter Steps
The following steps will be performed on the Flutter project code.
- Open the
lib/widgets/news_card.dartfile and add the following imports at the top of the file.
import 'package:football_news/screens/login.dart';
import 'package:pbp_django_auth/pbp_django_auth.dart';
import 'package:provider/provider.dart';
- Change the
buildmethod to addCookieRequest.
Widget build(BuildContext context) {
final request = context.watch<CookieRequest>();
return Material(
// ... rest of your code
);
}
-
Change the command
onTap: () {...}in theInkwellwidget toonTap: () async {...}so that theInkwellwidget can perform the logout process asynchronously. -
Add the following code to
async {...}at the end (after the previous if statements).
// Add this after your previous if statements
else if (item.name == "Logout") {
    // TODO: Replace the URL with your app's URL and don't forget to add a trailing slash (/)!
    // To connect Android emulator with Django on localhost, use URL http://10.0.2.2/
    // If you using chrome,  use URL http://localhost:8000

    final response = await request.logout(
        "http://[YOUR_APP_URL]/auth/logout/");
    String message = response["message"];
    if (context.mounted) {
        if (response['status']) {
            String uname = response["username"];
            ScaffoldMessenger.of(context).showSnackBar(SnackBar(
                content: Text("$message See you again, $uname."),
            ));
            Navigator.pushReplacement(
                context,
                MaterialPageRoute(builder: (context) => const LoginPage()),
            );
        } else {
            ScaffoldMessenger.of(context).showSnackBar(
                SnackBar(
                    content: Text(message),
                ),
            );
        }
    }
}
- Run the application again and try to logout.
Closing Remarks
Congratulations! You have completed Tutorial 8! Hopefully with this tutorial, you can understand about models, fetch data, basic state management, and Django-Flutter integration well. 😄
- Study and understand again the code you have written above carefully. Don't forget to complete all the TODOs!
Don't forget to run flutter analyze to see if there are parts of your code that can be optimized.
-
Do
add,commitandpushto update the GitHub repository.git add .
git commit -m "<commit_message>"
git push -u origin <main_branch>- Change
<commit_message>according to your preference. Example:git commit -m "tutorial 8 completed". - Change
<main_branch>according to your main branch name. Example:git push -u origin mainorgit push -u origin master.
- Change
Additional References
- Fetch Data From the Internet
- How to create models in Flutter Dart
- Simple app state management | Flutter
- Flutter State Management with Provider
- Introduction to Flutter State Management and Its Types (Indonesian)
Contributors
- Fiona Ratu Maheswari (FIO)
- Meutia Fajriyah (MEW)
- Yeshua Marco Gracia (ACO)
- Anthony Edbert Feriyanto (ANT)
- Regina Meilani Aruan (GIN)
Credits
This tutorial was developed based on PBP Even Semester 2025/2026 written by the Platform-Based Programming Teaching Team 2025/2026. All tutorials and instructions listed in this repository are designed in such a way that students who are taking the Platform-Based Programming course can complete the tutorial during lab sessio