Tutorial 9: Flutter Deployment with GitHub Actions and Bitrise
Platform-Based Programming (CSGE602022) — organized by Faculty of Computer Science, University of Indonesia, Odd Semester 2025/2026
Learning Objectives
After completing this tutorial, students are expected to be able to:
- Understand the concepts of continuous integration and continuous deployment.
- Understand the concepts and usage of GitHub Actions and GitHub Release.
- Understand the concepts and usage of Bitrise.
- Implement continuous integration and continuous deployment for Flutter applications using GitHub Actions and Bitrise.
Introduction to CI/CD
CI/CD (Continuous Integration and Continuous Deployment) is an important concept in software development that focuses on automating the testing and release process of code using tools like GitHub Actions.
Continuous Integration (CI) ensures that every code change sent to the repository is automatically tested. The goal is to detect errors early and prevent them from disrupting existing functionality.
Continuous Deployment (CD) continues the CI process by automating the release of code that has passed testing to production or testing environments, without manual intervention. This makes development faster and more responsive to changing requirements.
With GitHub Actions, every time there's a change in the repository, the system can automatically run CI workflows for testing and CD for server deployment. Overall, CI/CD helps maintain application quality, accelerate release time, and improve efficiency in software development.
Introduction to GitHub Actions
GitHub Actions is a GitHub feature that enables automation of software development processes through workflows. With this feature, tasks such as testing, building, and releasing can be executed automatically whenever there are changes to the repository.
For example, when new code is pushed to GitHub, GitHub Actions can immediately run tests, build the application, and save the results as artifacts.
Each workflow is configured through a YAML configuration file in the .github/workflows/ folder, which contains step-by-step instructions for GitHub Actions.
It's important to note that GitHub Actions utilizes special configuration files (usually named .github/workflows/filename.yml) in the repository. This file contains descriptions of the steps that GitHub Actions should execute.
Thus, GitHub Actions helps development teams work more efficiently, as many routine processes can be automated, allowing them to focus on feature development and code quality improvement.
Here's an example of a simple workflow that we can use to build an Android application:
name: Build Android APK

on:
  push:
    branches:
      - master

jobs:
  build:
    runs-on: ubuntu-latest
    steps:
      - uses: actions/checkout@v4

      - name: Setup Java
        uses: actions/setup-java@v3
        with:
          distribution: 'zulu'
          java-version: '17'

      - name: Setup Android SDK
        uses: android-actions/setup-android@v3

      - name: Build APK
        run: ./gradlew assembleRelease

      - name: Upload APK
        uses: actions/upload-artifact@v3
        with:
          name: app-release
          path: app/build/outputs/apk/release/app-release.apk
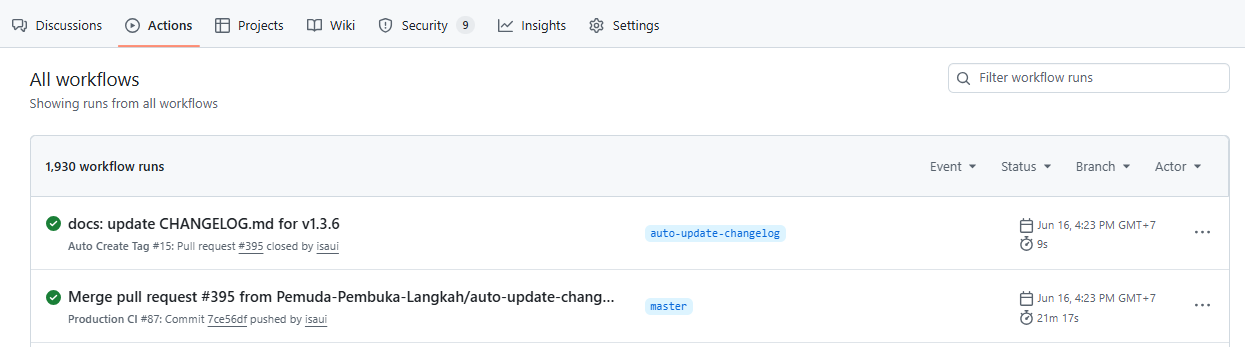
Here's an example of the GitHub Actions page displaying the workflow run history:
Introduction to GitHub Release
GitHub Release is a GitHub feature that allows developers to publish release versions of their projects. Each release can include:
- Application version (e.g., v1.0.0, v2.1.3)
- Release notes explaining changes or new features
- Binary files such as APK, executables, or other ready-to-use files
GitHub Release is very useful for:
- Distributing built applications to users
- Tracking release versions of applications
- Providing documentation for each version
- Making it easy for users to download applications without building them themselves
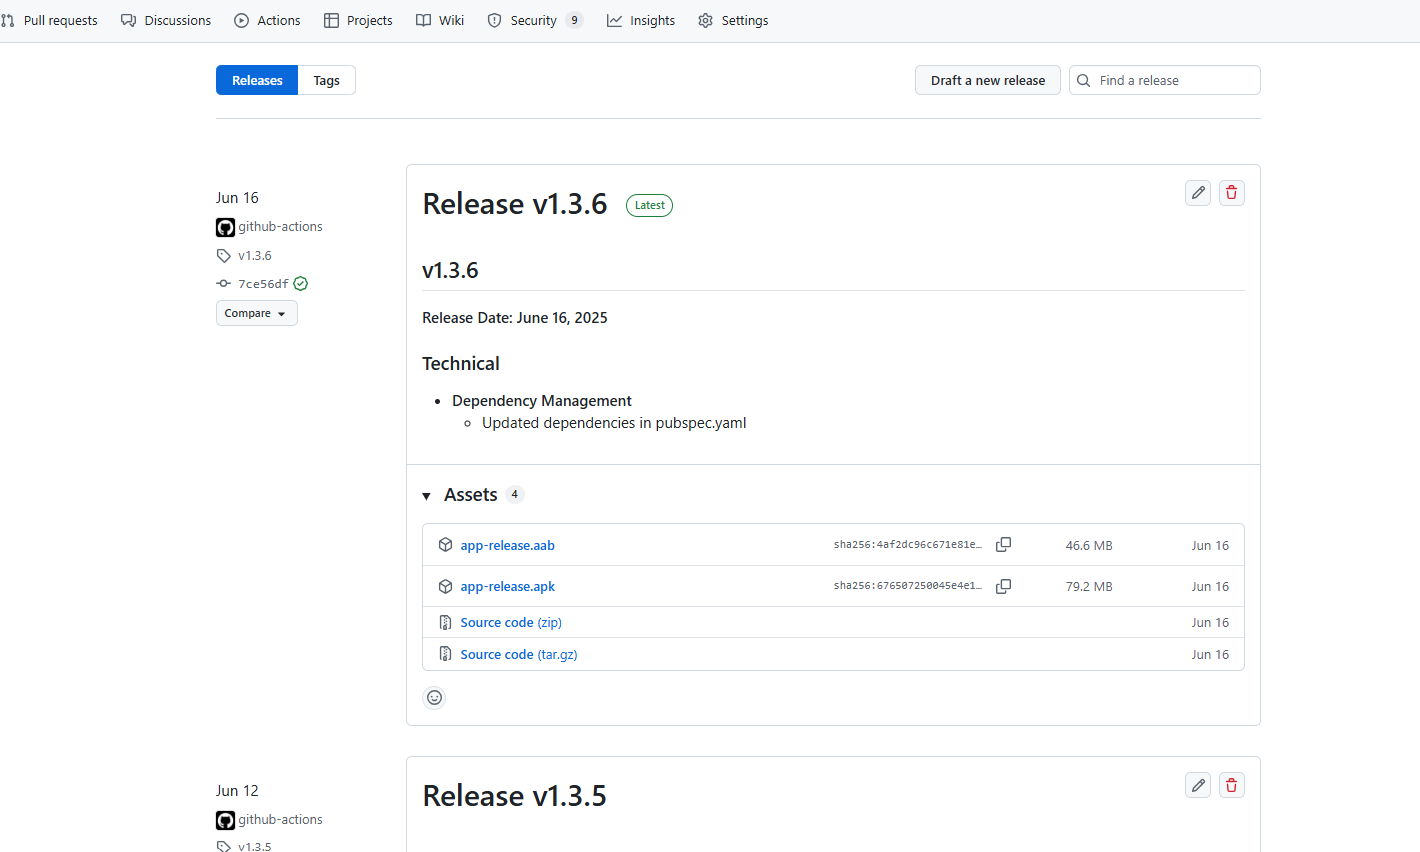
Here's an example of the GitHub Release page:
Example Workflow with GitHub Release
Here's an example workflow that builds an Android APK and automatically creates a GitHub Release:
name: Build and Release Android APK

on:
  push:
    branches:
      - master

jobs:
  build-and-release:
    runs-on: ubuntu-latest
    steps:
      - uses: actions/checkout@v4

      - name: Setup Java
        uses: actions/setup-java@v3
        with:
          distribution: 'zulu'
          java-version: '17'

      - name: Setup Android SDK
        uses: android-actions/setup-android@v3

      - name: Build APK
        run: ./gradlew assembleRelease

      - name: Create Release
        uses: ncipollo/release-action@v1
        with:
          artifacts: "app/build/outputs/apk/release/*.apk"
          body: "New release"
          name: "Release v1.0.0"
          token: ${{ secrets.GITHUB_TOKEN }}
With the above workflow, every time there's a push to the main branch, GitHub Actions will:
- Build APK from the latest code
- Automatically create a GitHub Release
- Upload the APK to the Release so users can download it
As a result, users can directly download the APK from the Releases page without having to build it themselves.
Introduction to Bitrise

Bitrise is a cloud service that provides various features to facilitate the build, test, release, and monitoring processes for applications. This service can be used for various platforms, such as Android, iOS, React Native, Flutter, and others. In this tutorial, we will use this service to build and release Flutter applications automatically. Bitrise is also specifically configured for mobile application development.
Tutorial: Setting Up CI/CD for Flutter Application Build on GitHub Actions
In this tutorial, you will deploy the Flutter application you created in previous tutorials to GitHub Release using GitHub Actions.
1. Create GitHub Actions Workflow
If it doesn't exist yet, create a .github/workflows folder in your application's root folder.
Create a new file release.yml in the .github/workflows folder:
# This is a basic workflow to help you get started with Actions
name: Release

# Controls when the workflow will run
on:
  # Triggers the workflow on push events but only for the main branch
  push:
    branches: [main]

# Permissions needed for creating releases
permissions:
  contents: write

# A workflow run is made up of one or more jobs that can run sequentially or in parallel
jobs:
  # This workflow contains a single job called "Build and Release APK"
  releases:
    name: Build and Release APK
    # The type of runner that the job will run on
    runs-on: ubuntu-latest
    steps:
      - name: Checkout the code
        uses: actions/checkout@v4

      - name: Get version from pubspec.yaml
        id: version
        run: echo "::set-output name=version::$(grep "version:" pubspec.yaml | cut -c10-)"

      - name: Setup Java
        uses: actions/setup-java@v3
        with:
          distribution: "zulu"
          java-version: "17"

      - name: Setup Flutter
        uses: subosito/flutter-action@v2
        with:
          channel: "stable"

      - name: Get packages
        run: flutter pub get

      - name: Build APK
        run: flutter build apk --split-per-abi

      - name: Get current date
        id: date
        run: echo "::set-output name=date::$(TZ='Asia/Jakarta' date +'%A %d-%m-%Y %T WIB')"

      - name: Generate unique tag
        id: tag
        run: echo "::set-output name=tag::v${{ steps.version.outputs.version }}-$(date +'%Y%m%d%H%M%S')"

      - name: Release APK
        uses: ncipollo/release-action@v1
        with:
          allowUpdates: false
          artifacts: "build/app/outputs/flutter-apk/*.apk"
          body: "Published at ${{ steps.date.outputs.date }}"
          name: "v${{ steps.version.outputs.version }} - ${{ steps.date.outputs.date }}"
          token: ${{ secrets.GITHUB_TOKEN }}
          tag: ${{ steps.tag.outputs.tag }}
Adjust the main branch to match the main branch in your Flutter repository.
2. Test Workflow
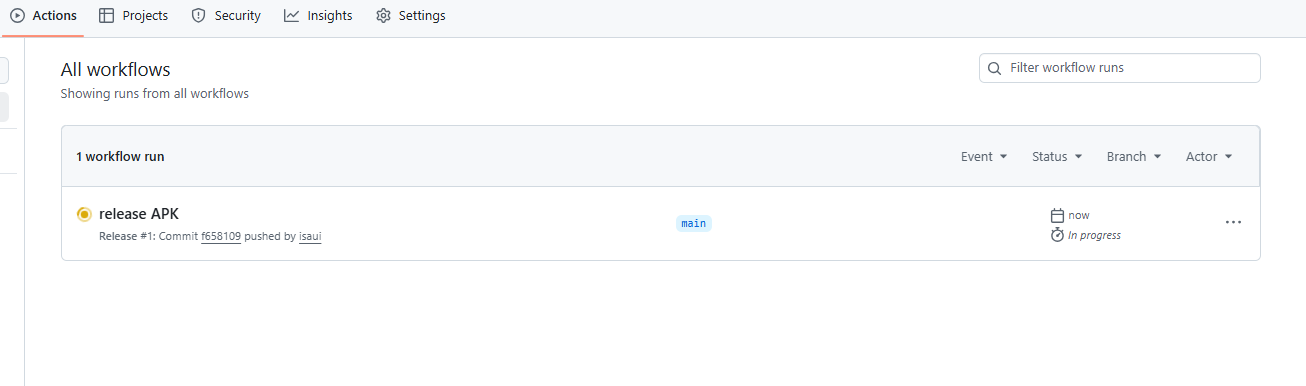
Save the workflow file and push it to your repository. Check if the application is successfully built and released by GitHub Actions automatically. Next, you can check your workflow progress in the Actions tab of your repository.
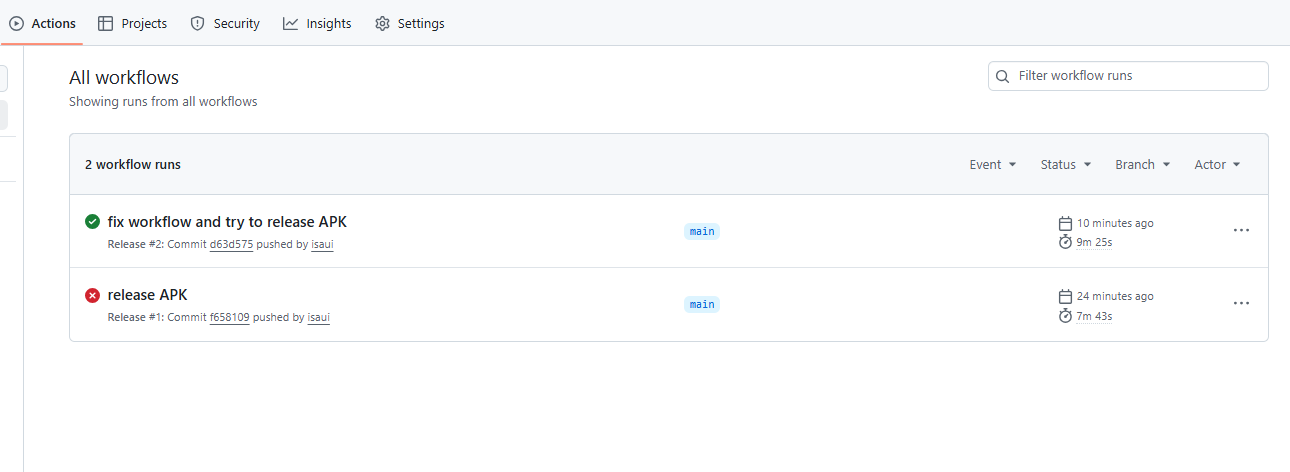
If your workflow succeeds, you will get a green checkmark, if it fails you will get a red X mark. To check the logs, you can click on that workflow.
If the workflow succeeds, you can see the results in GitHub Releases. Open your repository page, then click the Releases tab in the right sidebar or access it through the URL https://github.com/your-username/your-repository/releases.

Note that the APK currently generated is unsigned. This is normal because we haven't performed the signing process on the Flutter application yet. Signing will be configured in the next stage.
Tutorial: Setting Up CI/CD for Flutter Application Build on Bitrise
In this tutorial, you will deploy the Flutter application you created in previous tutorials to Bitrise.
-
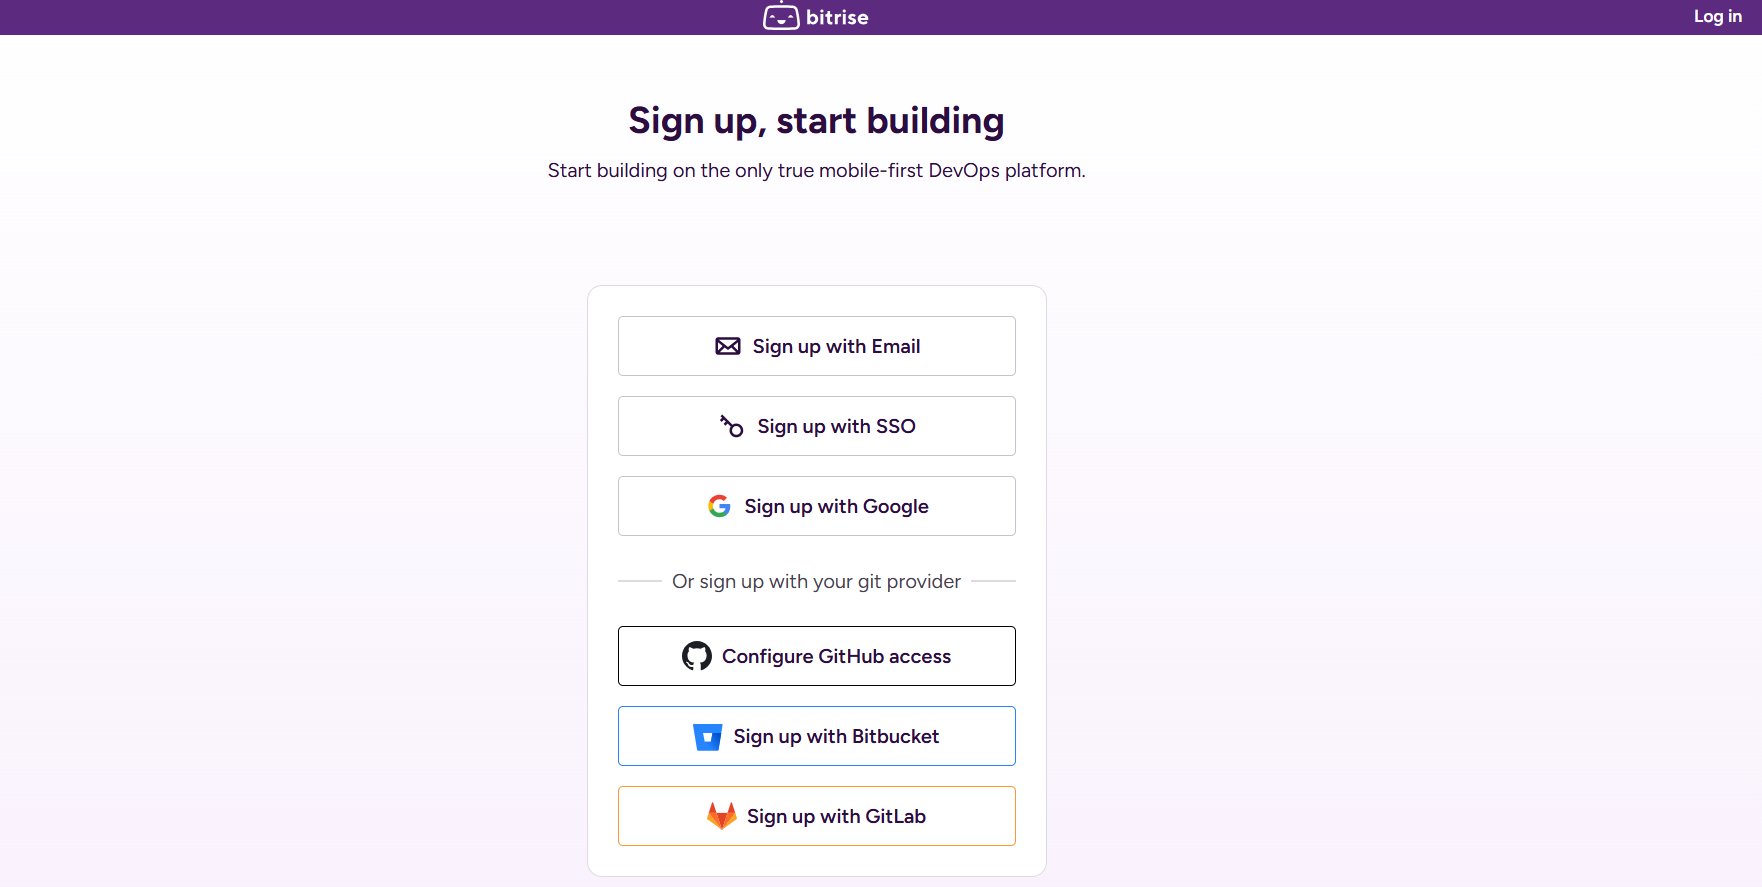
Create a Bitrise account using your GitHub account (Click the Configure GitHub access button).
-
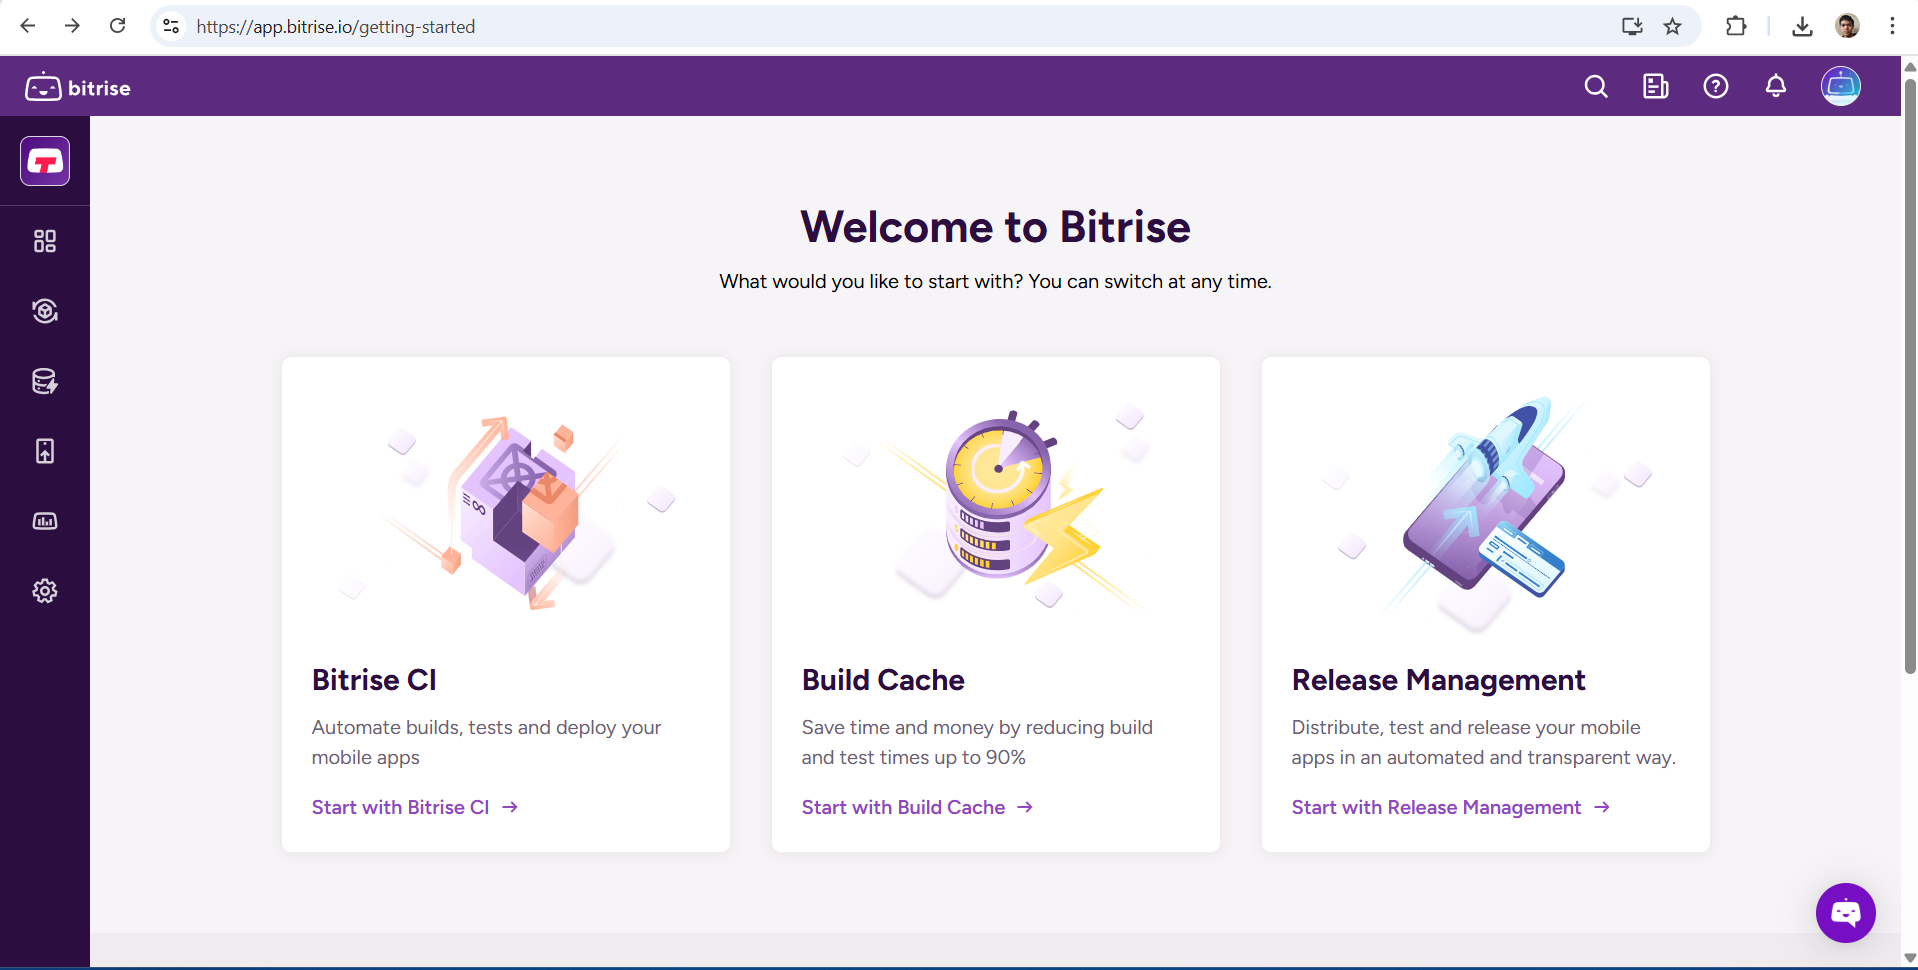
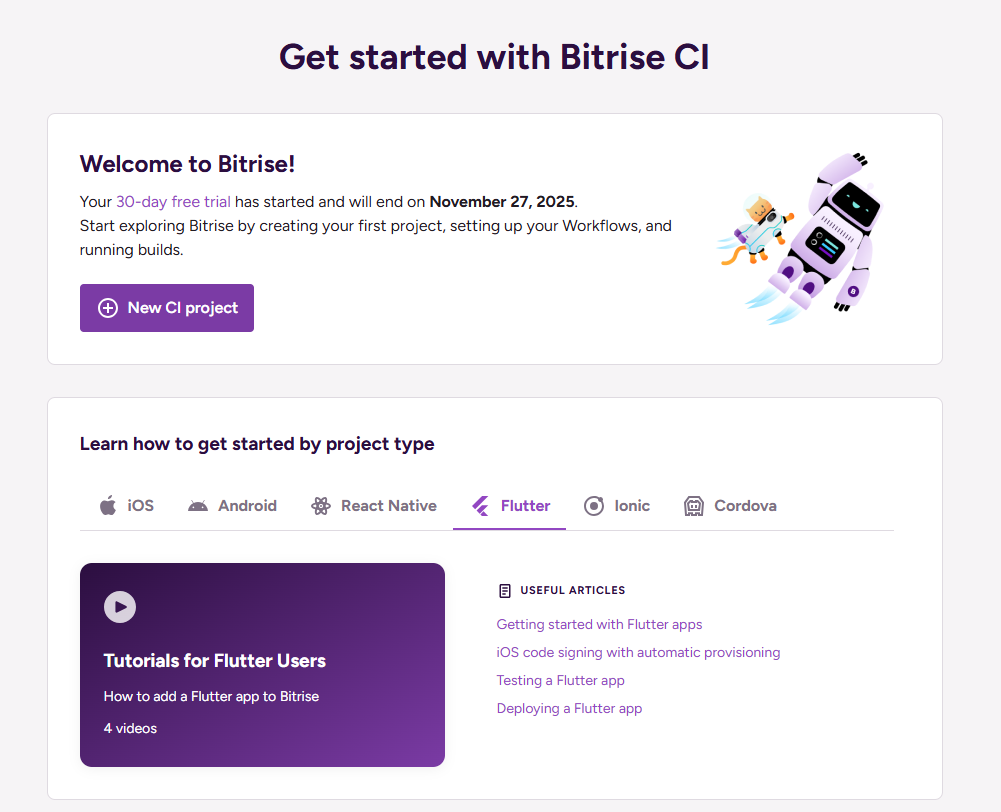
After successfully creating an account, enter your desired Bitrise username and click Continue. Then on the Onboarding Page, click Start with Bitrise CI → New CI project.
-
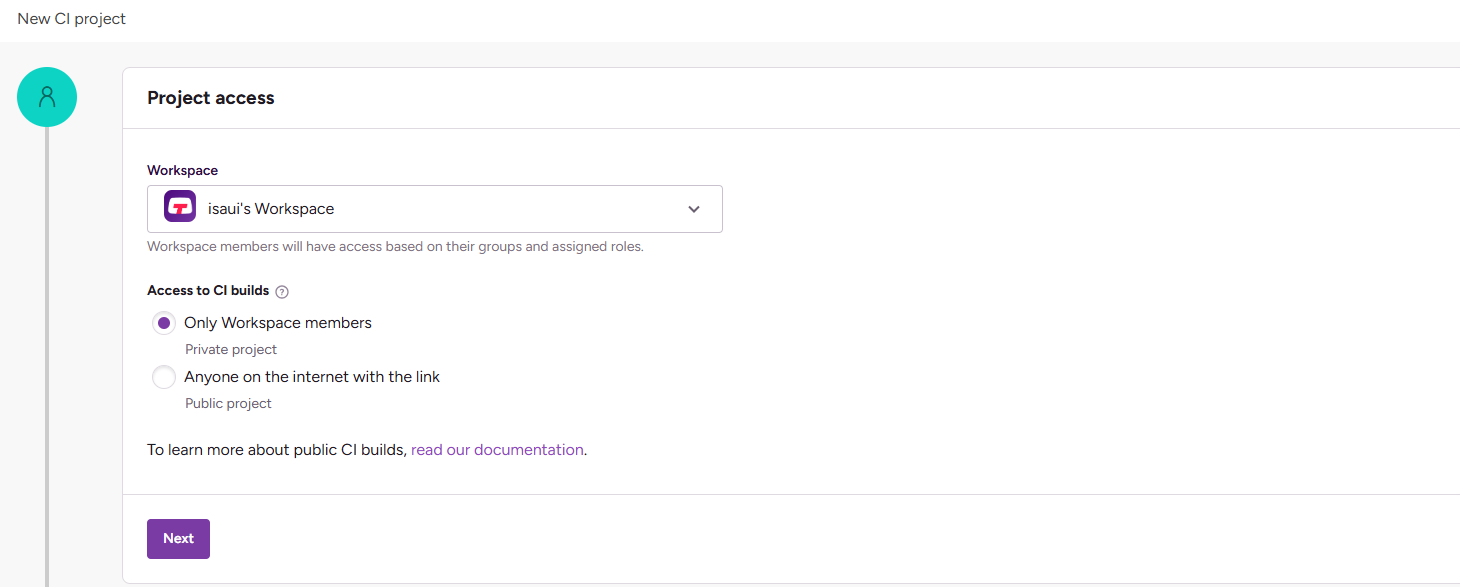
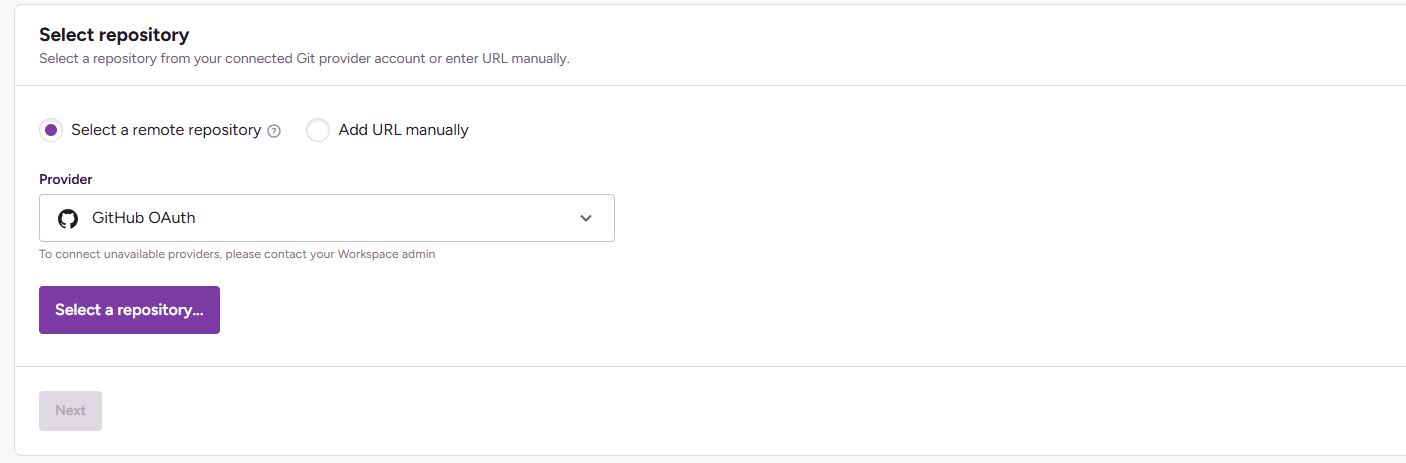
In the Project Access section, select private project and click Next. Then select your Flutter repository and click Next again.
-
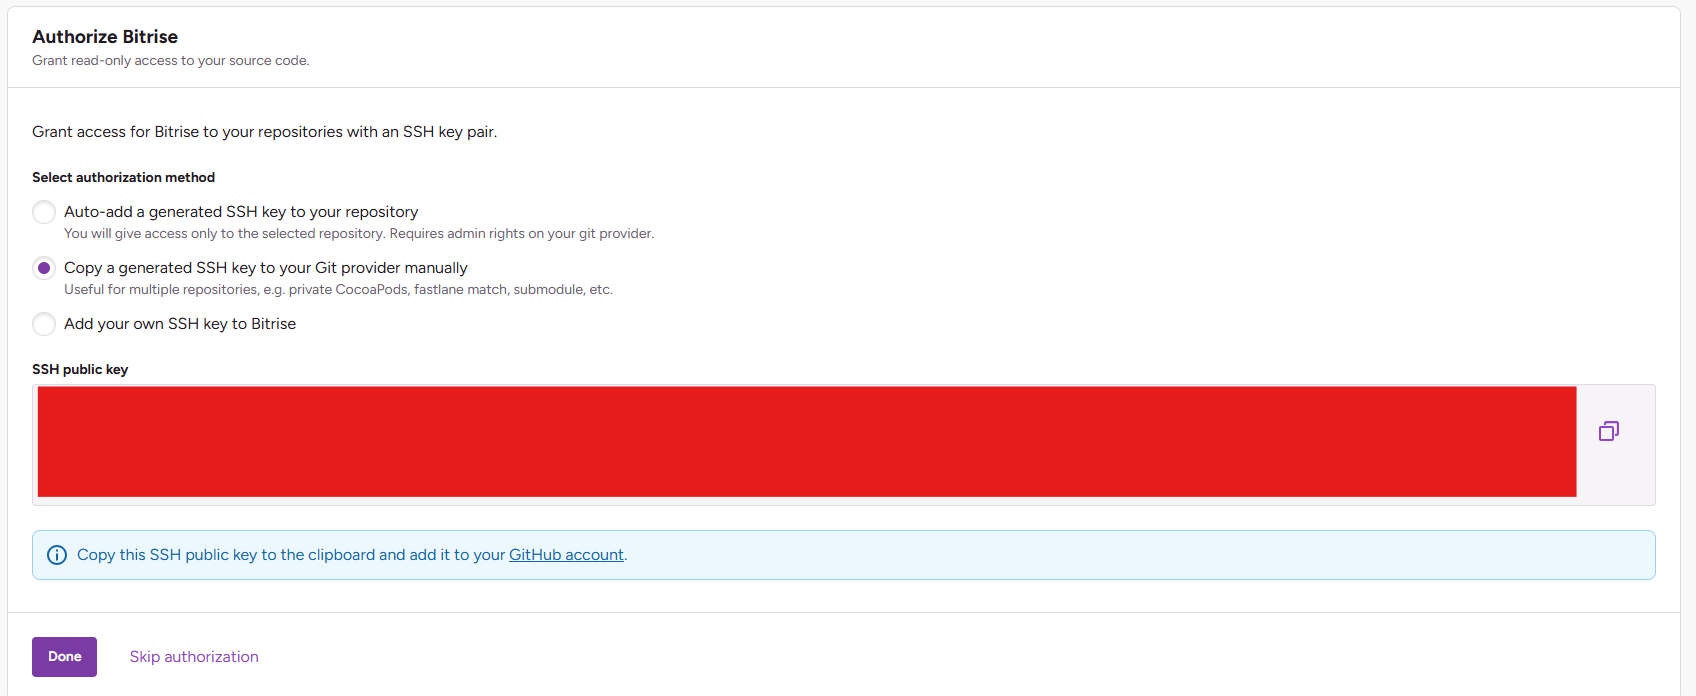
Choose Copy a generated SSH key to your Git provider manually, then copy the displayed SSH public key.
-
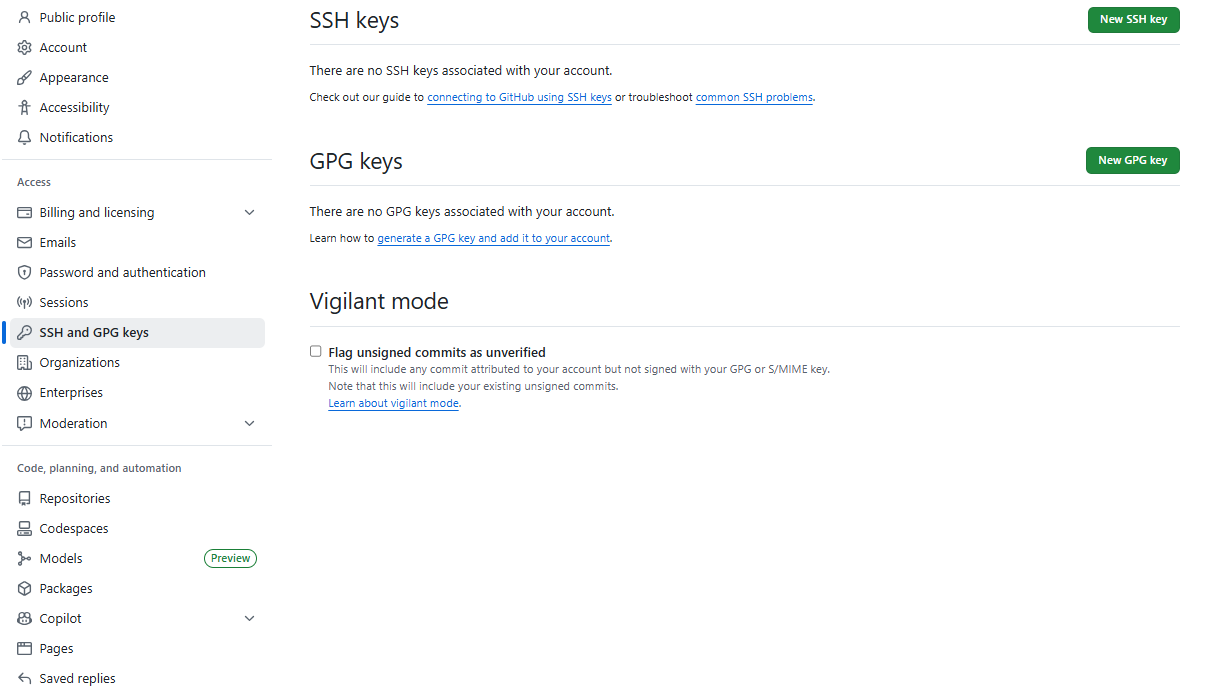
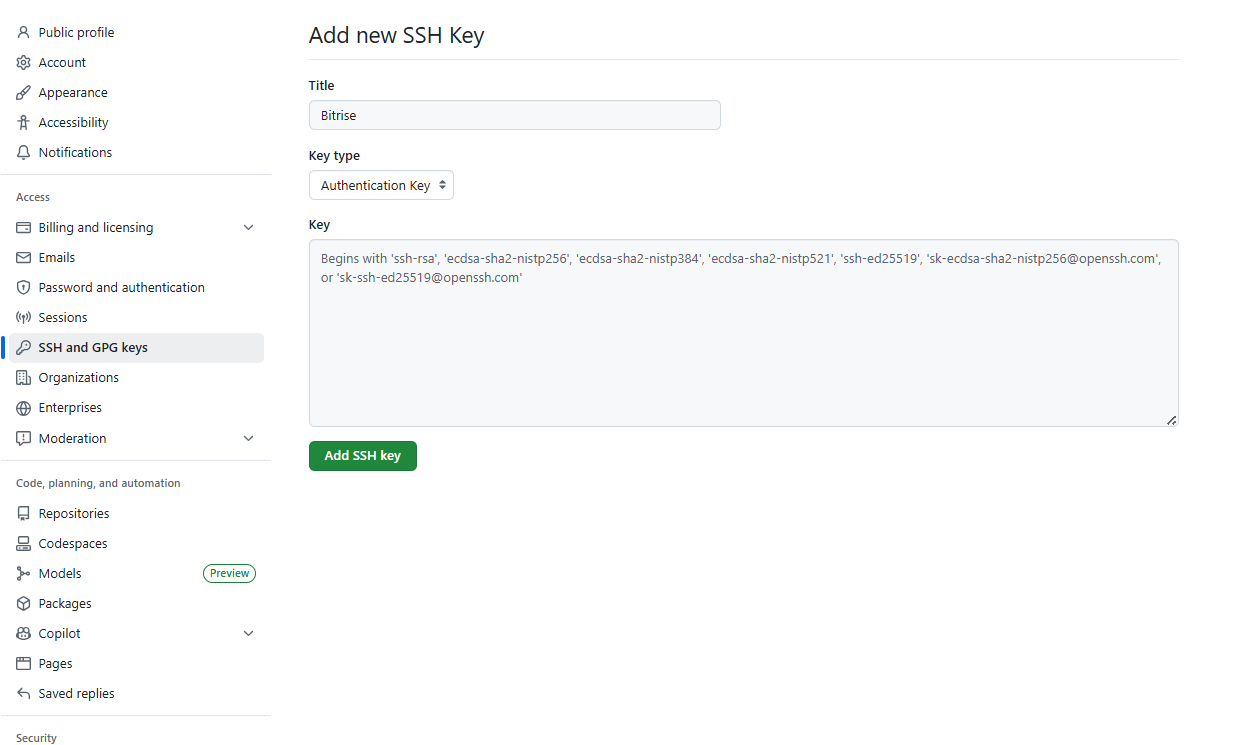
Open SSH and GPG keys in GitHub settings, click New SSH key, select type Authentication Key, paste the SSH key, then click Add SSH Key.
-
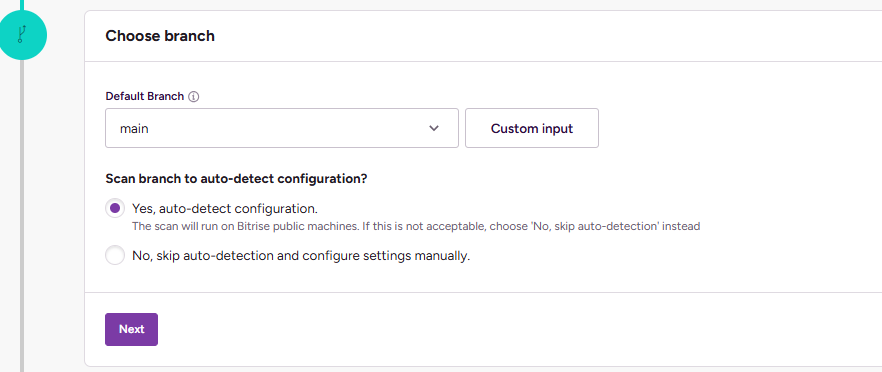
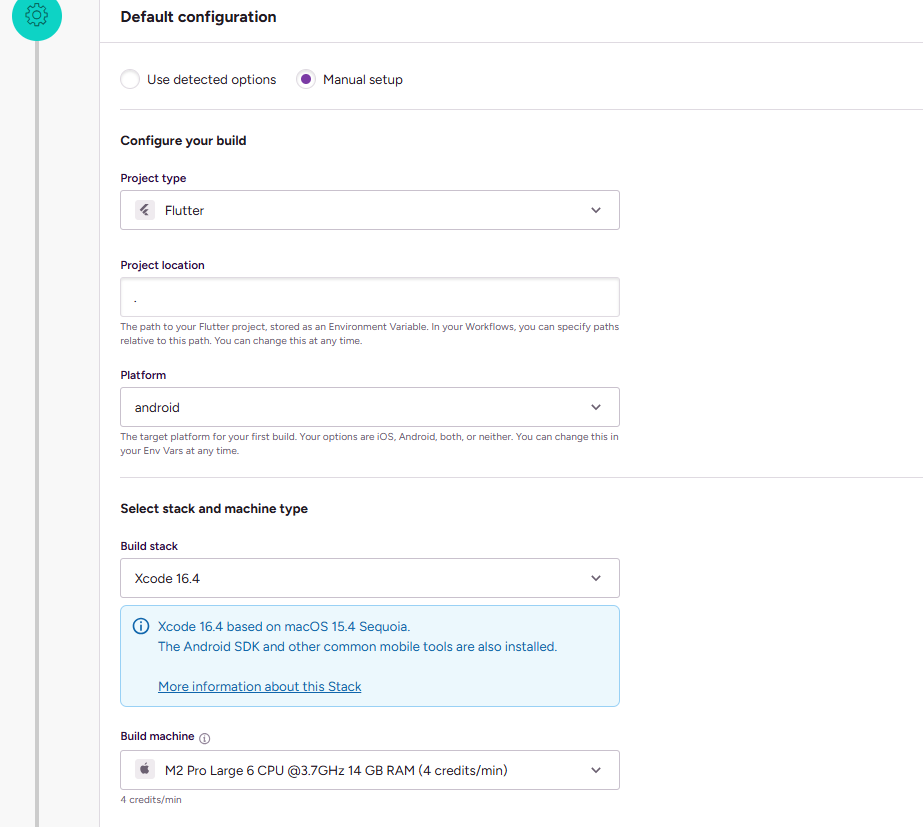
Select the main branch for building your mobile application, then in the Default configuration section, choose Manual setup and configure:
- Project type: Flutter
- Project location:
.(dot, meaning root folder) - Platform: Android
- Build stack: Xcode 16.4
- Build machine: As needed
-
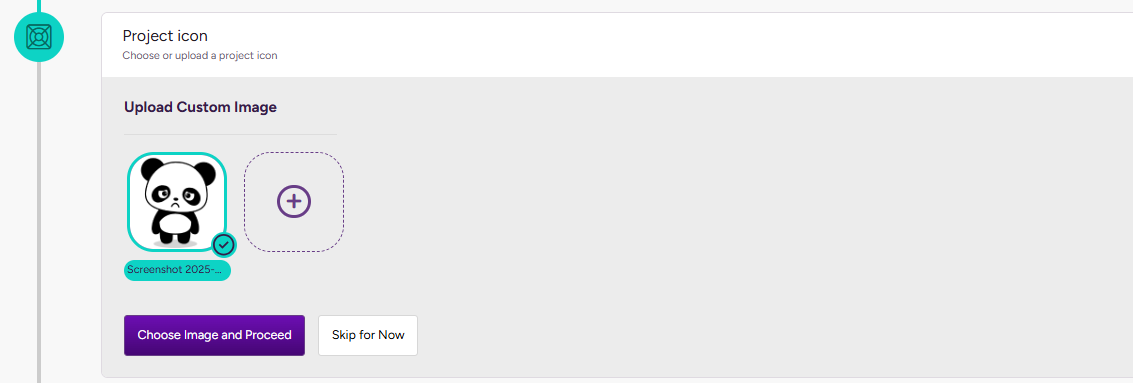
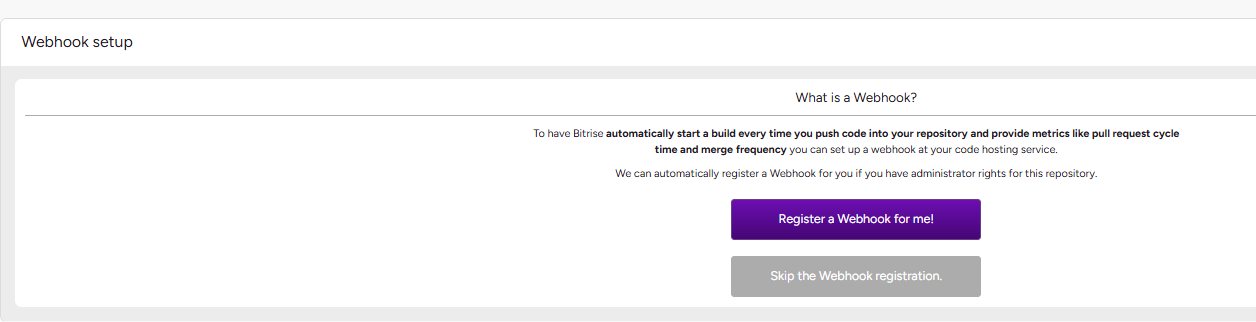
Select your application icon, then activate the Bitrise webhook so that every code push/merge automatically triggers a build. Click Save to save the configuration.
-
After saving, you will be directed to the project build page. Click the Workflows button to configure the CI/CD pipeline.
-
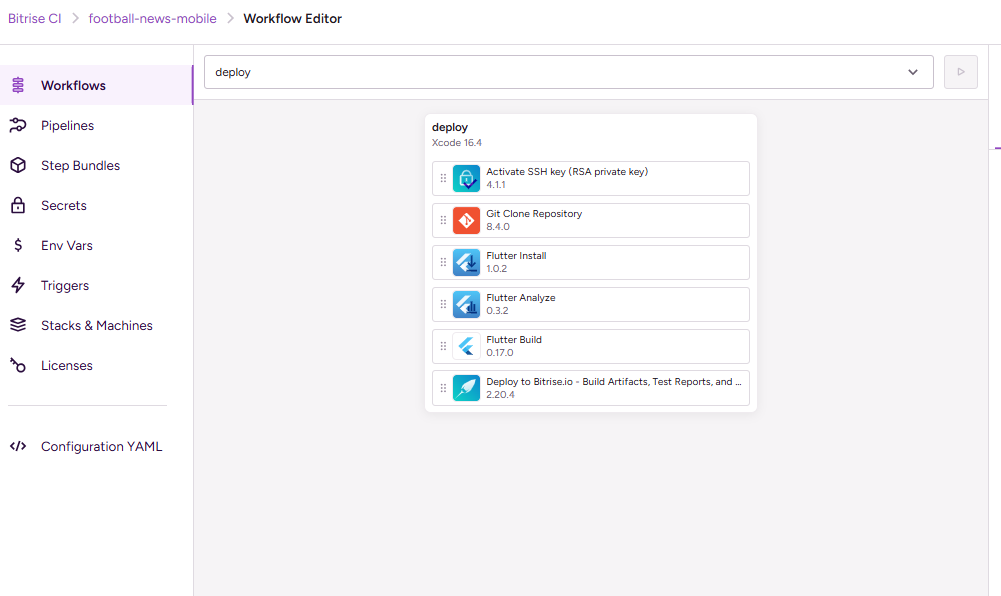
Select one of the existing workflows or create a new one. Make sure the following steps are in that workflow:
- Activate SSH key (RSA private key) - for repository access
- Git Clone Repository - for cloning source code
- Flutter Install - for setting up Flutter SDK
- Flutter Analyze - for static code analysis
- Flutter Build - for building APK/app bundle
- Deploy to Bitrise.io - for saving build artifacts
The workflow configuration result will look like this:
Important: In the Flutter Install step, make sure to fill in the Flutter SDK version with the latest version (e.g.,
3.35.7) so that the Dart SDK matches the requirements in yourpubspec.yaml. If left empty, Bitrise will use an old Flutter version which can cause "SDK version solving failed" errors.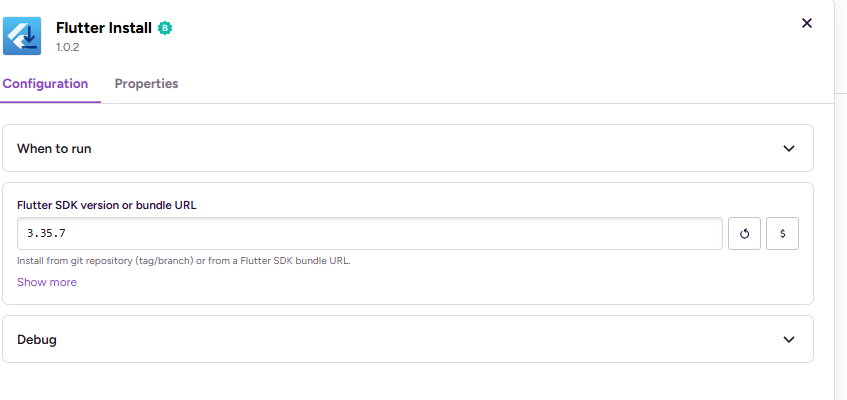
-
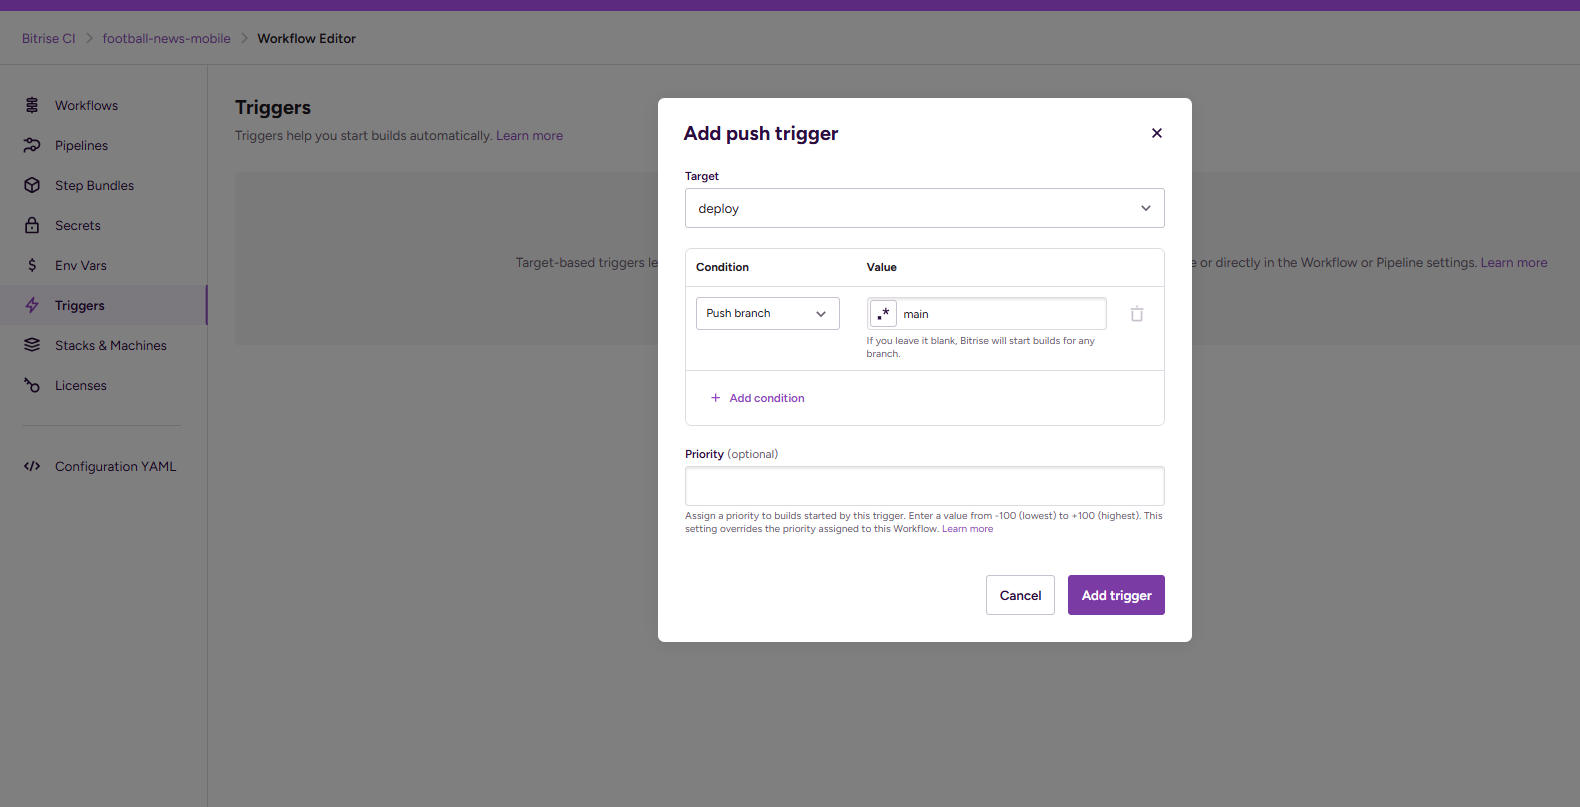
Open the Triggers tab to set up automation:
- Click Add Trigger → select Push
- Set branch according to your repository's main branch (e.g.,
mainormaster) - Select the workflow you configured earlier.
- Click Save Changes
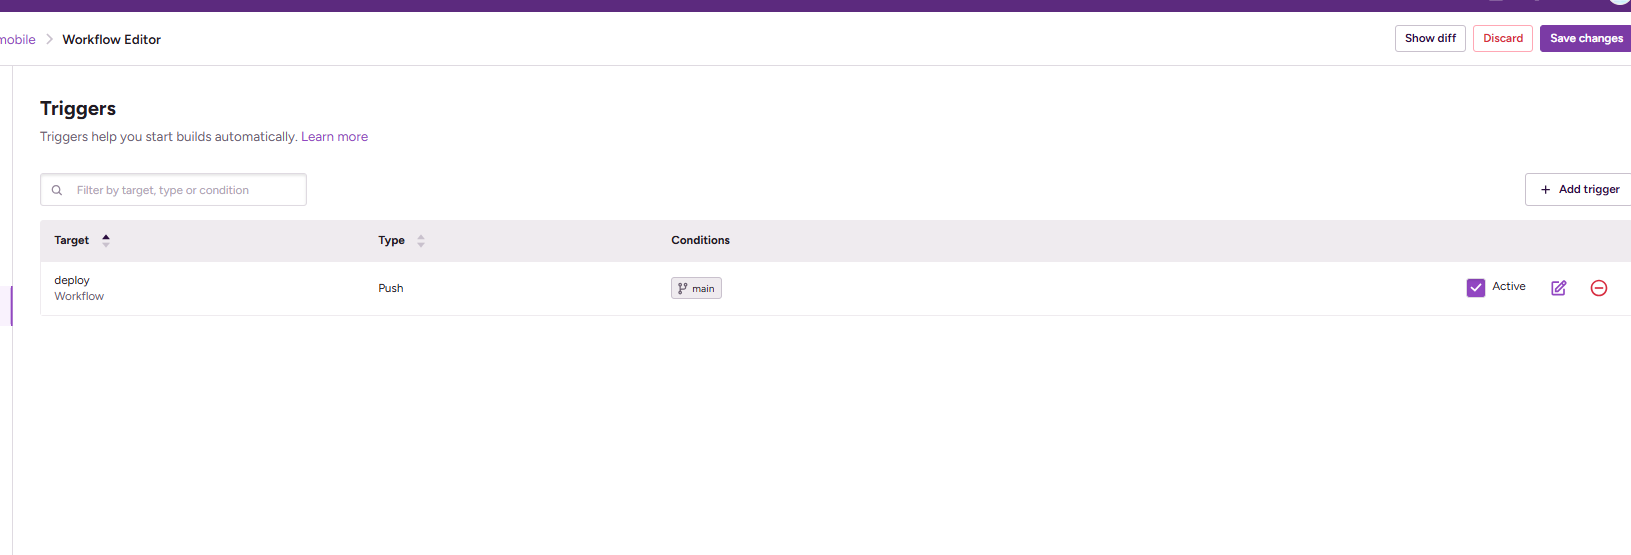
Make sure there are no duplicate triggers (e.g., triggering the main branch in more than one workflow). Duplicate triggers can cause builds to run twice and consume resources on your Bitrise free tier account.
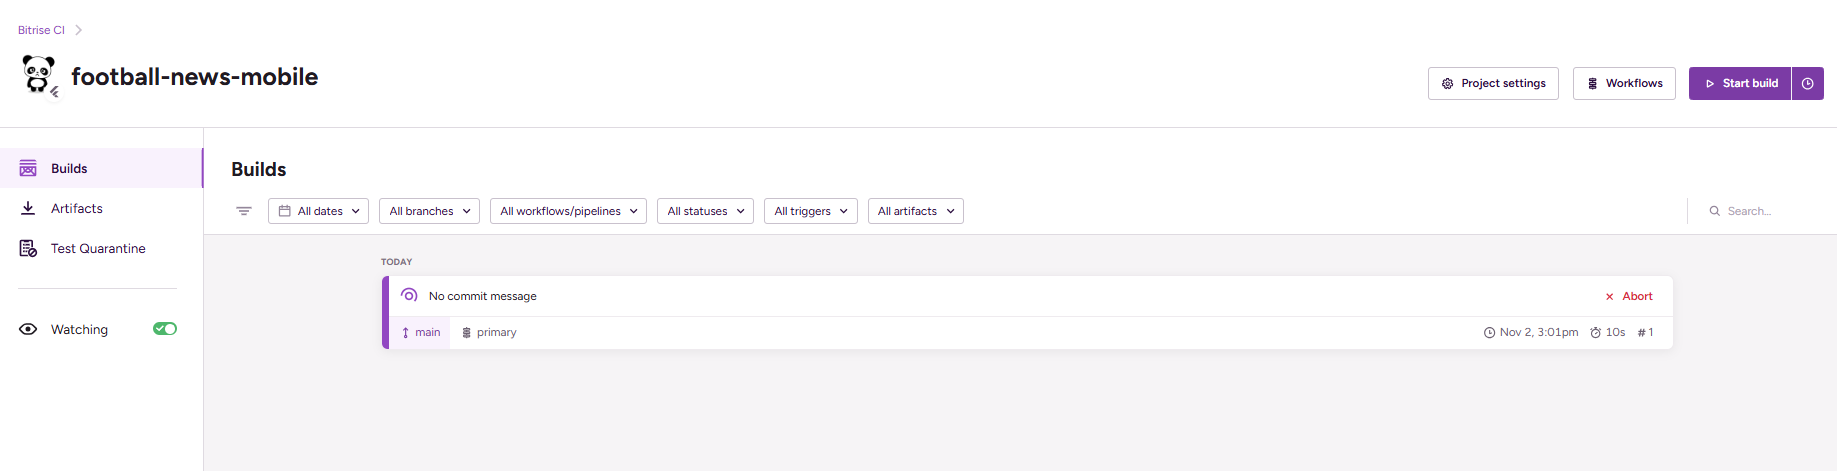
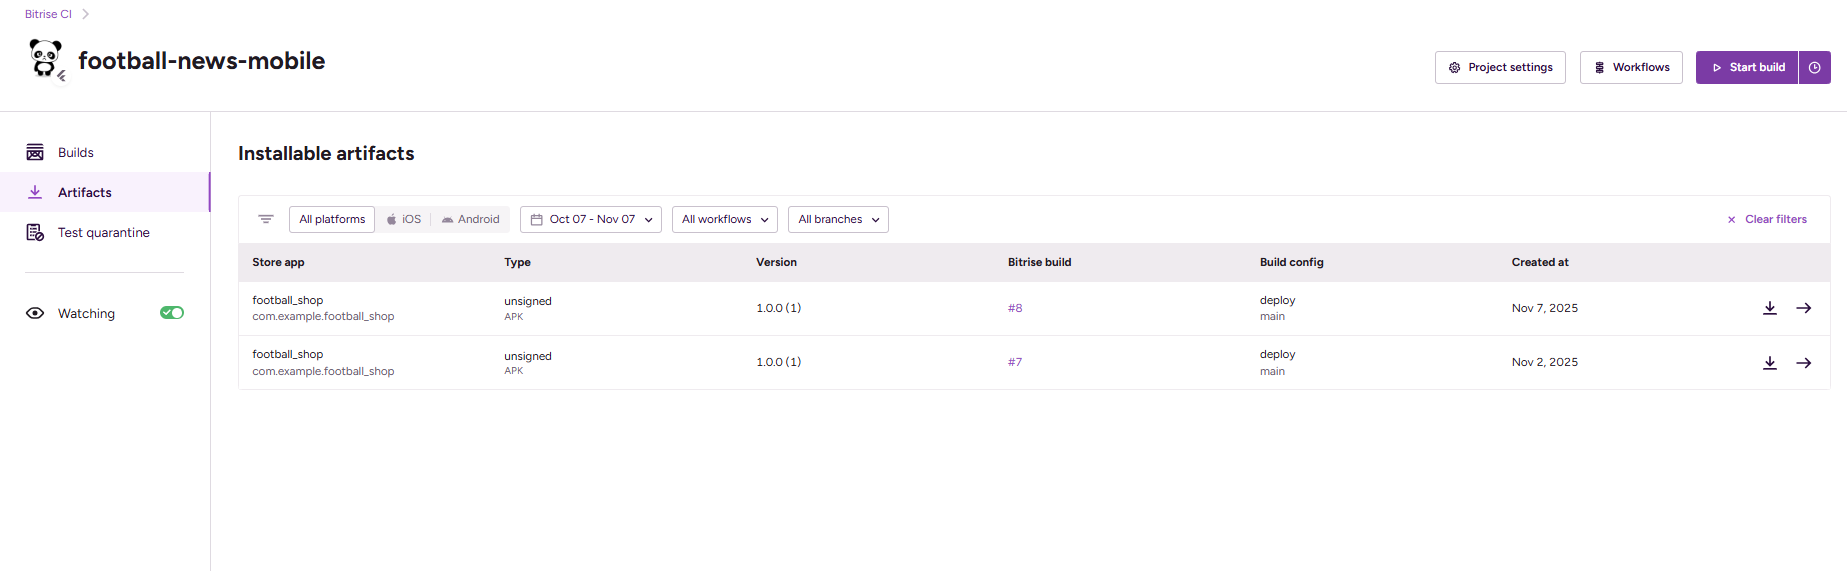
Now try triggering a push on the main branch of your GitHub repository. Bitrise should now automatically build your Flutter application and the results can be seen in the artifact tab like this.
Up to this point, you have configured CI/CD on Bitrise. Next, you will configure scripts and signing for the Flutter application project.
Tutorial: Creating Keystore for Flutter Application Signing
For secure application publication on Bitrise and GitHub, Flutter applications must be signed using a key to ensure the authenticity of the released application.
-
Create Keystore
Open Terminal (Mac/Linux) or Command Prompt (Windows), then navigate to the root directory of your Flutter project:
cd path/to/your/flutter/projectRun the following command to create a keystore:
For Mac OS / Linux:
keytool -genkey -v -keystore release-keystore.jks -keyalg RSA -keysize 2048 -validity 10000 -alias releaseFor Windows:
keytool -genkey -v -keystore release-keystore.jks -storetype JKS -keyalg RSA -keysize 2048 -validity 10000 -alias releaseImportant:
- Provide a secure password and save that password (don't forget it!)
- Fill in the required information (name, organization, etc.) until the process is complete
- The
release-keystore.jksfile will be created in your project's root directory
infoIf the Terminal or Command Prompt doesn't recognize the
keytoolcommand, please follow the additional guide in the Note section on Flutter's official web page for Create an upload keystore to add thekeytoolcommand to the environment path. -
Configure
.gitignoreAdd the following lines to the
.gitignorefile in the project's root folder so that the keystore is not pushed to the Git repository:# Remember to never publicly share your keystore.
# See https://flutter.dev/docs/deployment/android#reference-the-keystore-from-the-app
*.keystore
*.jksinfoKeystore is a secret file like a password, which is why it should never be committed to Git.
Up to this point, you have configured the basics for application signing. Next, you will modify CI/CD (GitHub Actions or Bitrise) to perform signing automatically every time the application is built.
Tutorial: Modifying GitHub Actions CI/CD to Sign Flutter Application
After creating the keystore, you need to modify the GitHub Actions workflow so that the generated APK is automatically signed.
-
Generate Base64 String from Keystore
Generate a base64 string as a representation of the keystore file that we will store as an environment variable later.
infoFor Mac OS or Linux users
- Run the command
openssl base64 -in release-keystore.jksin Terminal in the root folder to generate a base64 string. - Save the generated string temporarily. It can be saved in a notepad temporarily.
infoFor Windows users
- Open the project root folder in File Explorer.
- Then right-click, click
Show more options, then clickGit Bash here.
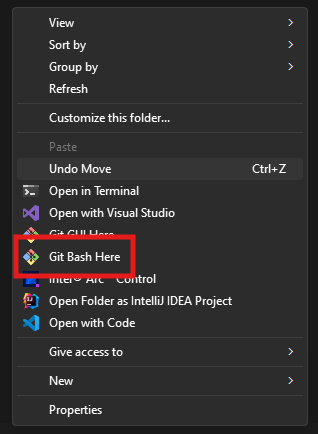
- A Git Bash terminal will open.
- In that terminal, run the command
openssl base64 -in release-keystore.jks. This command will generate a base64 string. - Save the generated string temporarily.
- Run the command
-
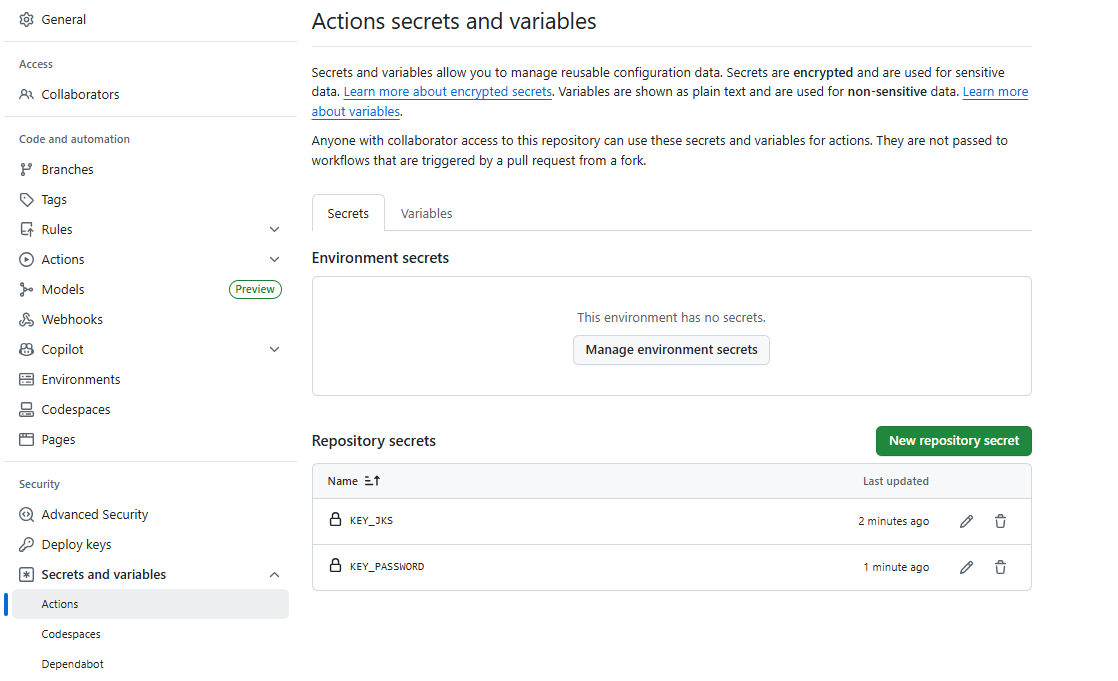
Add Repository Secrets
Add new repository secrets to your GitHub repository:
KEY_JKScontaining thebase64string from the keystore file you created earlierKEY_PASSWORDcontaining the password you used when creating the keystore file
Eventually, your repository secrets page will look like this:
-
Update Workflow File
Edit the
.github/workflows/release.ymlfile and add steps to generate keystore and sign APK:# This is a basic workflow to help you get started with Actions
name: Release
# Controls when the workflow will run
on:
# Triggers the workflow on push events but only for the main branch
push:
branches: [main]
# Permissions needed for creating releases
permissions:
contents: write
# A workflow run is made up of one or more jobs that can run sequentially or in parallel
jobs:
# This workflow contains a single job called "Build and Release APK"
releases:
name: Build and Release APK
# The type of runner that the job will run on
runs-on: ubuntu-latest
steps:
- name: Checkout the code
uses: actions/checkout@v4
- name: Get version from pubspec.yaml
id: version
run: echo "::set-output name=version::$(grep "version:" pubspec.yaml | cut -c10-)"
- name: Setup Java
uses: actions/setup-java@v3
with:
distribution: "zulu"
java-version: "17"
- name: Setup Flutter
uses: subosito/flutter-action@v2
with:
channel: "stable"
- name: Get packages
run: flutter pub get
- name: Build APK
run: flutter build apk --split-per-abi
- name: Decode Keystore
run: echo "${{ secrets.KEY_JKS }}" | base64 -d > release-keystore.jks
- name: Sign APKs
run: |
for apk in build/app/outputs/flutter-apk/*.apk; do
echo "Signing $apk..."
jarsigner -verbose -sigalg SHA256withRSA -digestalg SHA-256 \
-keystore release-keystore.jks \
-storepass "${{ secrets.KEY_PASSWORD }}" \
-keypass "${{ secrets.KEY_PASSWORD }}" \
"$apk" release
done
- name: Cleanup Keystore
if: always()
run: rm -f release-keystore.jks
- name: Get current date
id: date
run: echo "::set-output name=date::$(TZ='Asia/Jakarta' date +'%A %d-%m-%Y %T WIB')"
- name: Generate unique tag
id: tag
run: echo "::set-output name=tag::v${{ steps.version.outputs.version }}-$(date +'%Y%m%d%H%M%S')"
- name: Release APK
uses: ncipollo/release-action@v1
with:
allowUpdates: false
artifacts: "build/app/outputs/flutter-apk/*.apk"
body: "Published at ${{ steps.date.outputs.date }}"
name: "v${{ steps.version.outputs.version }} - ${{ steps.date.outputs.date }}"
token: ${{ secrets.GITHUB_TOKEN }}
tag: ${{ steps.tag.outputs.tag }} -
Test Workflow
Save the workflow file and push it to your repository. Check if the application is successfully built and released by GitHub Actions.
Tutorial: Modifying Bitrise Workflow to Sign APK
In this section, we will add a step to sign the APK after the build APK step in the Bitrise workflow. The APK signing process is necessary so that the application can be distributed to the Play Store or installed on Android devices.
-
Configure Keystore in Bitrise
The first step is to upload and configure your keystore file in Bitrise:
- Open Project Settings in your Bitrise project
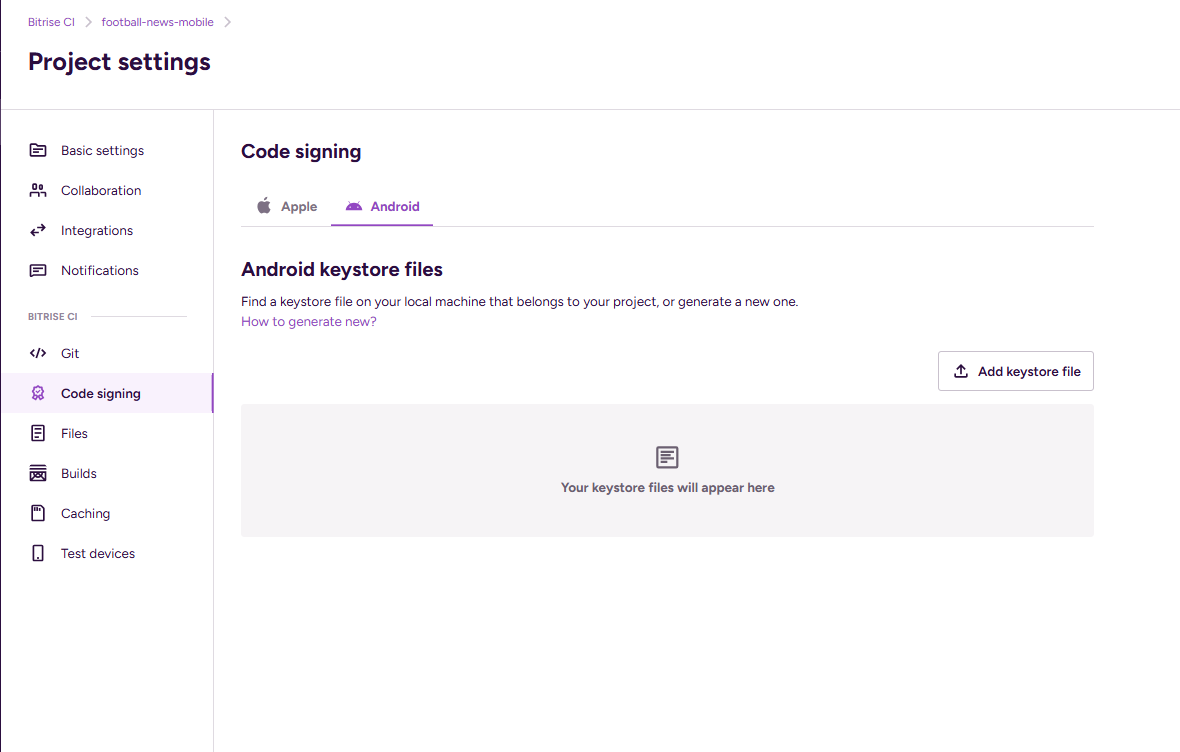
- Click the Code Signing section in the left menu
- Select the Android tab
- Click the Add Keystore File button
After the keystore file modal opens, configure the following:
- Upload file keystore: Select the
.jksor.keystorefile you created earlier - Keystore password: Enter the password you used when creating the keystore
- Private key password: Enter the password for the private key (usually the same as the keystore password)
- Key alias: Enter the key alias, for example
releaseor the alias you specified when creating the keystore
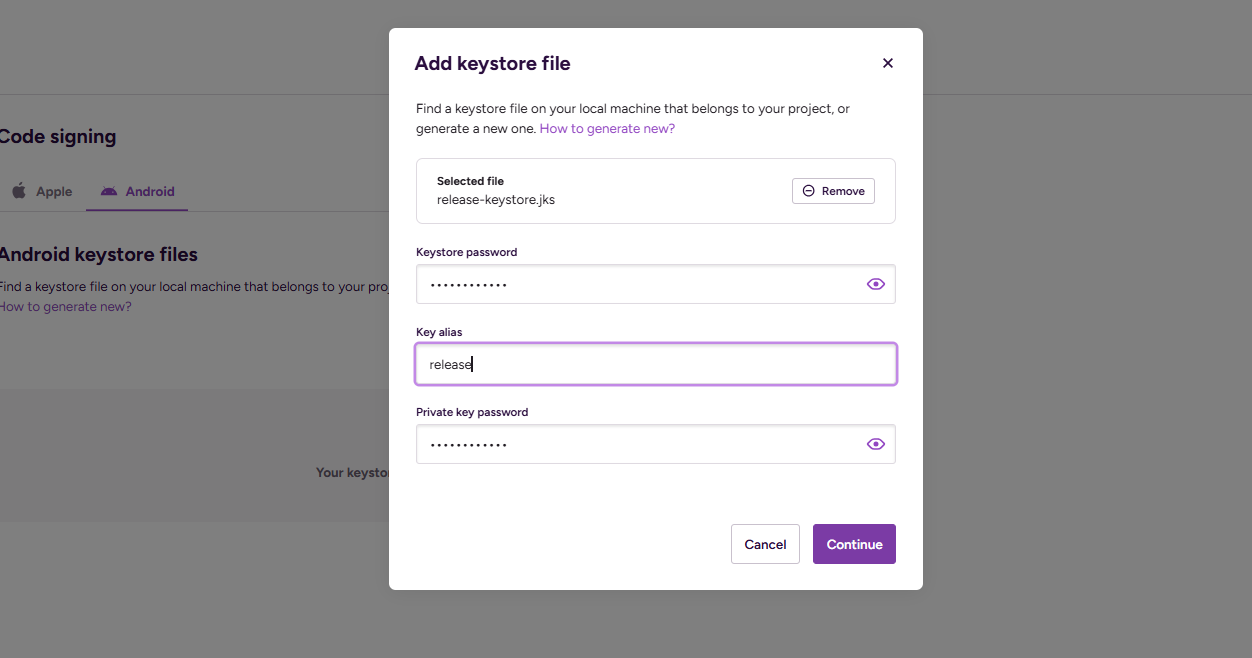
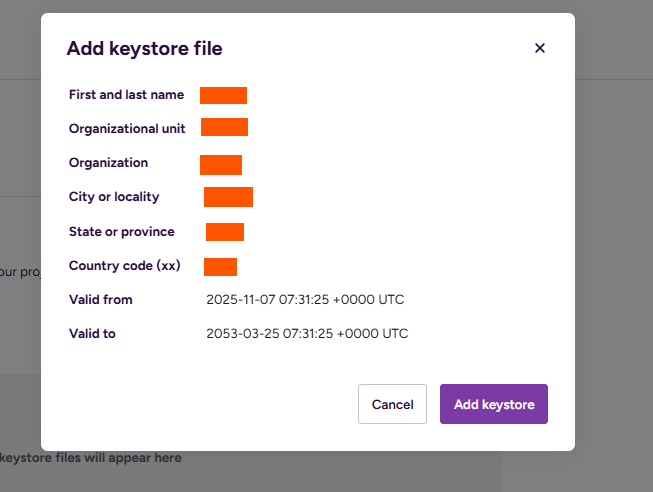
After all information is filled in correctly, your keystore details will be displayed. Click the Add Keystore button to save the configuration.
-
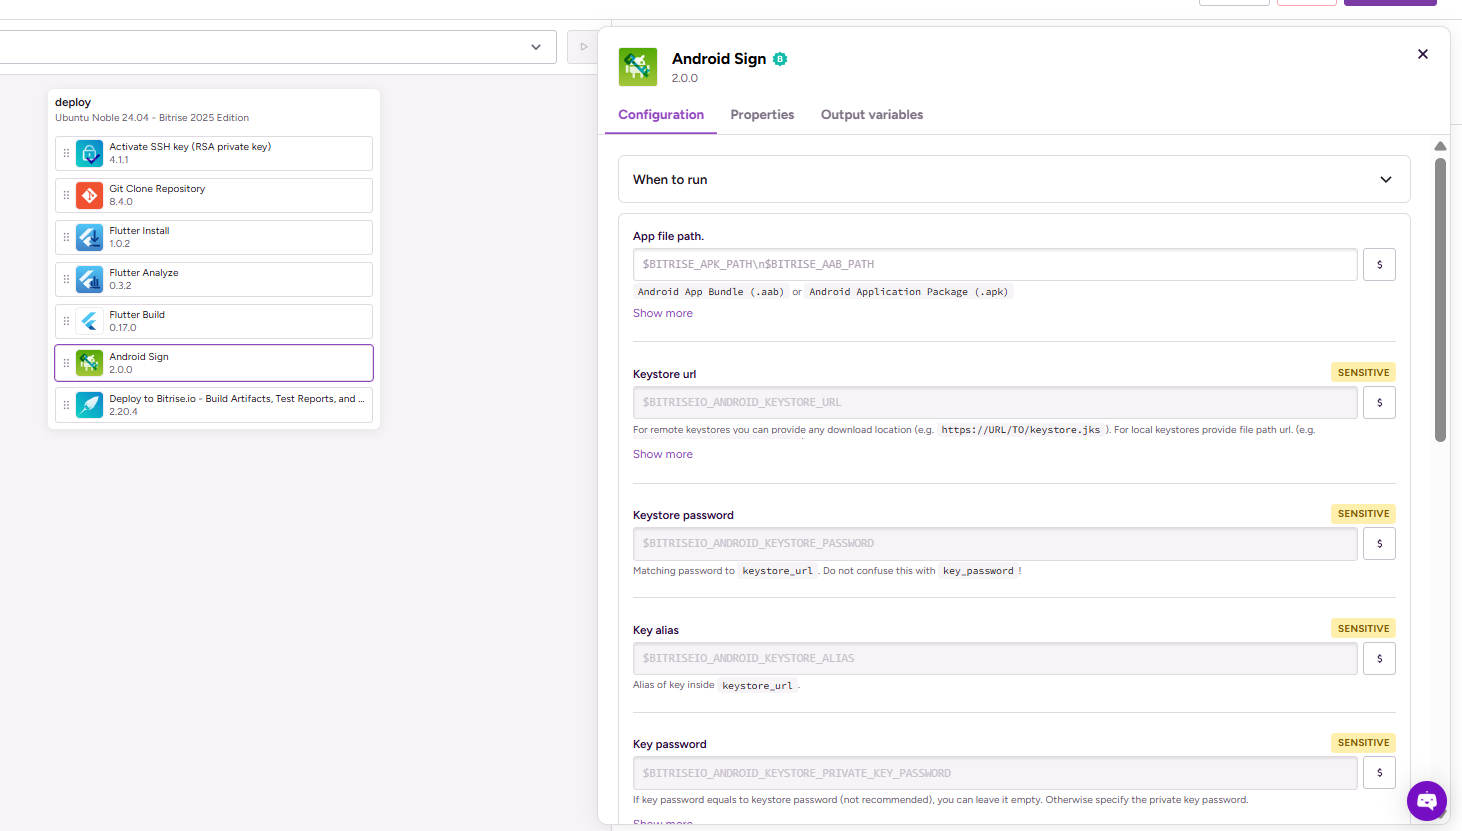
Add Android Sign Step to Bitrise Workflow
After the keystore is configured, the next step is to add a step for signing the APK:
- Open the Workflows page in your Bitrise project
- Select the workflow you want to modify (usually the
deployworkflow) - Find the Android Sign step in the available steps list
- Drag and drop that step after the build APK step (Flutter Build)
For the Android Sign step configuration, you can use the default values.
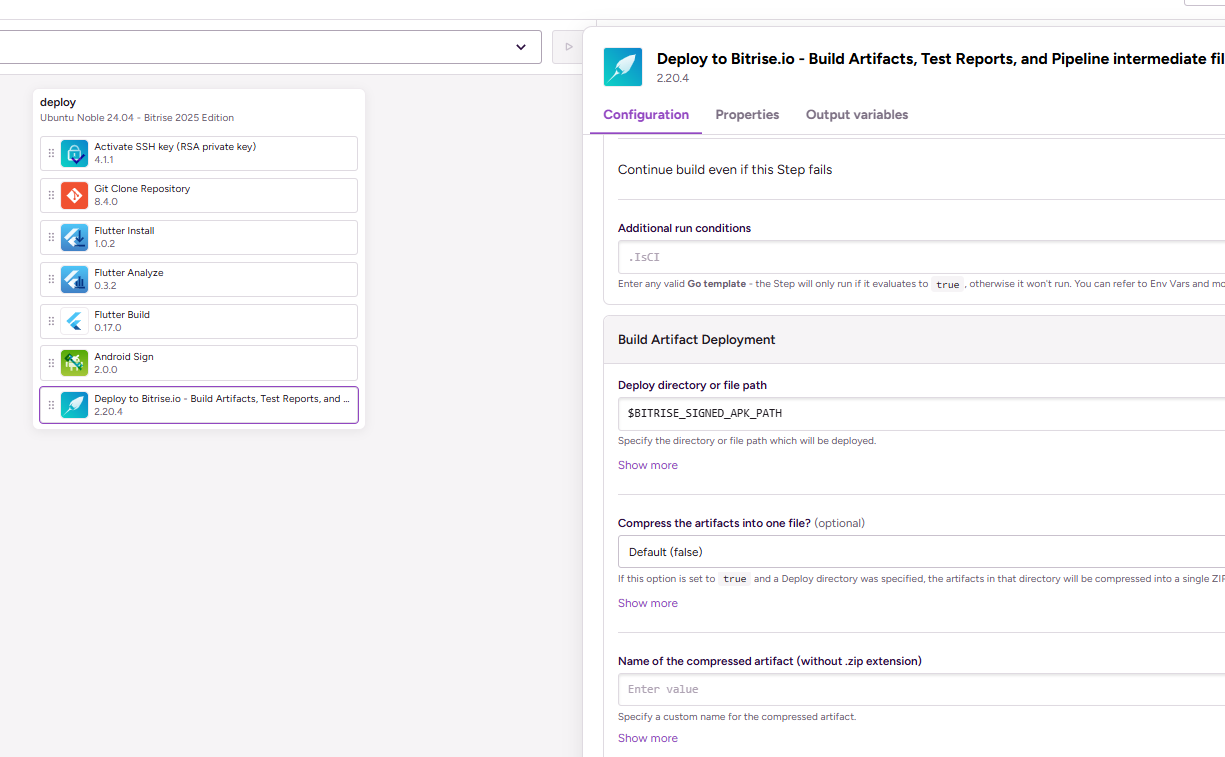
-
Update Deploy Step to Reference Signed APK
So that the signed APK can be distributed as an artifact, you need to update the deploy step:
- Find the Deploy to Bitrise.io step in your workflow
- In the Deploy directory or file path input in the Build Artifact Deployment section, fill it with the environment variable
$BITRISE_SIGNED_APK_PATH - This variable is automatically filled by the Android Sign step with the path of the signed APK
Tutorial: Verify Application is Signed
After configuring signing on Bitrise, you need to verify that the generated APK is actually signed with the keystore you are using.
-
Download the Signed APK
Download the signed APK from GitHub Release and Bitrise.
-
Verify Certificate with Sisik.eu
- Open the page sisik.eu/cert
- Upload the APK file you downloaded
- Wait for the analysis process to complete
-
Check Verification Results
After the APK is successfully analyzed, you will see signing certificate information as shown in the following image:
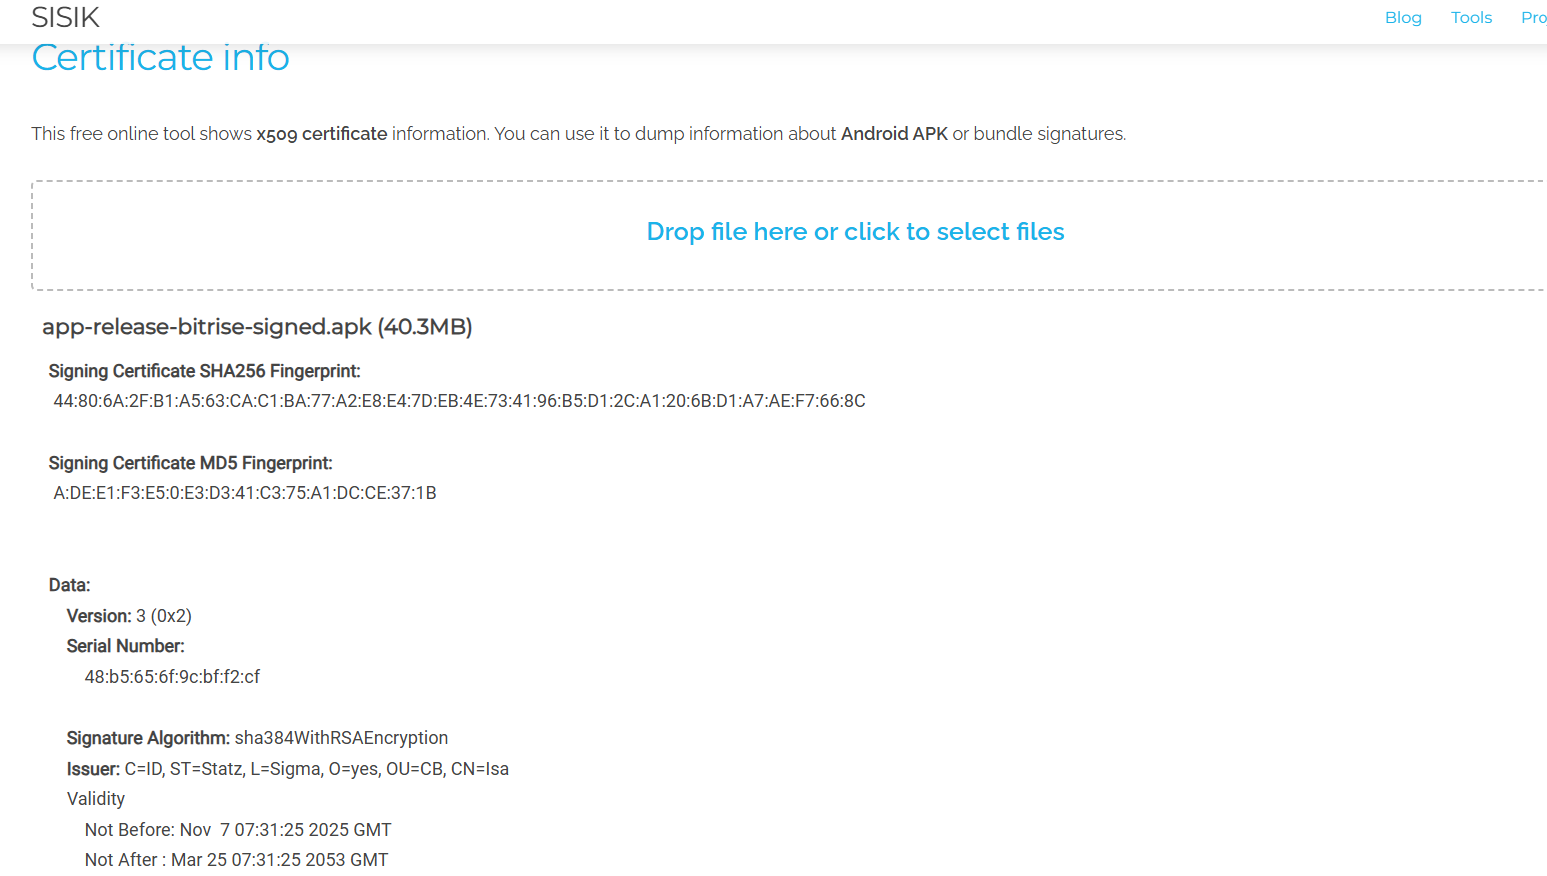
Make sure the following information matches the keystore you created:
- Issuer: Name and information you entered when creating the keystore (CN, O, L, ST, C)
- Validity: "Not After" date is still far in the future (usually 25-30 years)
If the information matches, it means your APK has been successfully signed and is ready for distribution.
Tutorial: Adding Application Link and Bitrise Deployment Badge to README
After the application is successfully built and signed, you can add the Bitrise build status badge and APK download link to your repository's README file. This makes it easy for others to see the current build status and download the application directly.
- Get APK Download Link from Bitrise
-
Open the last successful build page in Bitrise
-
Click the Artifacts tab to see the generated APK file
-
Click on the app-release.apk file or the signed APK file
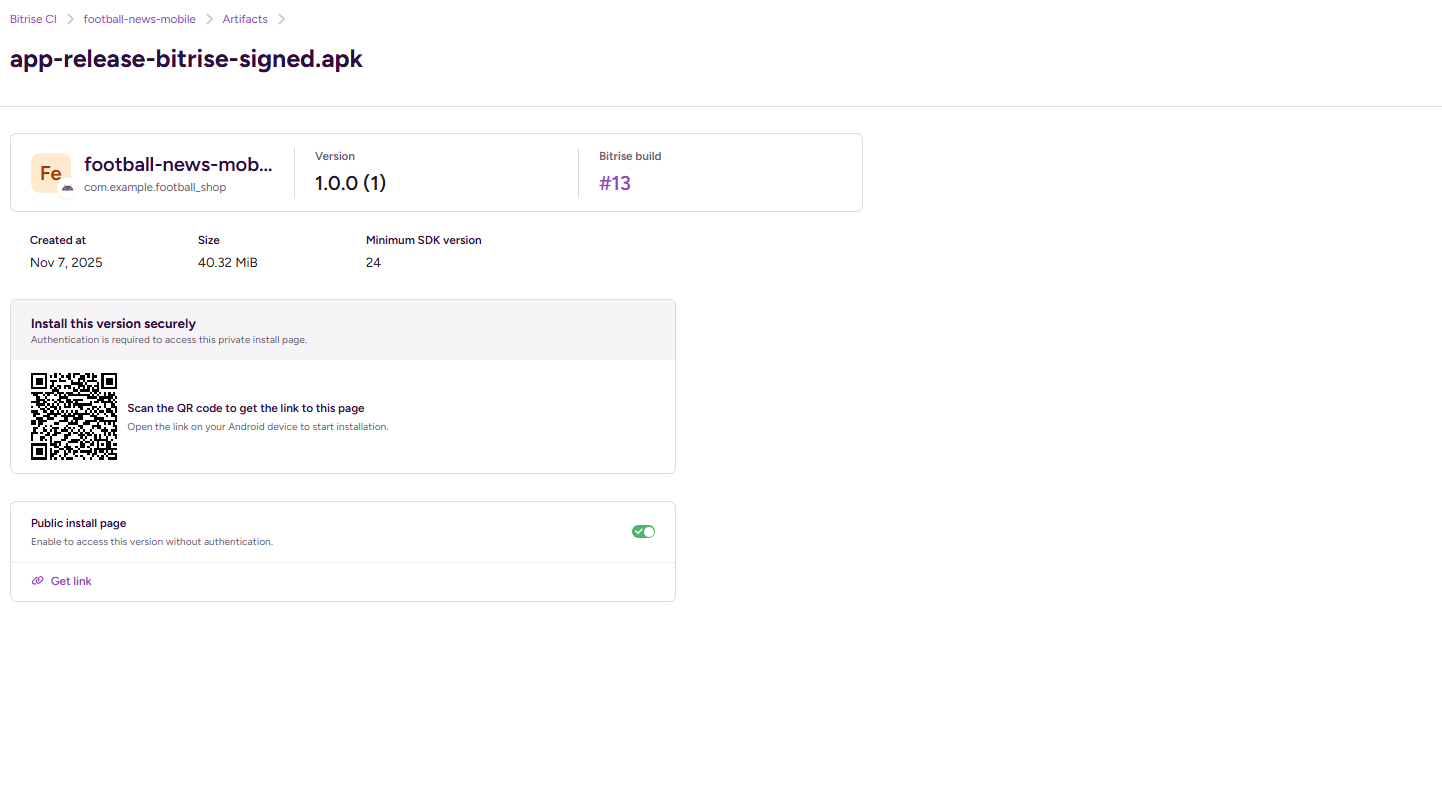
-
In the Public install page section, activate the toggle to enable public access
-
Click Get link to open the Get link to public install page modal
-
Copy the URL displayed in that modal
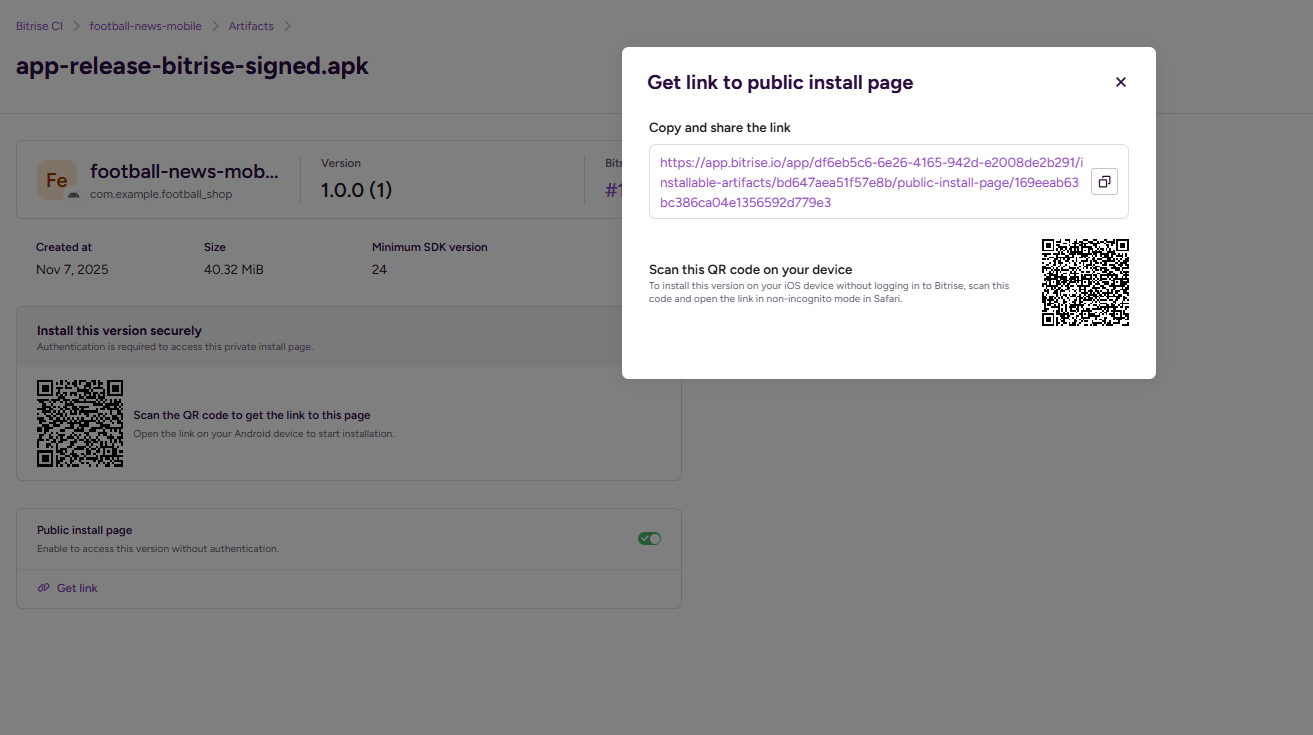
The public install page URL has a format like this:
https://app.bitrise.io/app/YOUR_APP_ID/installable-artifacts/YOUR_ARTIFACT_ID/public-install-page/YOUR_PAGE_ID
Note: Each APK artifact has a unique public install page URL. This URL is different for each new build, so you need to update the README every time there's a new release.
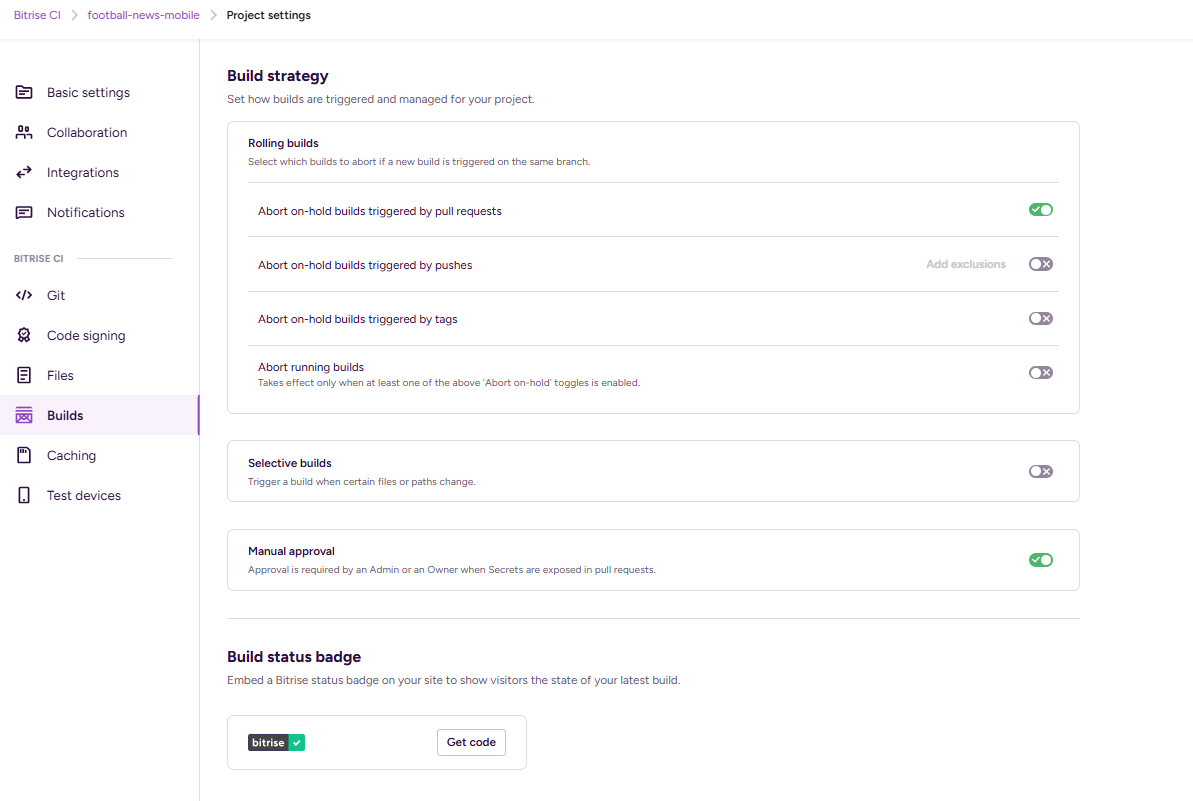
- Get Bitrise Build Status Badge
- Open Project Settings in Bitrise
- Click the Builds menu in the left sidebar
- Scroll down until you find the Build status badge section
- Click the Get code button
In the modal that appears:
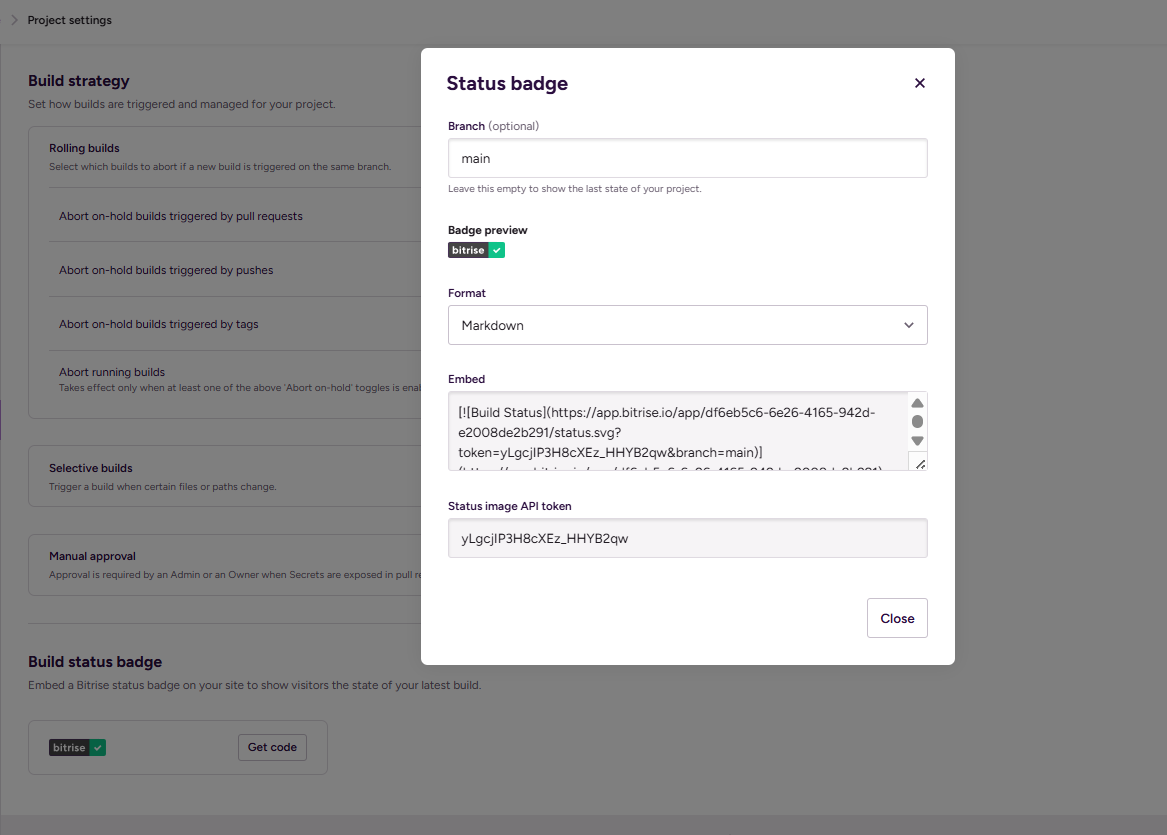
- Branch (optional): Select the branch you want to display the build status for (e.g.,
main) - Format: Select Markdown
- Embed: Copy the available Markdown code
The code you copy will look like this:
[](https://app.bitrise.io/app/YOUR_APP_ID)
This badge is an SVG image that displays the build status (passing/failing) with a link to your Bitrise app page.
- Update README with Badge and Download Link
Open the README.md file in your repository and add the following information:
# Your Application Name
[](https://app.bitrise.io/app/YOUR_APP_ID)
## Download
Download the latest version of the application: [Download APK](https://app.bitrise.io/app/YOUR_APP_ID/installable-artifacts/YOUR_ARTIFACT_ID/public-install-page/YOUR_PAGE_ID)
Notes:
- Replace the badge code with what you copied from step 2
- Replace the APK download URL with the public install page URL from step 1
- The badge will automatically update every time there's a new build on the branch you selected
- Commit and Push Changes
After updating the README, commit and push the changes to the repository:
git add README.md
git commit -m "Add Bitrise build badge and APK download link"
git push origin main
Now anyone who visits your repository can see the latest build status and download the APK from the public install page.
Closing Words
Congratulations! You have successfully deployed your Flutter application to Bitrise. With this, we officially complete the PBP Tutorial for Odd Semester 2025/2026! Thank you to all students for their hard work, dedication, and participation throughout this course.
Throughout the semester, we have learned concepts and practices of web and mobile application development using Django and Flutter, understanding the architecture, features, and tools in building robust and responsive applications across various platforms.
The teaching team hopes that all lab processes and assignments have helped you understand the potential and challenges in multiplatform application development, while equipping you with skills useful for careers in the software development world.
Learning certainly doesn't stop here. The world of technology continues to evolve, so keep learning, adapting, and innovating. Keep exploring and developing your skills, a bright future awaits in the world of software development. Good luck Pacilians 2025!
Contributors
- Marla Marlena [NDF]
- Isa Citra Buana [ISA]
- Regina Meilani Aruan [GIN]